
In this article, Tony Iannucelli shows how to turn your Thunder Tiger Raptor 60 or 90 helicopter into a gorgeous scale military machine using Thunder Tiger’s scale body. Check it out! Flight photos are by Martin Cohen.
Thunder Tiger’s scale line of fuselage kits includes the E325 Titan Cobra, the beautiful Ecureuil, four versions of the Hughes 500, and the Agusta 119 and 109. A combination of factors makes these ARFs unique. First, they are model specific to the Thunder Tiger Raptor lineup, now carried by Tower Hobbies. The fuselages literally bolt on to the Raptor mechanics with few if any modifications. Second, the prices are reasonable, especially considering the level of quality of the kits. Third, they are relatively easy to assemble. Fourth and most importantly, they fly very well and create a stunning presence in the air. This article describes the spectacular stand-off scale 60-90-size Hughes MD500, which I am always very proud to bring to the flying field. And, after flying a few circuits, my sense of accomplishment is second to none.

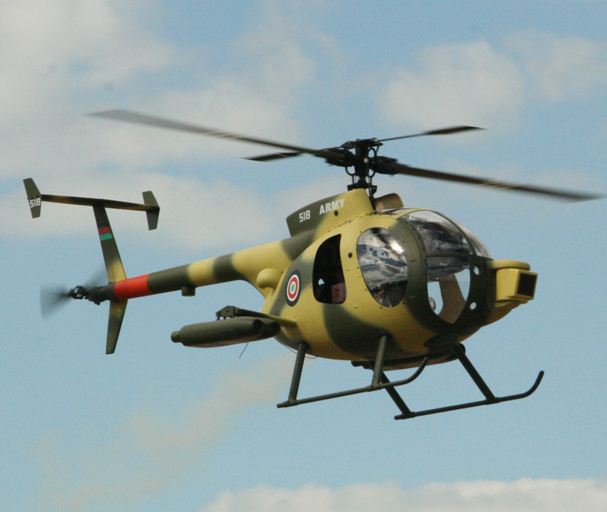
This fuselage kit converts the Raptor 60-90 into a magnificent version of the light multi-role military helicopter, and my four-year-old Raptor 60, powered by an OS70SZ, was used as the platform. The completeness of this ARF, the attention to detail, and the quality of the paint work make it a perfect choice for someone who wants to try scale, but not break the bank or spend weeks in their workshop. I anticipated that 30-40 hours might be required for the assembly, but that was an over-estimate. More like 20-25 hours should be budgeted for completion from box to the hover pad assuming the mechanics have already been built. The two short wings that support the missile pods are attached to the fuselage first. It took a while to get it right, and the results were good, but
getting the alignment correct was challenging. In addition to gluing the wings on, they are fastened with screws from the inside of the fuselage. Taking your time is required; measuring more than twice and gluing once is good advice. Next, cutting four openings in the bottom of the fuselage was necessary to install the landing struts. Fortunately, the engineers at Thunder Tiger marked the positions on the fuselage and making the holes for the gear worked out well. Again, the key was taking the time necessary to do it correctly. The mechanics slide in easily after the holes are cut for the gear. The tail blades bolt on and alignment of these parts is automatic.
Perhaps the most time consuming part of the build is the attachment of the windows. Having some experience in doing this was a big help, but even a rookie can do it successfully, so have no fear if you identify yourself in that category. Marking the intended drill points on the window frames with a light pencil is a good way to start. Be sure the hole locations are matched on both sides for a professional look. Then, drill on your marks using a sharp 1/16th bit. Holding the fuselage at the spot to be drilled results in perfect placement and nice clean holes. The side window installation was easy compared to the windshield attachment. Thirty-two fasteners were used which included six 2mm socket head bolts with nyloc nuts. Marking the spots where the drill will be used comes first, similar to the side windows. The difference is that these marks are made on the plastic windshield – not the fuselage. Whereas the plastic on the side windows holds the screws, the fuselage fiberglass holds them on the windshield attachment. The plastic attachment is a stronger one than the fiberglass, but care must be used when drilling regardless of which material is the subject.

A scale helicopter needs scale-looking main blades. Black blades are an option, but painted wood blades seemed like a better way to go. The experiment resulted in the looks you see here in the pictures. Two sets were painted; two more were covered with Solartex covering material. They passed muster with the guys at the field and added a nice touch to the helicopter.

Flying the MD500
First flights on any helicopter are exciting. Establishing correct engine settings, throttle and pitch curves, and gyro gain are the most important initial radio settings. Trimming for forward flight on this helicopter also entails putting in some down trim in the idle up modes to avoid nose ups. The manual suggests 15-20%. Expo, rates and other fine tuning can come later.
It took about a half an hour to fix the radio curves to the helicopter’s satisfaction. This meant adjusting both throttle and pitch until the rotor speed varied between 1350 and 1400 in hover. Sounds low, but this is what was advised in the manual. It works! There was no vibration in the air of either the tail tail fins or the missile pods. There was some vibration until liftoff, but once the blades settled in and the landing gear was off the ground, the vibes went away. The MD500 was happy at a 1400 rpm headspeed and it lets you know it. This was now a 13.5-pound helicopter the O.S. .70 was being asked to handle; approximately a 4-pound increase over the stock Raptor.
Subsequent flights after satisfactory adjustments were uneventful. Flying high is important both for the pilot’s nerves and for the sake of safety. Keeping a high setting on idle up also makes sense. If too much headspeed is lost because of careless flying, recovering it will take time with this one and might lead to unexpected “landings”. The helicopter does lazy stall turns, very nice “gun runs” and is capable of typical scale manuevers. Presence in the air is outstanding. My flying buddies love it. Me too!
A 90 size engine would really make this helicopter perform, but a 70 does the job adequately and scale-like flight was the goal. The body does create some extra noise, so be prepared for it. It sounds loud on the ground, as the gear train and muffler are enclosed in what amounts to a shell; the noise is trapped in there. The engine is running at about 70% throttle at hover, which also generates some extra noise. To sum it up, first flights were very satisfying. No loose screws, no cracks, no problems of any kind were evident. This one looks good in the hangar, on the flightline, and in the air!
Equipment Used:
JR 9303 transmitter
Select Scan 790 receiver
3600 HydriMax NiMH flight battery (needed for balance)
JR 4721 on collective
JR 4131s on the swashplate
JR 531 on throttle
JR 8700 on the tail
Futaba 401 gyro
O.S. 70 SZ
O.S. #8 glow plug
Mavvrik muffler
Aerotrend “blue” tuned pipe coupling used as a muffler extension.
Thunder Tiger 680mm symmetrical Raptor wood blades
Mavvrik carbon fiber tail blades
Coolpower 20% helicopter fuel
From Wikipedia, the free encyclopedia:
“The Model 500MD Defender … first flew in 1976. It was tailored for specific roles including unarmed observation and an armed scout helicopter equipped with TOW anti-tank missiles. An anti-submarine version was developed with a search radar, magnetic anomaly detector and the capability to carry lightweight torpedoes. The helicopter was popular with customers like Kenya who could buy a capable anti-armour helicopter for less than half the cost of a gunship such as the Bell Cobra or the AH-64 Apache. Israel used the Defender extensively during the conflicts of the late 1970s and 1980s against Syrian armored forces. The Defender is currently used by the Iraqi Air Force (and others)…”
Specifications:
General characteristics
- Crew: 1-2
- Capacity: 4-5 passengers
- Length: 23 ft 0 in (7.01 m)
- Rotor diameter: 26 ft 4 in (8.03 m)
- Height: 8 ft 6 in (2.59 m)
- Disc area: 544.63 sq ft² (50.60 m²)
- Empty weight: 1,320 lbs (599 kg)
- Max takeoff weight: 3,000 lbs (1361 kg)
- Powerplant: 1× One Allison 250-C20B Turboshaft, 420 hp (313 kW)
Performance
- Maximum speed: 160 mph (257 km/h)
- Range: 230 miles (370 km)
- Service ceiling 13,800 ft (4,205 m)
- Rate of climb: 1,650 ft/min (503 m/min (8.4 m/s))
Armament
- four TOW anti-tank missiles, or
- two 7.62mm General Electric M134 Miniguns, or
- four General Dynamics Stinger air-to-air missile, or
- Mk 44 or Mk 46 lightweight torpedoes (ASW Version), or two seven-shot rocket pods


Hello,
I am about to start my MD500 build onto my raptor. The manual says there are markings on the body that shows where to trim for the strut installation. I have the camo version and I am not seeing any markings. Do you have any advice, or tips to make sure I mark and align the wholes for the struts before I cut?
Thanks, Chris!