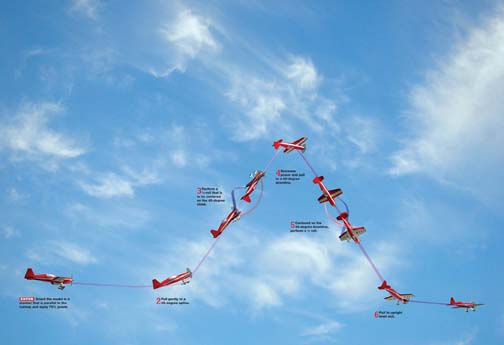
If you follow full-scale aerobatics, there is another maneuver that goes by a similar name, but it is called the Pugachev Cobra. The Pugachev Cobra shows post-stall maneuvering as it displays an abrupt pitch change and a high angle of attack. The Pugachev Cobra is very similar to the common “3D” maneuver, the “Wall,” where the model will transition abruptly from horizontal upright level flight to a vertical situation instantly with a hard pull on the elevator control surface. However, unlike the Pugachev Cobra, the model will not return back to upright level flight after performing the “Wall.”

MANEUVER OVERVIEW
This maneuver begins from upright level flight in a manner that is parallel to the runway. Keep in mind that this maneuver also has to be centered on the pilot. This means that the top of this aerobatic move should be performed directly in front of the pilot. While travelling parallel to the runway, increase the throttle to maximum power and pull to a 45-degree upline. Then, show a brief line and perform a half roll to an inverted 45-degree climb. Once a line segment that is the same length of the first line segment is performed, pull 90 degrees to a 45-degree downline. Again, show a brief line segment and perform a half roll to an upright 45-degree downline. Please note that the two half rolls must be centered on the line segments! When nearing your entry altitude, perform a radius to upright level fight at the same altitude in which the maneuver began at.
Before tackling a stunt like the Cobra, you must become proficient with inverted flight and the necessary corrections needed to keep your model on heading, and the reason is quite simple. While this may appear to be a fairly easy maneuver to perform, it will take time to perfect due to the notion that many different elements exist. For example, this maneuver combines upright and inverted flight all incorporated within a geometric shape, a triangle! Now, let’s simplify the control inputs needed and divide this maneuver into four steps:
STEP 1: Orient your model in a manner that is parallel to the runway at your normal base altitude. With a model like the Park-Zone Extra 300, you should fly your base altitude at about 100 feet for the best possible presentation of this maneuver. Please note that the power setting needed to perform this maneuver will vary from model to model as all power-to-weight ratios differ. On a typical model, 75% throttle is needed for this maneuver. Resulting, apply this throttle setting and begin a gradual pull to a 45-degree upline about 150 feet before the model approaches you.
STEP 2: Now that the model is on a 45-degree upline, a 1/2 roll will need to be centered on the 45-degree climb portion of this maneuver. I recommend that you count to two (allowing a two-second, 45-degree upline), perform a 1/2 roll, and count to two again. Using the “counting” method will give you equal spacing provided that little to no wind exists and that the model is flying a constant speed. As the model approaches the pilot, you will need to pull back ever so slightly to “pull” the model to a 45-degree downline and decrease the throttle setting from anywhere between idle and 25% power. The center of this radius should be directly in front of you, the pilot.
STEP 3: A 1/2 roll will need to be performed on the center of the entire downward segment of this maneuver. Either use the “counting” method that we discussed in the previous step, or, visually perform the 1/2 roll in the center of the downward segment. After this 1/2 roll is performed, you can gradually increase the throttle slightly to maintain airspeed if need be.
STEP 4: Lastly, you will need to perform a gentle radius (the same size as the first radius) to upright level flight. Once level flight is established, please return the throttle setting to 75% power and prepare to give this maneuver another try!
Since you have just learned all of the control inputs needed to perform this maneuver in the perfect world, let’s discuss wind and torque. You may find that at times, you will need to hold rudder input (usually right rudder due to engine torque) throughout the maneuver. If there is no wind present, make all necessary rudder corrections to keep the model in a manner that is parallel to the runway.
If wind exists, and especially a crosswind, you should strive to keep your model’s flight path parallel to the runway. For example, the airplane can be leaned 5 degrees out (in other words, the model’s nose will be leaning into the wind) so that the airplane will not deviate in flight path. In summary, no matter what type of wind is present, make all necessary corrections to ensure the best possible presentation of the figure as we have described.


