

Let’s discuss a maneuver called the “avalanche.” You can learn from the fundamentals in this exciting move. For example, I’m sure a lot of you have performed a basic loop. In fact, the loop is the first aerobatic maneuver that many people perform. The avalanche is a basic loop, but has one addition to it. At the top of the loop, the pilot performs a snap roll.
FIRST THINGS FIRST
When performing a graceful maneuver like the loop, focus your attention on geometry and smoothness. When executing the “loop” portion of this aerobatic maneuver, you want a low-rate setting that has about 12 degrees of elevator deflection, 30 degrees of rudder deflection, 25 degrees or more of aileron deflection and exponential on all surfaces. As a starting place, I recommend you use about 20% of expo and increase it until you are comfortable with how the airplane responds. Keep in mind that adding expo will soften the feel of how your servo reacts around neutral.
Let’s now discuss the snap roll. The snap roll rotation should happen relatively fast, and if you find that your model “barrel rolls” around in rotation, you do not have enough control surface deflection and may need different rates on your radio. Most models will snap with about 15 degrees of elevator, 35 degrees of rudder and 35 degrees of aileron throw, but again, values differ from model to model. This serves as an overview, and fine-tuning your model will be up to you. As I mentioned earlier, use exponential and start with a value of about 35% on all control surfaces and then make any necessary adjustments.
When I perform a maneuver like the avalanche, I keep my model on my low-rate settings for the “loop” portion of the maneuver. Then, when I want to initiate the snap roll, I switch to my high-rate setting. I perform the snap and flip immediately back to my low-rate setting for the rest of the figure. To simplify matters, I use flight modes, which means that all rates can be found on one switch!
AVALANCHE OVERVIEW
Until you are familiar with this maneuver, I recommend you climb to an altitude of about 150 feet. Keep in mind, though, that this altitude will vary depending on the size of your model; this starting point is great for an electric model with a wingspan of about 50 inches.
Once your altitude is established and your airplane is traveling parallel to the runway, increase the throttle and begin a gradual loop right when the model passes the pilot (for future reference, the pilot’s position is called the “center”). Keeping the same radius, it’s critical to perform a snap roll at the top of the loop. If the loop began immediately after the model passed the pilot, the snap should be performed as the model is inverted over the top of the loop and at center. Once the snap roll is performed, the model continues the second half of the loop and exits at the same altitude at which the maneuver began.
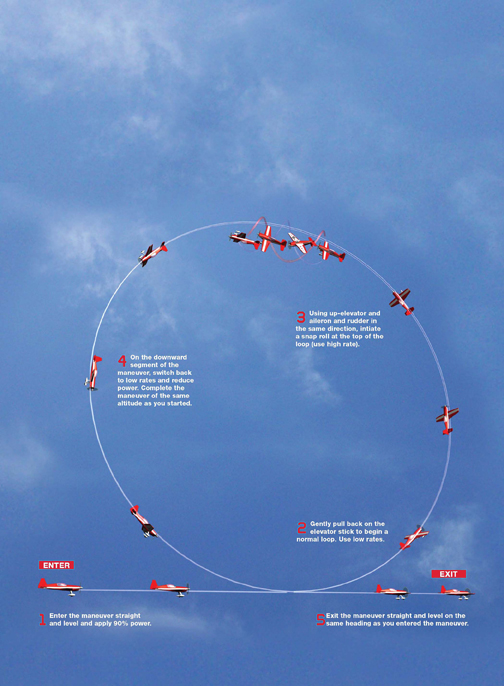
Now, let’s simplify the control inputs needed and divide this maneuver into four steps:
1 Begin by climbing to a safe altitude and orienting your model so it’s traveling parallel to the runway. The throttle will vary depending on your model’s power-to-weight ratio and the size of your loop. If your model has a fairly equal power-to-weight ratio, you’ll need to use maximum power, especially if you want to perform a larger loop. Increase the throttle to about 90% for your first attempt, and wait until the model approaches center.
2 If you’re using dual rates, make sure you’re on your low-rate setting. As the model is at center, gently pull back on the elevator control surface to begin the loop. Geometry is the key, and it’s critical to perform a perfect circle. With that being said, you may need to increase your throttle to keep the speed of the model constant. Also, you may need to make various rudder corrections to keep the model at the same distance from you (nine out of 10 times, you’ll need to apply right rudder due to motor torque). Keep the same radius constant throughout, and when the model is almost halfway through the loop, it should almost be at center, but inverted. This is a key moment to flip to your high-rate settings, or what I call my “snap rate condition.”
3 Initiate the positive snap roll by applying full left rudder, left aileron and up-elevator (if performing the snap to the left; otherwise, right rudder and right aileron with up-elevator). After one complete rotation is performed, neutralize inputs and immediately flip back to your low-rate setting and decrease the throttle to about 10% power.
4 Complete the second half of the loop. When the model is 75% done with the loop, it may be necessary to lower the throttle to idle. However, keep in mind that you may need to increase the power again as you are approaching center (the same point at which the maneuver began).
Now that you have learned how to properly execute the avalanche, let’s discuss a few key tips. If you are flying in an extreme headwind, you may need to gradually pull the model up to initiate the loop and then pull back harder once it has completed the first quadrant, as the wind may push you toward center faster than anticipated. After the snap is performed, you’ll need to pull a little harder on the elevator until you are about 80% done with the loop. You then ease off elevator to complete the maneuver as the model is directly in front of you. Whether you are flying in a head-wind, which we just described, tailwind, or crosswind, it is critical for this maneuver to be centered and performed directly in front of you. Make all necessary adjustments so the model always remains at the same depth from you and that it reaches the cardinal points.
Illustration by FX Models


