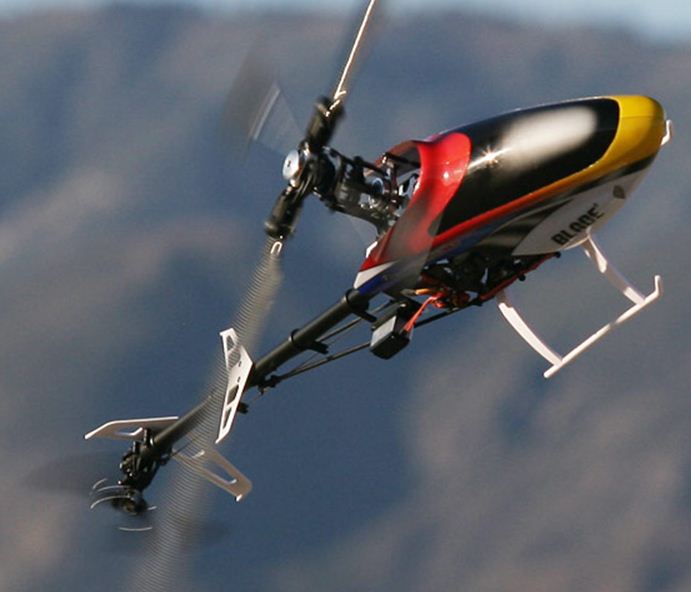
There are some maneuvers that are truly unique to RC helicopters, and the rolling tailslide is one of them. Performing what appears to be a suicidal maneuver and turning it into a controlled and graceful 3D move is always a crowd-pleaser, and while there are many maneuvers that are similar between airplanes and helis, this one truly separates the planks from the choppers. The ability to perform backward maneuvers defines RC helicopters, so it’s good to have a few practiced and ready to go. When done right, the rolling tailslide is a maneuver that always wows the spectators, so all your practice to learn this maneuver will be worth it.
PREREQUISITES
First and foremost, the rolling tailslide requires a well set up tail. Don’t try this maneuver unless you are comfortable with the reliability of your tail setup. Depending on the distance covered during the tailslide, the heli can reach fairly high backward speeds, so make sure the tail is working well and the gyro/servo combination is up to the task of fast backward flight without the tendency to “blow out” to either side. You should be comfortable with fast backward flight, both upright and inverted, as well as proficient with fast forward flight, stall turns, and backward rolls.
POSITION 1
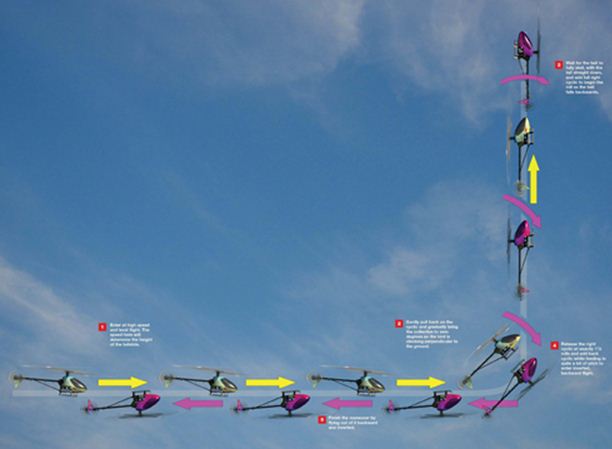
There are many ways to start the rolling tailslide, but for the purpose of this article we will enter the tailslide from fast forward flight. This maneuver is viewed to its best advantage when it’s performed parallel to the flightline so that spectators have a good view of the entire maneuver. Start with the heli entering the maneuver from the left side in medium- to high-speed level forward flight and the heli parallel to the runway at a comfortable altitude (around 20 feet is a good height to start at). Resist the temptation to start too low until you are very comfortable with the maneuver. Ideally, you will exit at the same height you entered the maneuver and follow the same line out.
POSITION 2
Gently pull back on the cyclic to begin the curve to vertical being careful not to “pinch” the maneuver by giving too much aft cyclic. Too abrupt a transition to vertical will shorten the vertical line and allow less time for the rolling portion of the tailslide on the way down. The idea is to enter the curve to vertical with enough speed and momentum to get as much vertical height as possible before the heli stalls and begins to fall. The only control you have for gaining altitude is the amount of forward speed on the run in and the radius of the curve to the vertical line, so a larger radius will give more altitude, which is what you want. Start reducing the collective pitch as you transition to vertical and make sure you are at zero degrees pitch as you exit the radius so the ascent is straight vertical.
POSITION 3
For this maneuver to be right, you need to achieve a full stall by waiting until the vertical portion of the maneuver stops and the heli is motionless with the tail facing straight down before beginning the rolling part of the maneuver. Don’t rush it by starting the roll before vertical momentum stops and don’t wait too long to begin the roll when the heli is already accelerating (falling) backward. Timing is the key here and you need to start the roll just as the heli comes to a stop vertically. Also, make sure the tail is vertical so the roll stays axial and doesn’t turn into a barrel roll. Start the roll by giving full right cyclic. No need to be shy with the cyclic; you want full deflection so you can complete 1 1/2 rolls before leveling out on the exit line. When you just start to learn this maneuver, it’s OK to start the roll just a half second before the vertical stops on the upline to allow a bit more time to complete the roll. Don’t wait until the heli is already heading back down to start your roll. That’s just too late and doesn’t leave enough time to smoothly complete the roll. Better to bail out of the maneuver and try again or only complete a 1/2 roll to make sure you have time to complete the maneuver.
POSITION 4
By now 1 1/2 rolls have been completed and it’s time to describe the same curve to level flight that we used to enter the tailslide. Of course we will be exiting inverted and backward, but you need to imagine the same line that we entered the maneuver so you can finish the maneuver at the same altitude. Gently pull back on the cyclic to begin the curve to horizontal and, like before, resist the temptation to “pinch”the maneuver. The heli is in the throes of gravity on its way down, so you need to add negative collective to stop the descent and to begin the transition to fast inverted backward flight. The tail needs to be at a downward angle to enter fast backward flight, so you’ll need more negative collective than you may think as you are going to lose some lift to the rotor disc being at an angle to gain speed in backward flight. Also, you are still countering gravity and halting the descent, which also requires more pitch.
POSITION 5
The hard part is done and now you just fly out of the maneuver in fast backward inverted flight following the same track as you entered. Pay close attention to matching the flight speed you entered with and maintain the same altitude and heading. You can transition out of the maneuver in any way that is comfortable for you; I usually perform a half backward roll to upright backward flight.
CONCLUSION
It is probably a good idea to start with a half roll to get a feel for the timing you need to perform this maneuver before progressing to 1 1/2 rolls. After you are comfortable with a half roll, just start a bit higher and go for the 1 1/2 rolls, or do a full roll and exit in upright backward flight. I think the maneuver looks best exiting inverted and backward, though.
TEXT BY JOHN GILMORE; ILLUSTRATIONS BY CHROME CITY STUDIOS


