
I often see an otherwise fine-looking scale model degraded by a really poor trailing edge construction technique. All but a very few specially designed aircraft have sharp trailing edges on all their flying surfaces. For my scale models, I try to always strive to make the trailing edge sharp, straight and durable. The technique I use is not difficult and I use it for all my trailing edge, wing and tail surface treatments.
Some may say thick, rounded trailing edges fly better and are less sensitive around neutral. This may be true for aerobatics, but for the scale models I fly, realism is more important. Modern transmitters offer exponential control surface travel and I find that about 25- to 30- percent expo solves any control problems that might arise. So, let’s get going!
BUILDING STRAIGHT
A straight wing begins when the framework is being assembled. During this preliminary assembly, I use a straight, grooved strip of wood about 42 inches long. The groove is 1/2-inch deep. Its length can be whatever is required, as long as it’s straight. This is placed over the rear tips of the ribs to keep them aligned during assembly. It’s important that the parts fit without having to be forced into place. If a slot has to be opened up a little to make a better fit, do it. There should be no tension on any of the parts. I always build the ailerons and flaps as part of the wing and then separate them after the wing has been sheeted. This method assures that the surfaces match the wing when they are hinged back into place.
To start, I cover the bottom of the wing completely from the leading edge to the trailing edge. Edge glue your sheets of balsa together to make two larger pieces. One that extends from the center of the main spar forward to the leading edge and a second that extends from the spar back to the trailing edge. Cut and join the sheets so the grain runs parallel to the leading and trailing edges. I generally apply the sheeting from the spar to the trailing edge first and then apply the leading edge sheeting. The lower sheeting can also be applied in one large piece if you desire. Once the glue has set, bevel the trailing edge of the sheeting to match the ribs.
Next, make similar sheets to cover the wing’s top surface. Before gluing the sheeting in place, install all the control horn mount plates, hinge blocks, servo mounts, rib webs and any other internal details. The top sheeting must be installed while the wing structure is in perfect alignment. If the wing is closed up while it’s out of alignment, there is no easy way to correct it after the glue sets. To maintain a warp-free structure, I use a rib shim strip taped in place on top of the plans to support the rear of the wing. The shim strip is positioned to obtain the desired amount of washout at the tip.
I do all the assembly work up to this point with Pacer Zap CA glue, but to glue the top balsa sheeting in place I use yellow carpenter’s glue. Trim the top sheeting so it is just slightly oversize and then run a bead of glue along the main spar’s rear edge and on top of all the ribs and spars aft of it. Position the rear top sheet in place with the front edge centered over the spar and tack glue the ends of the sheeting to the spar with CA. This keeps the sheeting from shifting. Place the wing precisely on the plans with the shim strip in place and pile up some magazines on top of the wing to hold the covering in contact with the substructure.
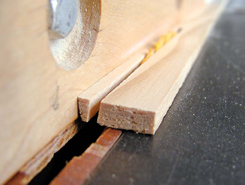
I use a second grooved wood strip to hold the trailing edge sheeting together and straight. This strip has a 12-degree-angled groove that’s wide enough to hold the trailing edge sheeting together. Be sure this grooved fixture doesn’t get glued to the wing. Place a strip of wax paper or plastic food wrap over the trailing edge first. I don’t worry about bringing the top and bottom sheeting together to form a sharp edge. A tapered hardwood trailing edge cap will be glued to the flat trailing edge later.
If, however, you desire to form a sharp trailing edge without the hardwood cap, it is worth the extra effort to sandwich a length of carbon-fiber strip (such as Dave Brown Products CPSP-5230) between the top and bottom sheeting. This allows you to form a really sharp, long-lasting edge. I generally do this on smaller wings, up to 50-inch spans. Again, it’s most important to use a grooved wood strip fixture to keep the trailing edge straight while the glue dries.
SHEETING THE TOP LEADING EDGE
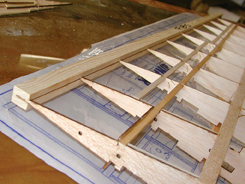 This grooved rib alignment fixture strip holds the rear of ribs in alignment during frame construction.
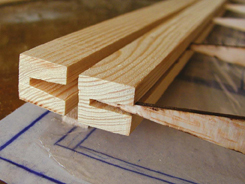 The rib alignment fixture is now in place on rear tips of ribs. The covering fixture is behind it.
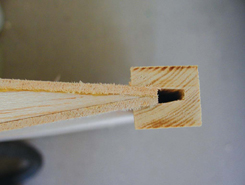 Here the sheeting clamp fixture is in place. Be sure not to glue it to the wing.
If spar webs have been installed, the wing can now be removed from the plans. The webs create a closed box structure that helps the wing hold its shape. Glue the top leading edge covering to the spar while keeping the leading edge up off the ribs. Run a bead of carpenter’s glue down each rib and then, starting from the center of the leading edge, pull the sheeting down to the leading edge cap and glue with Zap CA. Work one rib space each way from the center out to the ends. This should produce an accurate wing panel.
TRAILING EDGE CAPS
 The trailing edge cap is being sawn to shape. Each side should be cut at a 6-degree angle.
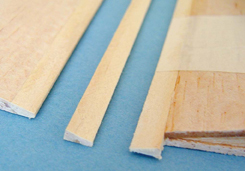 The trailing edge cap is being glued in place. When the glue has dried, sand it to match the wing sheeting.
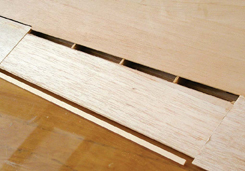 To maintain alignment, glue and sand the trailing edges before the flaps and ailerons are cut from the wing.
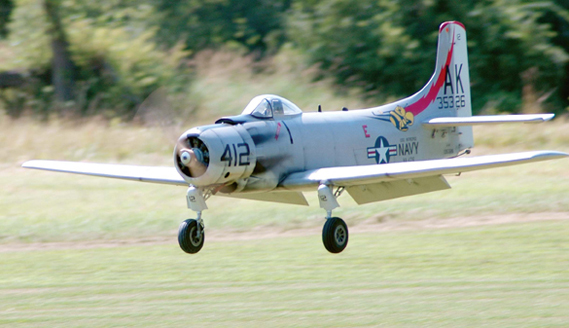
Fine, thin trailing edges don’t affect the flight characteristics of my scale planes at all. If a model is a little pitch sensitive, I just use the “expo” feature of my computer radio.
Cut the tapered trailing edge caps from a hard wood such as pine or spruce. I use clear pine here, and for many other places in the model since it’s easily obtained at local lumberyards or home improvement centers. I look for the best 6- foot-long by 6- or 8-inch-wide boards that I can find. If I find something really special that’s lightweight, clear of knots and straight, I buy it.
With your table saw blade set at a 6-degree angle, saw off a few strips 1/4- to 5/16-inch thick (depending on the size of the model). Cut one edge off the strips at this angle, then set the fence so the strip’s thick edge will be between 3/32 and 1/8-inch thick or, to match the thickness of your wing’s flat trailing edge. By turning the strips over after each cut, you create strips with a symmetrical 12-degree taper. While I have the saw set up, I usually make enough strips for at least the next project.
Before the ailerons and flaps have been removed from the wing, glue and tape the edge caps in place. This way you can sand them to match while the wing structure is still in one piece. Use a hardwood sanding block with 80-grit sandpaper to blend the trailing edge and wing surface together. Then after the control surfaces have been removed, capped and hinged back into place, everything should align perfectly.
I hope this easy building technique might inspire you to take some time during your next project to produce nice sharp, straight and true trailing edges. It’s worth the extra effort and your model will look great.
BY NICK ZIROLI


Old repeated article, but a good reminder. Got anything new?
Great construction tip, really appreciate the details, like old magazines to weight a structure while the glue sets.
May be old, but new to me. Thank You Very Much!
Great tip!! I’m glad i thought of that. LOL… well at least I wish I thought of that. Simple and straight forward. I always have trouble with trailing edges. Looks like that issue is in the past. Thank you!
Great information,always have had great admiration for sharp straight ,thin, trailing edges and the men that can pull them off,As a smuck that spent 35 years building wind tunnel models,installing and getting to witness all types of flying things in wind tunnels, ,im here to tell you the how important a sharp ,thin trailing edge is to drag ,and smooth laminar airflow. If in doubt ,next time your on a flight line,check out the trailing edge on any full size bird,dont bump your forehead JR