

RC’ers love novelty — anything to make flying a little different. Float flying, aerotow, aerial video; all these add variety, but one of my favorites is night flying. There’s something absolutely magical about flying in the dark. My efforts with night flying go back nearly 20 years, starting with spotlights, then Cyalume light sticks and finally LEDs. Back then, I was fascinated by the night helicopter demos presented by Howard Kendall at the MidAmerica Electric Flies in Ann Arbor. Howard was a pioneer in night 3D, and his beautiful lighting system and smooth pattern-influenced flying style made for an awesome display. This was all years before I started flying helicopters, but I thought it was incredibly cool.
Heli night flying has become a thriving niche in the sport, with the best 3D pilots crafting routines in which their lighting systems are choreographed to music. It’s very impressive, but maybe a little beyond most of us. That said, when my local flying buddies started getting together for foamie night flying, I decided I needed to get my helicopters into the act!
I spent a weekend setting up my old reliable Align T-Rex 450SE for night flying, and I was hooked from the first flight. Night flying with helis is even more fun than fixed-wing flying. With the effect of the lighted blades, night helis are a big crowd-pleaser, and ironically, the lighting system can make orientation easier in than in daylight. Let’s look at how to convert a heli for night flight.
Equip your heli for night flight
RC’ers love novelty — anything to make flying a little different. Float flying, aerotow, aerial video; all these add variety, but one of my favorites is night flying. There’s something absolutely magical about flying in the dark. My efforts with night flying go back nearly 20 years, starting with spotlights, then Cyalume light sticks and finally LEDs. Back then, I was fascinated by the night helicopter demos presented by Howard Kendall at the MidAmerica Electric Flies in Ann Arbor. Howard was a pioneer in night 3D, and his beautiful lighting system and smooth pattern-influenced flying style made for an awesome display. This was all years before I started flying helicopters, but I thought it was incredibly cool.
Heli night flying has become a thriving niche in the sport, with the best 3D pilots crafting routines in which their lighting systems are choreographed to music. It’s very impressive, but maybe a little beyond most of us. That said, when my local flying buddies started getting together for foamie night flying, I decided I needed to get my helicopters into the act!
I spent a weekend setting up my old reliable Align T-Rex 450SE for night flying, and I was hooked from the first flight. Night flying with helis is even more fun than fixed-wing flying. With the effect of the lighted blades, night helis are a big crowd-pleaser, and ironically, the lighting system can make orientation easier in than in daylight. Let’s look at how to convert a heli for night flight.
LET THERE BE LIGHT!
The following is by no means a comprehensive summary of lighting systems, but rather a simple nuts and bolts approach to getting a night heli into the air. We’ll talk about simple lighting systems and provide some tips on making it all work. For our demo subject, we’ll start with a Century Heli Swift NX, an affordable 550-class machine with a simple structure and 5S power. The durable Swift is a good candidate for night ops, and its plain blow-molded canopy should look great with internal lighting. There are several technologies available to us, with the most popular being “glow wire” and LEDs.
Glow Wire. Glow wire is electroluminescent wire that glows like neon. The wire remains cool, and it can be used to outline features on your heli for a very nifty effect. There are a couple of catches: First, it requires a special driver — essentially a low-wattage 120V AC inverter—to make the wire glow, and this high-frequency driver should be kept isolated from your receiver. Second, glow wire has a finite lifespan, and the higher the frequency, the faster the wire starts to dim. That said, the overall effect is very cool, and many night fliers find it well worth the little extra work.
LED Strips. The other popular lighting option is LED strips. I prefer LEDs because they’re inexpensive, reliable, and simple to set up. Power consumption is modest, and today’s LEDs are really bright. So for this project we’ll focus on LED strips for most of the lighting.
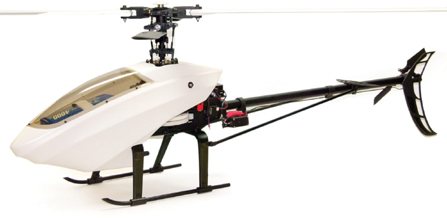
The Swift NX from Century Heli is a good candidate for a night machine; it’s inexpensive and tough, and the blow-molded canopy makes internal lighting practical.
CARE AND FEEDING FOR LEDS
The LED strips are cut to length and secured in place with their self-adhesive backing. If you ever need re-position them, 3M’s VHB transfer adhesive is made to order. For the Swift, the strips were mounted on support bars to light the canopy internally.
I want to keep this discussion accessible, but a few electronic basics are necessary. An LED, or Light Emitting Diode, is a semiconductor that will glow when current flows through it in the proper direction (diodes are like one-way valves). The diode produces a given forward voltage drop (generally in the 2.2 to 3.0 volts range) and draws a nominal current (typically 20 to 30 milliamps).
LEDs have a fairly narrow voltage sweet spot: too low and they won’t light at all, and too much and they’ll burn up. But in their correct voltage range LEDs will provide dependable light for years.
The self-adhesive LED strips we’ll be using are designed to run on 12 volts — essentially a 3S lipo pack. To do this, the LEDS are wired in series in “blocks” of three, with a resistor added to obtain the correct voltage drop. The resistor’s value is carefully selected to protect the LEDs from a fully charged pack and yet keep them lit to the very end of the flight. These blocks of three are linked in parallel to make long strips. Because they’re wired in parallel, you can have as many blocks as you like, and the LEDs will all light uniformly. It’s really ingenious when you stop to think about it.
Strips of LEDs can be installed wherever you like on your heli, and then you can link them all together like a daisy chain. It’s a good idea to have a couple of chains in your lighting system so that a single broken wire won’t take the whole system down.
POWER OPTIONS
NOW, I said the LED strips we’ll be using are designed to run on 12 volts. That’s great for 3S helis like my T-REX 450, but what about our bigger 5-cell Swift? There are a number of options for supplying power to your LED system:
Direct 12 Volt. if your heli is running a 3S lipo pack, you can simply tap power directly off the main battery connector. I always include a JST connector in the wiring harness so I can disconnect the lights for day flying or for bench maintenance.
Center-Tapped Battery. another option that allows you to use the main battery is to “center tap” the battery so that the leD system receives the requisite 12 volts. This can be easily accomplished by wiring a female balancing connector to pull power from pins 1 and 4. In theory, this means the first 3 cells in the pack will be drained faster than the others, but the LEDs pull so little current this really isn’t much of a worry if you don’t fly your battery to the point of depletion and balance charge your packs between flights.

For fiberglass canopies the LED strips should be applied on the outer surface. Small holes are drilled at the ends of the strips so the wires can be routed internally, and a JST connector is glued to the upper rear edge with PFM or similar elastomeric glue.
Split Battery Tap. if your heli is running a 6S flight battery, you can do a variation on the center tap by wiring a balancing connector so that cells 1 thru 3 and 4 through 6 power different sections of the light system. With this scheme all cells see about the same load, and the effective current drain is cut in half. This same approach can be applied to 12S systems.
Voltage Regulator. While a little more expensive to implement, a programmable voltage regulator or high-output BEC is probably the ideal solution. If your regulator can be programmed for 12 volts it’ll reliably power the LEDs with no special maintenance required.
Separate Lighting Battery. Finally, you can simply install a separate 3-cell lipo pack to power the lights. Even a small pack in the 500mah range will provide several flights worth of power, and the only down side is that you have another battery to charge and maintain.
All these power options are relatively simple to set up and highly reliable. Which you choose will depend on your heli’s particular power system and your personal preference.
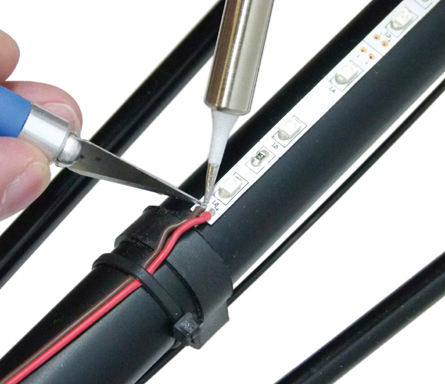
After scraping the solder pads until they’re clean and bright, pre-tin the pads and the wire leads. You can then touch-solder them together with a fine tip. A hobby knife is helpful for holding the wire in place while soldering.
LET’S GET STARTED
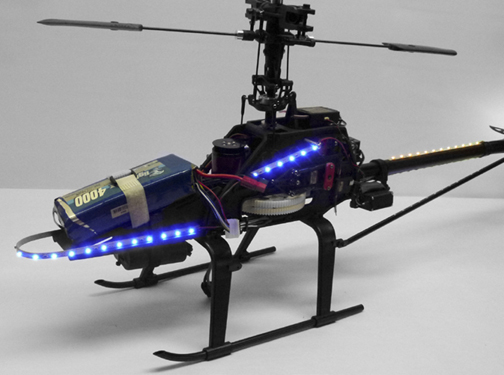
Before you start plastering LED strips all over your heli, take a little time to plan things out. Two important considerations are the overall visual effect you want to obtain and of course, the need to maintain orientation in pitch darkness. Like the nav lights on a full-scale aircraft, I like to put red LEDs on the left side of the tail boom and green on the right. A little farther forward I install blue or white LEDs on the bottom of the boom. This not only gives an additional visual cue, but LEDs shining downward give you a clear reference for height above ground level. Also, the heli floating along on a bright pool of light looks very cool!
LED strips on the landing skids also enhance visual appeal. The ideal if your heli is big enough is to make your own skid pipes with clear or tinted Lexan tubing and slip the LEDs inside. This looks very sharp and helps protect the lighting from dewy grass.
I apply my main attention to the canopy. On my T-Rex’s fiberglass canopy I applied three strips of LEDs: blue down the center and yellow along each side. These are connected with a Y-harness inside the nose, with very small holes drilled to route the wires to the LED strips. Secure a JST connector inside the back lip of the canopy with PFM or other flexible adhesive so that it’s easy to connect in the dark.
The LED strip down the center of your canopy is a great visual reference; on a nose-in approach you can precisely gauge heading depending on whether the line curves to the left or right. I always use different colors up front than at the tail so there’s no chance of confusing the two.
For the Swift I adopted a different approach. Since its blow-molded canopy cries out for internal lighting, I made a curved frame from laminated 1/64-inch plywood to hold a light strip inside the canopy. Farther back I installed bars of .060 G10 fiberglass to support more light strips without interfering with the cyclic servos. The result looks very cool and makes the heli really easy to see.
SOLDER CONNECTIONS
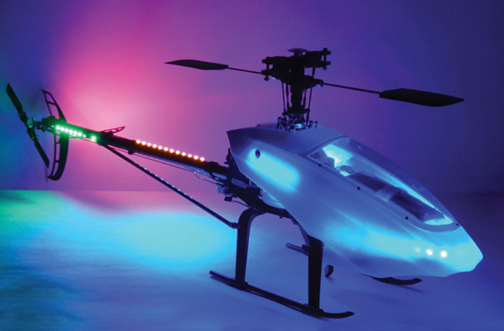
While some night fliers like to light up their helis like Las Vegas, even a few simple LED strips look good and provide more than enough visual cues for safe night flying. You may be surprised how easy night flying can be.
While it’s fine work, soldering fine-gauge wire between the various LED strips is straightforward. Be sure to observe correct polarity, as LEDs will only allow current to flow in one direction. Use a hobby knife to scrape the solder pads on the LED strips so they’re nice and bright. Pre-tin the pads and the very tips of your wires and then solder them together. If your eyes are like mine, you may find a magnifying visor helpful, but it’s really not difficult. Keep linking the strips together until you have everything lit up.
UNTIL NEXT TIME
This takes care of the lighting up the main airframe. Add a set of commercial night blades, and you’re ready to go flying. By all means, do your first night flights at dusk in a large space to give yourself a chance to get used to the look of the heli, but I think you’ll find orientation surprisingly easy.


