

Traditionally, the 4-point hesitation roll is a maneuver that is a struggle for many pilots. The reason for this is because most fliers attempt to perform the 4-point roll the way a highly proficient pilot would. Consequently, the pilot is so overwhelmed, he’s unable to identify what mistakes he’s making and how to correct them. On the other hand, those who first master the basic 4-point roll make adding refinements much easier and more efficient.
Rather than rehashing an ideal 4-point roll scenario, my intention is to crawl-walk-run pilots through the stages of practice that are required to perform outstanding 4-point rolls. You’ll also learn how to enhance your practice effectiveness by focusing your attention on controlling the airplane.
4-POINT ROLL BASICS
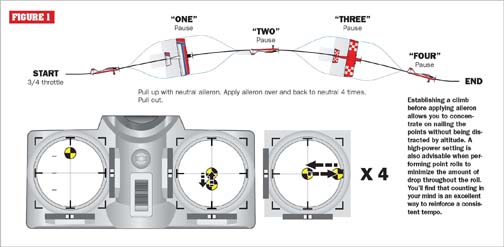
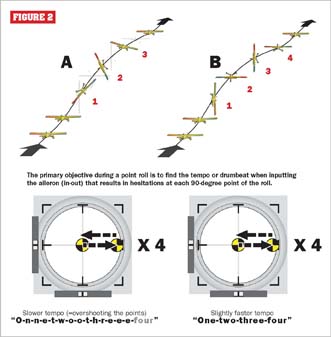
By definition, the main objective during a 4-point roll is to precisely stop the roll every 90 degrees. However, things happen too fast to perform accurate points when trying to react to the wings. Therefore, proficient pilots concentrate on timing their aileron control inputs to consistently hit the points. In other words, your first objective when learning the 4-point roll is to find an even tempo or drumbeat to input the aileron (in-out) that results in hesitations at each 90-degree point of the roll. Keep in mind that developing the correct timing becomes much easier when you pull up into a 20- or 30-degree climb before initiating the roll so that you are not distracted by altitude. A high-throttle setting is also preferable during point rolls to minimize the amount of drop when the airplane is paused on its side and inverted.
After reflecting on the results of your first attempt, go into the next with the appropriate speeding up or slowing down of your aileron inputs. For example, if you overshoot the points, you’ll need to apply your aileron inputs at a slightly faster tempo next time, and vice versa.
At this stage, neither a faster or slower tempo is more ideal. The correct tempo is whatever it needs to be for you to complete the fourth point with the wings level. You should also make sure you clearly define each point by pausing at neutral for a “count” before rolling to the next point.
HORIZONTAL 4-POINT ROLL
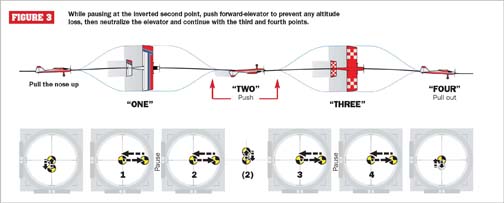
Once you possess the correct input timing of the basic 4-point roll, the next step is to “push” forward-elevator during the inverted second point to keep the plane level. To avoid barreling the roll at this point, make sure that you neutralize the aileron at the inverted second point with the wings level before adding the push. It’s very easy for a pilot to get so far ahead of himself thinking about the push, that he neglects to establish a good second point with the wings level. This ultimately results in a botched maneuver.
The addition of the push when inverted means you can start to shallow the entry as your confidence increases. The eventual goal is to pull just enough up-elevator at the start to keep the plane from dropping through the first part of the roll, but is otherwise undetectable.
UPRIGHT 4-POINT SLOW ROLL
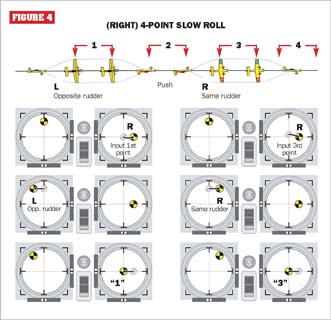
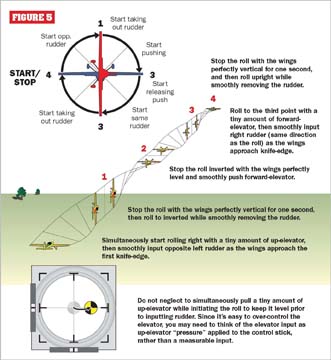
When you have mastered the horizontal 4-point roll, start slowing down your tempo and use less aileron to slow the roll rate. You can add “top rudder” during the knife-edge points to keep the roll level. Forget the talk about using the rudder as an elevator when the airplane is on its side. Instead, simply commit to memory that the rudder is always applied in the “opposite” direction of the roll (aileron input) during the first point, regardless of whether the top or bottom of the airplane is facing you. The rudder is then applied in the “same” direction as the roll during the third point. Thus, if you’re rolling right, opposite left rudder is smoothly applied to maintain altitude during the first knife-edge. Don’t forget to smoothly push forward elevator when inverted, and smoothly apply right rudder (same direction as the roll) during the final knife-edge.
Keep in mind: the slower the roll rate, the slower the rudder and elevator inputs need to be applied and taken out. This is where maximum stick tension and paying attention to your control inputs really helps. The rudder inputs should be just enough to maintain level flight. Visible yaw is not the object; rather, the object is to locate and repeat the control inputs that consistently produce the best results.
It’s wise to enter your first several attempts from a climbing start to buy yourself more time to think. Remember, the most important aspect of the point roll is maintaining accurate points. At this stage, it’s very easy to botch the points when thinking about the rudder. Understand that refinements, such as rudder, only help to perfect an otherwise decent horizontal 4-point roll. If adding rudder causes you to botch your point rolls, rather than concentrating on improving the rudder, you need to refocus on the basics that lead up to adding rudder for “perfect 10″ attempts.
Another common mistake is neglecting to pull a slight amount of up-elevator at the start of the roll to prevent the airplane from dropping, instead of trying to keep it level with a large rudder input. Not only can neglecting the elevator at the start cause the airplane to descend, but also applying large rudder inputs well before reaching knife-edge can initiate a slight turn. Remember to input a small amount of up-elevator at the start of the roll to prevent it from dropping. The rudder should not be input until the wings are banked at least 30 to 45 degrees.
CONCLUSION
Most of the challenges that advancing aerobatic pilots experience are not due to their ability to master the finer points or the amount of stick time they have, but are caused instead by rushing or overlooking the fundamentals that got them to that point. Oftentimes, fliers who emphasize precise points and timely elevator inputs will have more success than those who may have more experience, but are constantly correcting the consequences of emphasizing rudder while neglecting the basics.
BY DAVID SCOTT


