
Ever since purchasing a small camera from Hobby King I’ve been taking onboard videos, also known as FPV (first person view) videos, from my Sig LT-40 Kadet which is electric powered. Up until recently I’ve been simply attaching the camera to the side of the fuselage with velcro. The view was okay, but it was a side shot facing out under the left wing, and wasn’t as exciting as a pilot’s eye view would be. I decided to construct a small mount that can easily be removed and yet safely secured to hold the small camera.
I had several ideas in mind. The first involved chopping up the side of the fuse, attaching a platform to the side with wooden dowels, and epoxying it in therefore making for a permanent fixture… I didn’t like it. My second idea was an “L” shaped piece that would slip in a hole cut in the front windscreen of the fuse. Then it would be glued to the inside of the plane with the top of the camera poking out through the windscreen. That one was too complicated.
I liked the “L” shaped cradle design of my second idea, but I didn’t like all the slicing and dicing to the airframe that the plan would require. Then I got an idea… but I needed that cradle.
My dad helped me construct a cradle from light plywood and some thin balsa we had laying around. We cut two pieces of light ply, about one inch by two inches, and about one inch by three inches. We CA’ed the pieces together to form the “L” shape and we decided to test fit it to the airframe before putting too much effort into the design.
I placed the cradle on top of the fuse right behind the wing. I then set the camera in the cradle and recorded a short clip of me waving at it from in front of the plane. Upon review, the angle was pretty good! It had a little bit of the wing at the bottom for reference, along with a bit of the propeller arch and plenty of room for sky or clouds or… the ground.
We knew the cradle idea would work We then decided to beef it up a bit so it wouldn’t just blow apart under speed. To do so, we cut a small triangle of balsa to reinforce the area where the two pieces were glued together, and two larger triangles to span between the fuse mounting side, and the camera mounting side.
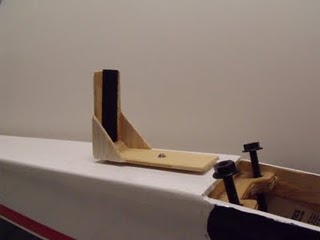
The cradle is mounted to the airframe using velcro and a wood screw. The camera is mounted in the cradle with velcro. You can also see the two triangle reinforcements on the sides as well as the triangle piece between the two platforms.
We’ll see how it holds up after I fly it a few times, but for now, it looks like it will work well. It’s an easy build, and shouldn’t provide too much of an affect on flight performance becasue of its small size.
Here’s a picture of the camera installed in its cradle when mounted.

The camera attaches to the mount with velcro and the mount attaches to the fuse with velcro and a wood screw. It is light so it won't affect the CG much and is relatively small so shouldn't provide much of problem in flight.
–Tom K.


This from the hobby king website board.
Camera must be connected to a computer to change the date format. 1)Open ‘notepad’ 2)create the following format exactly including [date] in notepad using your current time & date & leave a space at the end of each line (invisible space). (Note: year/month/day & 24 hour clock) [date] 2011/01/05 22:36 3) with switch in off position & SD card installed plug camera into PC with USB cable. DO NOT SWITCH ON 4)return to notepad. click file/SaveAs/ save file as tag.txt into the root of the camera example* My Computer/Removable Disk(F:), NOTE: do not save in the DCIM folder 5)do not switch on or off, directly unplug the camera before next step. 6) Now switch camera on & try video. Switch off when finished. 7) with switch in off position & SD card installed plug camera into PC with USB cable. DO NOT SWITCH ON 8) explore My Computer/Removable Disk(F:) The tag.txt file should now be gone (disappeared). 9) review files in the DCIM folder & check the date should now be correct.
Dear Tom,
I applaud your attempt at FPV flying, but I have a comment about the aerodynamics of your design. If you haven’t already found out, it appears that the camera cradle would disturb the airflow past the rudder and perhaps make handling difficult. (If it’s close enough to the tailfeathers, it may also affect the elevator authority).
Other modelers who use cameras, even in front of the wing, have found that they must increase the rudder area.
Good luck to you – and let us know how it went!
Brian Gray – AMA 526
Captain, retired – United Airlines