 |
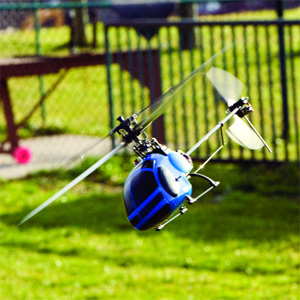
Day after day, I find myself at the flying field wishing I had brought another model with me to fly during down- time, battery recharges, or just to spice things up. Skyartec has the perfect solution: a brushless, LiPo-powered, micro heli with a very attractive price tag that is ready to fly right out of the box. The Wasp V2 has many upgrades over the V1; most notable is the brushless motor and ESC combo. The model comes fully adjustable, so that the experienced helicopter pilot will have no problem setting it up to his or her flying style.
The Wasp is a fixed-pitch copter, so no 3D stunts can be performed. With that being said, the Wasp will be appreciated by pilots with helicopter knowledge and experience because of the adjustable components such as the pitch and gyro sensitivity. A beginner can fly it, but I recommend that you sit down and spend time with the included simulator and have help nearby while you learn how to fly. All of the hardware and software needed to use the simulator is provided. It is very durable for its size and can handle significant drops if it happens to get away from you. All you must provide are 8 AA batteries for the included transmitter and a Philips screwdriver to make adjustments. The Wasp is relatively small and is designed for indoor use such as in a gym, but it can be flown outdoors.
Unique Features
The Wasp comes fully assembled and requires hardly any setup time. Fully adjustable servo and head links are included, and that allows more experienced pilots to tweak the model to their liking. Minimal corrections were needed; the tracking of the main blades needed slight fine-tuning as well as tightening, and the gear mesh from the main motor needed readjustment. All of which are normal maintenance tasks that should be done on any heli, and they were easily accomplished due to the heli’s accessible components. There is room on the swashplate for two setups: one for more responsive controls by using the longer ball links and a less responsive setup.
The drive system and electronics are cleverly placed in the model to allow a very compact design. No more messy receiver antennas getting in the way;
the Wasp’s antenna is routed through
a coiled wire that is attached to the chassis. The gyro is integrated into the electronics, and the sensitivity can be adjusted. Attached to the receiver are industry-standard 3-wire servos, which allow easy and direct replacements of aftermarket units, if desired.
The Wasp is equipped with a brushless outrunner motor, which is different from most micro helis. This design works very well with the included 7.4V 900mAh LiPo battery and included wall charger (about 2-hour charge time). This combo provides almost unlimited power—more than enough to power this very light helicopter—coupled with very long flight times. You can expect flight times of around 20 minutes consistently, depending on how you manage the throttle. Don’t worry about over-
discharging your LiPo; a warning LED will let you know when voltage is getting low, giving you plenty of time to land, provided you aren’t too far away. The tail rotor is powered by a separate electric brushed motor. Sometimes the gyro wants to kick in while you are moving the helicopter around, so be sure to keep your hands and any other loose objects away from the tail while the Wasp is armed.
Skyartec had durability in mind while designing the Wasp V2. Even though I am a decent pilot, the Wasp fell from altitudes of up to 8 feet while I allowed others to test-drive it. I didn’t notice a scratch or any signs of damage. While the Wasp isn’t as easy to fly as trainer models, I feel more comfortable letting people try it out because of its solid construction and tested durability.
Conclusion
Skyartec has created one of the most cost-effective brushless-motor-powered micro helis on the market today. This little thing is a blast to fly and has longer run times than any other comparable bird I have flown. This makes for the perfect lunchtime break or even in-between flying of your bigger models. I recommend trimming the canopy support bars for easier access. That being the only modification I did makes the Wasp V2 a winner and the perfect backyard brushless “beater” for your collection.
See the Source Guide on page 92 for
manufacturers’ contact information.
IN THE AIR
The included 4-channel transmitter operates smoothly; however, the ratcheting throttle is somewhat of an annoyance. Heli transmitters typically do not have a ratcheting mechanism on the throttle so that minute throttle changes can be made. The rotor head is actually a collective-pitch layout sans collective-pitch servo. This gives the Wasp good stability and smooth flight characteristics. The battery slides
into a plastic cage on the front of the heli and is very easy to install and remove.
Climb Performance I was surprised the first time I flew it: it shot upwards at about 1sible failure modes.
120-degree CCPM swashplate
The most common CCPM swashplate design is the 120-degree swashplate as shown in Figure 1 where each of the three control servos are connected 120 degrees apart to points X, Y and Z. Note that the center of the swashplate (which is also the center of the main shaft) is point O, and the radius of the swashplate is O-X = O-Y = O-Z. Also, for this discussion, it does not matter which servo is attached to which point because they are all used (mixed) to obtain the required control input. And although the front of the helicopter is at the top of the page, the same points can be made with the helicopter facing in the opposite direction.
This 120-degree swashplate has been the standard CCPM configuration of the industry for more than 20 years, but it has the following built-in design disadvantages:
Aileron sensitivity
When a right aileron control command is given, the swashplate is tilted to the right by lowering point Y and equally raising point X to allow the swashplate to rotate about its center axis. Note that the aileron sensitivity is proportional to the length of X-Y. The greater this distance, the smaller the movement of the swashplate for any given servo movement, resulting in a less sensitive aileron control function. As a further example of this point, let’s use some numbers to give us a feel for the swashplate movement. Let’s suppose that a right aileron command is given that results in point Y being lowered by 1bsp; This proves point 1: the ailerons are less sensitive than the elevator when using the 120-degree CCPM swashplate design.
Un-commanded collective pitch
Again referring to Figure 1, in our example, point D is raised by 1encies I have presented, and they have modified their CCPM programs in an attempt to compensate for them. To see whether your radio has such a compensation and to verify its accuracy, you can do the follow
ing experiments:
Elevator compensation Move the elevator control stick through its entire range as you watch the three servos move the swashplate. You should notice that the servo attached to point Z in Figure 2 has a greater movement than the two servos attached to points X and Y. This is the computer program trying to compensate for the elevator design deficiencies in the 120-degree swashplate. Then take a sharpened pencil, and mark the main shaft where it meets the swashplate. Again, move the elevator control through its entire range and see whether the swashplate moves up or down on the main shaft. Although I certainly have not tested all the radios, my Spektrum DX7 does an excellent job of making this compensation.
Aileron compensation This is relatively easy to check simply by using a pitch gauge to measure the main rotor blade pitch at the extremes of both aileron and elevator input. The process will be easier if you have a helper.
To check the aileron sensitivity, have the nose of the helicopter and main rotor blade facing you as you apply and hold full right aileron. Take a reading with the pitch gauge, and then apply and hold full left aileron and again take a reading with the pitch gauge. The difference between the two readings will give you the aileron pitch range.
Now move to the side of the helicopter and rotate the main rotor blade so it’s again facing you and is perpendicular to the
helicopter. Apply and hold full up-elevator and take a pitch reading; then apply and hold full down-elevator and take another reading. This will give you the elevator pitch range. You can now compare the two pitch range readings to see whether they are the same; if they are, the sensitivity of the aileron and elevator is the same. If they are different, the control with the larger pitch range will be the more sensitive. My tests indicate that the elevator is indeed more sensitive than the ailerons, as presented earlier. Evidently, the CCPM program in the radio does not compensate for this deficiency in the 120-degree swashplate design.
JR 140-degree swashplate
The people at JR must think that the 120-degree swashplate’s deficiencies I have presented are significant and detrimental to the performance of our helicopters because they have introduced a 140-degree swashplate design on their Vibe 90 helicopter. And to make this swashplate design work, they include a 140-degree swashplate option in the JR9303 radio. Although I have not seen a 140-degree swashplate, I think their program would work with my 135-degree swashplate design.
Conclusion
According to these figures and calculations, my 135-degree CCPM swashplate design has all the benefits of having CCPM control while eliminating both of the 120-degree CCPM swashplate’s undesirable attributes. I have always believed that the best way to design something is to make it as mechanically correct as it can be and to eliminate the need to make any compensation. This is the theory most pilots follow when they set up their helicopters, and it can also be applied here to our swashplates.
Although I don’t have the means to make or modify a swashplate to my specifications, I hope someone or some company will take on the challenge. If and when this happens, I would certainly like to be among the flight-test team to verify my design. I believe that such a 135-degree CCPM swashplate and the applicable CCPM computer program will improve the performance of our helicopters and will find its way into many new helicopter designs.
Article taken from the October 2007 issue of Model Airplane News


