
Although I enjoy all aspects of RC aircraft, I truly enjoy aerobatics. Often, people who are just getting into aerobatics ask me how to perform some of the most difficult maneuvers out there and become discouraged when they can’t succeed. I tell them that one aerobatic maneuver builds on another. For example, you can’t build a home without first building the foundation. This month, I’ll cover a maneuver that is a true showstopper. The Blender is a combination of a rolling vertical down-line and a flat spin. Please note, however, that this move is intended for advanced pilots and truly aerobatic planes; it will push you and your airframe to the max! So, without further hesitation, let’s get started!
4 simple steps to look like a pro!
Although I enjoy all aspects of RC aircraft, I truly enjoy aerobatics. Often, people who are just getting into aerobatics ask me how to perform some of the most difficult maneuvers out there and become discouraged when they can’t succeed. I tell them that one aerobatic maneuver builds on another. For example, you can’t build a home without first building the foundation. This month, I’ll cover a maneuver that is a true showstopper. The Blender is a combination of a rolling vertical down-line and a flat spin. Please note, however, that this move is intended for advanced pilots and truly aerobatic planes; it will push you and your airframe to the max! So, without further hesitation, let’s get started!
FIRST THINGS FIRST…
Your success in properly performing this maneuver relies not only on your flying skills, but also on your aircraft’s setup. This is an extreme aerobatic maneuver that requires maximum control travel on all surfaces. If you’re flying a foam aerobat that is intended mostly for 3D flight, you may only use one flight condition and fly the entire maneuver on one rate: maximum! If you are flying a larger electric model, however, it is crucial that you use different rates for different maneuvers; using too high a rate throughout can get a pilot into trouble at the wrong time. I only switch to 3D rates before I intend to perform a given maneuver.
For 3D rates, I recommend about 35 degrees of aileron deflection, 40 degrees of elevator deflection and maximum travel for rudder. You should also use about 65 percent exponential on all control surfaces.
AN OVERVIEW OF THE BLENDER

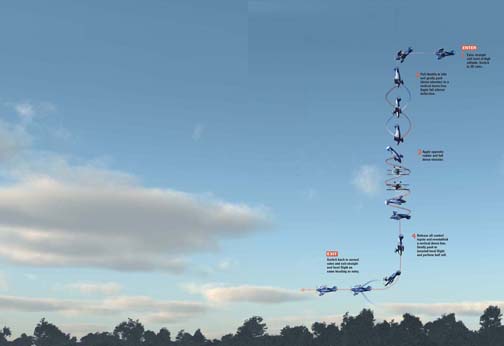
To perform this maneuver, you will generally climb to an altitude of 500 feet (the altitude will vary depending on the size of the model being flown) and travel parallel to the runway. Then, decrease throttle and perform a 90-degree push from upright level flight to a vertical down-line. At that point, you’ll apply aileron input so the airplane is rolling while traveling straight down. While holding aileron input, apply both full opposite rudder and full down-elevator. The result? Your aircraft will virtually “stop” its loss of altitude. After this, the airplane will essentially continue in an inverted spin. To exit this maneuver in a traditional manner, release all control inputs to establish a vertical down-line and push 90 degrees to inverted level flight. Then, perform a half roll to an upright level flight exit. Now, let’s break this maneuver into four steps:
1 First, begin by gaining a lot of altitude. Always keep in mind that the starting altitude is relevant to the size of model you are flying. If you’re flying a small indoor aerobat, an entry altitude of between 100 and 200 feet is acceptable. With any larger model, begin at 400 to 500 feet. Like all new and unfamiliar maneuvers, entry altitude is essential in case you lose orientation of the airplane or are unfamiliar with how the model will react to various inputs. When you establish your altitude, orient the model parallel to the runway and, when the airplane is about to fly directly in front of you (also referred to as the pilot’s “center”), you’re ready to begin.
2 As I mentioned earlier, flip your dual-rate switch to your 3D mode. Then, pull the throttle back to idle and gently push your model to a vertical down-line. Apply full left aileron input. If you prefer to roll to the right, apply right aileron instead.
3 After the model performs a few rolls, you are ready to initiate the breathtaking section of this maneuver. Apply opposite rudder input and full down-elevator. If you are rolling left on the down-line, apply right rudder. Similarly, if rolling right, apply left rudder.
4 After the model performs a few spinning rotations, it is time to exit. To do so, release all control inputs so the model will establish a vertical down-line. When a down-line is established, you may begin the 90-degree push to inverted flight. Then, perform a half roll to upright level flight. Flip to your normal flight rates and get ready to try this maneuver again!
You have now learned how to properly perform The Blender. This is a stunning maneuver to watch and perform, and it will take practice to perfect. It is important to have a structurally sound model before you attempt this demanding stunt, and always check the linkages on your airplane as well as the airframe from time to time as general flight maintenance. Last, always remember to enjoy this wonderful sport. Until next time, safe flying and be sure to always have fun!
by John Glezellis
ILLUSTRATIONS BY FX MODELS & CHROME CITY STUDIOS


Great article, just wish the graphic was readable