One great thing about this hobby is that there’s almost always a better and quicker way to make the process easier on the modeler, pilot or builder. We asked some pros in the industry and our contributors for their advice on easier approaches to building or flying. Here are the top 19 tips (listed in no particular order) that we liked and thought you might enjoy as well.
A PROPER FLARE
Landing is always the one of the hardest events during flying. A proper flare is what makes that perfect touchdown and the type of plane will determine how to flare correctly. Start out by flying about a foot above the runway, then hold in the flare all the way to touchdown with a light wing loaded aerobatic plane. For heaver wing loaded scale/racing planes, start the flare at the same point. As soon as the main wheels touch, quickly ease off the up-elevator. This should prevent the plane from bouncing down the runway.
SHIFT YOUR EQUIPMENT
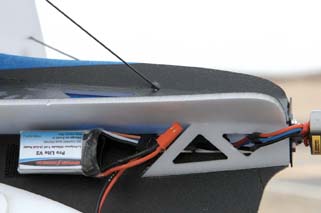
Batteries can be moved forward and backward to balance out the plane. Using a long strip of Velcro will let you place your battery wherever it’s needed. Be sure to mark that spot so other batteries will be in the same place.
Balance your planes (whether they’re large or small) by shifting around the equipment inside the aircraft. Adding weight seems counterproductive because it’s important to always try to keep the weight down on the plane, especially the smaller ones. In most cases, the heaviest item is the battery and this can easily be moved around to balance the plane. If you do have to add extra weight, again, go to the battery if possible. By using a larger battery instead of lead weights, you can benefit from the extra wing loading by getting some additional flying time.
CONTROL YOUR WIRES
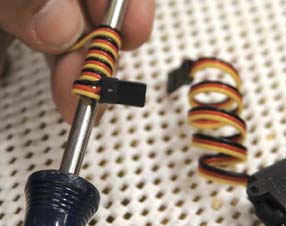
Wrapping the servo wires around a Phillips screwdriver will allow them to retain that coiled shape, making for a neat installation.
When working with smaller electrics, long servo wires can really become a problem-they tend to stick out like a bad hair day! Keeping these wires in line will generally involve taping or tacking them down in a number of locations, which adds more weight to the aircraft. One simple way to have some control over them is to wrap the wires tightly around a Phillips screwdriver and slide them off. This forms the wire into a tight roll that’s easy to tie down in one or two spots. Now the wires are under control and give your aircraft a nice neat look.
BORE HOLES WITH A BODY REAMER
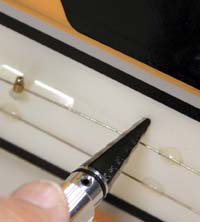
Body reamers, which can be found on the RC car side of the hobby shop, are great for boring holes in all kinds of material. Step ones like this let you make exact size holes.
Body reamers are great for making all kinds and sizes of holes in balsa, fiberglass or foam. If you get the one with dimensions on the reamer, you can cut the exact size you need. They also make neat cuts in the covering material.
USE HOT MELT GLUE
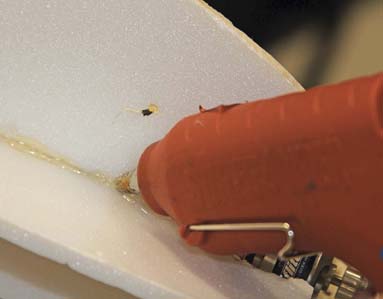
Using hot glue is a fast way to assemble any flat foamie. Use sparingly because it will add some weight rather quickly.
When you need to build a foamie fast, which is any time you build a foamie, consider using hot melt glue. This glue is easy to use; bonds well to foam and will set up almost instantaneously. The glue fills in any gaps, remains semi-flexible and never becomes solid, which is good for planes such as foamies that are always flexing. Be sure to use the low-temperature hot glue; this will stick without melting the foam.
LET’S DO THE TWIST
For foamie airframe assembly, do the twist. Twist carbon-fiber rods into the foam like a drill bit and you’ll have less chance of tearing or wrinkling the foam when installing.
THE PERFECT WRINKLE REMOVER
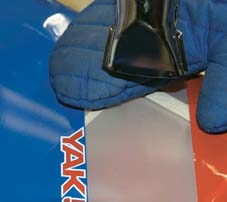
Using an oven mitt after the heat gun will guarantee good contact of the heated glue onto the balsa.
All ARFs will require some heating to shrink down the covering and remove the wrinkles. The covering iron will do a good job, but may leave marks on the covering, even when you use an iron sock. Try using a heat gun set to the low setting to quickly remove any wrinkles. But don’t just use it and rely on the air to seal down the covering to the wood; that won’t happen. You’ll need some pressure on the covering to create a solid bond between it and the wood. This is where an oven mitt comes to the rescue. A good-quality oven mitt will allow you to follow the hot air of the heat gun with some hand pressure on the covering. While the glue is hot, the pressure from your hand will seal the covering down on the wood and the soft material of the mitt will cool the covering and make it bond right away. Use this method to remove wrinkles and you’ll prevent any possible scratches on the covering.
DON’T FORGET TO FLOSS
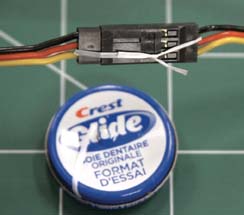
Dental floss makes a great servo retainer because it’s easy to use and strong. This connection will remain together until you cut the floss.
Dental floss is great to keep your teeth and gums clean. But it’s also great as an inexpensive keeper for servo extension; just thread it in between the wires and tie it tight. Dental floss is strong and it will stay there until you cut it off. It’s also much easier to use in the field compared to tape or shrink tubing.
CLEAN YOUR CA TIPS
Keeping the CA glue tip clean is a problem for all hobbyists. They just don’t stay clear for any length of time. One way to rectify that problem is to get a jar and fill it with acetone. Take the CA tips and drop them in the acetone overnight. By morning, they should be as good as new!
FLIGHT CONTROL CHECK
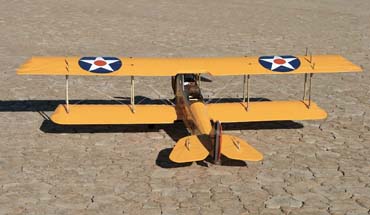
When checking the control direction, stand behind the plane like this.
To ensure a successful flight, always do a control throw/direction check before flight just to make sure you don’t have reversed controls after the takeoff. Stand behind the plane and move the stick to the left and right; the aileron should move up on the side of the wing that correlates to the stick movement. Then move aft-elevator
stick and the elevator should move up, forward stick and the elevator will move down. The rudder should match stick direction. Double checking this will help to ensure a successful flight.
THREADING TUBES
When running thread or wire through tubing for a pull-pull setup, use a thin and long length of carbon-fiber rod taped to the thread as a “fish tape.” No more struggling with a weight at the end of the string or bunching the thread up in the tube.
WHEN TO TRIM THE RUDDER

To trim out the rudder, watch what the plane does while banking during the figure-8s.
Almost all planes will need some rudder trimming, but how do you know? One way to find out is to fly the plane in a horizontal figure-8 and see how it reacts. If the plane drops while making a left turn but climbs when making a right turn, then you need some right rudder. If the plane drops while making a right turn while climbing when making a left turn, then you need some left rudder.
PRECISE GLUING
To place glue into tight places and corners, use a hobby syringe. These syringes work with epoxy, wood glue, Gorilla Glue and even silicon seal (in most cases one time use). If the wood glue or epoxy is too thick, thin it a little using water and alcohol respectively. Syringes are great for things like hinges slots and filling holes with glue.
SEALED EDGES
Ever had heat-shrink covering that just keeps coming up no matter how many times you reseal it with the hot iron? You can help to prevent this from starting by wiping MonoKote trim seal around all the edges when the plane is new. But after the trim starts coming up, just use a small drop of CA glue under the loose covering. Hold it down and hit it with a small spray of accelerator.
GET A CONTOUR GAUGE
A contour gauge is a tool that every modeler should have. They’re great for shaping the cutouts in the spinner. If you need a new former for the inside of the fuselage, just use the contour gauge to get the shape of the fuselage on the outside and reduce it by the thickness of the sheeting. Now you have a piece that’s a perfect fit on the inside!
TRIM STEPS

The trim steps are shown in this menu. The ailerons are set at 10 (coarsest), which will move the ailerons the most distance with each click. The elevator and rudder will have much smaller movement with each click.
Trimming up your plane is an extremely important procedure to perform during the first flight. There will, however, be times when the plane will just not track correctly. For example, the plane may want to climb so when you add in one click of down, the plane will start heading for the ground. The only issue is that your trim adjustment sensitivity is too large. Most radios today will allow you to adjust the trim steps so that they are not so large. Of course, this will require more clicks on the trim tabs to move the control surface the same distance. When you first fly the plane start out with larger trim steps, that way you have some control surface movements to trim out the plane initially. Once trimmed, set the steps to smaller movement and refine out the plane trimming.
GLUING SERVOS
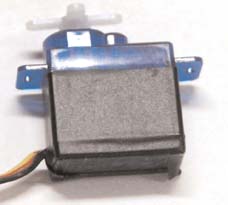
Using electrical tape around the servo will prevent any glue from seeping inside and sticking to the servo body.
With flat foamies and other small park flyers, it’s easier to glue down those small servos than trying to screw or bolt them in. The only problem is that no matter which type of glue you use, CA, epoxy, silicon seal, Goop or hot glue, you’ll always have a mess to wipe off the servo when you pull it out to use in another plane. The best way around that is to use tape around the body of the servo so that when you have to take it out, just remove the tape and you have a clean servo. I like using electrical tape because it forms a glove-like fit and gives a nice tight seal around the servo that won’t let any glue seep in.
O-RING ALTERNATIVE
Sometimes it’s rough finding the right size O-ring for the park flyer prop savers. A great alternative is to acquire lengths of surgical-type tubing from a hospital supply house. From this you can cut lots of O-rings to any thickness. This stuff has more elasticity and will last longer than the regular O-rings.
LEVELING THE WINGS

When flying toward yourself like this, the controls on both the rudder and ailerons are backwards. This requires much more concentration from the pilot.
Flying the plane away from you makes it is easy to control (at least somewhat) because when the stick is pushed to the right, the plane goes to the right. The same holds true when pushing the stick to the left. But when the plane is coming back at you, everything is reversed. A simple trick to move the wings back to level after making a turn is to move the stick to the low wing. For example, if you’re looking at the plane as it’s heading toward you and the left wing (actually the right one) is low, then move the aileron stick on the transmitter to the left and the wing will straighten out. You can then release the stick when it is level.
So, there you have it, 19 modeling tips that will make your life easier! Just think, if one of these saves you 10 minutes, it made reading this article worth your while. Enjoy!


A small ball of cotton and string can be drawn through a plane with a vacuum cleaner and use to pull servo wires or pull-pull lines into the model.
When something fails in flight, keep trying to fly the plane. Its not hopeless until it hits the ground.
[When something fails in flight, keep trying to fly the plane. Its not hopeless until it hits the ground.]
you sure have that right! I’ve saved many by not giving up.