
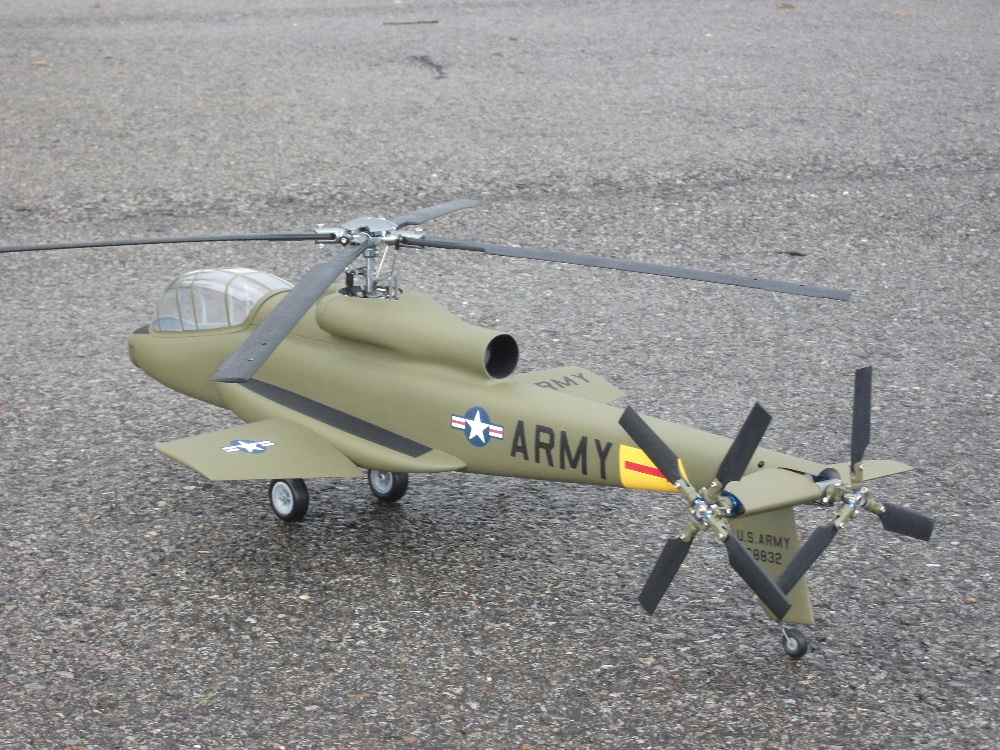
BUILDING THE MECHANICS:
As noted in my intro posting, my first priority for my 700-size Cheyenne project was to build and test fly the mechanics. After all, if I couldn’t get the outrigger tail and variable-pitch pusher prop to work properly, what was the point?
First decision was choosing the basic mechanics. Although this is nominally a 700-class helicopter, I wanted to use “stretched” 600 mechanics which would more easily fit into the slender scale fuselage. Stretching 600 helis is a fairly common practice. All that’s required is to install a longer tail boom, mount 700-class main and tail rotor blades, and upgrade the motor to a 12-cell unit of sufficient power capacity.
After considering a number of options, I settled on mechanics for the Blade 600 X. I made this choice for three primary reasons:
1. First and foremost, the stock tail unit, which would be the heart of the complex tail drive, is unusually stout for a 600-class heli. The large side plates and beefy bevel gears would lend themselves to the necessary modifications.
2. The 600 X overall has pretty robust construction for a 600-class machine; the rotor head can easily handle 690mm blades, the frame is very stout, and the stock motor is already 700-class.
3. Finally, it happened that I had a spare 600 X kit in the closet and a large stock of spares. While not the primary criterion on a project of this magnitude, it’s always nice to be able to build from hardware you already have on hand.
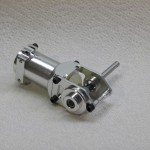
TAIL UNIT PART 1:
Since the tail unit is the star of the show where the mechanics are concerned, that was a natural place to start. I disassembled the stock tail drive and took detailed measurements of the side plates. These were used as the basis for designing new parts in Rhino. These parts were CNC machined and then the standoffs were machined from 5mm aluminum rod.
The tail rotor and pusher prop shafts were made from finish-ground 5mm stainless drill rod. As the photos show, the ends of these shafts had to be specially modified to mate with the stock gears. The tail unit fit together perfectly, and the next step was to complete the main mechanics.
-
- The stock Blade 600 X tail unit is relatively stout and makes a good basis for the complex tail drive.
-
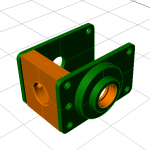
- The new side plates and the bearing block for the pusher prop shaft were drawn in Rhino and CNC machined.
-
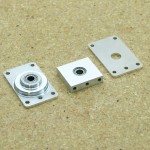
- Here are the new tail unit parts after being CNC machined.
-

- The 600 X stock tail rotor shaft has flats machined on the end and is drilled for a 1.5mm dowel. To use the same bevel gear, I had to copy this pattern in reverse.
-
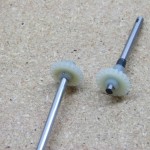
- Here’s the new tail rotor shaft alongside the stock part. With the flats and 1.5mm dowel the gear mounting is extremely strong.
-
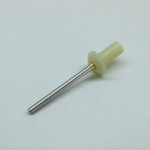
- The pusher prop shaft was a challenge because the 5mm drill shaft was too loose in the bevel gear. I fixed this by press-fitting it into a brass tube and in turn pressing this into the gear. Last of all the gear and prop shaft were drilled for a 1.5mm dowel.
-
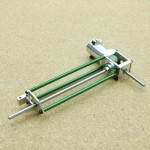
- Here’s the tail unit trial assembled. Next up is adding the pitch control linkages.


Hi Jim Iam a retired lockheed employee who worked on the Cheyenne program as my first assignment. Iam very interested in your project and would like to know if you plan on developing this into a low production kit for purchase? Also I would like more info on your first small Cheyenne. Thanks so much this brings back many memories.
John Glembotski
Hello John,
Very cool that you had a chance to work on this ground-breaking project. The plan is to make available molded fiberglass parts once the project is completed. While I’m not in a position to supply CNC machined parts for all possible mechanics, we will make available 3D CAD files, and the 3D printed parts will be available through Shapeways. Please email for additional details: HeliTalk@RyanAircraft.net.
Jim
Hello Jim where can I buy one uinit of your cheyenne AH-56 with a push back propeller either 450 size or 700 size.
Hello Jack,
See comments above. Sadly, the 450 molds are pretty much at end of life, and I don’t feel comfortable trying to produce more parts from them. But I do plan to supply 700 size parts in the future.
Nice job Jim!
They have it on display Fort Rucker Army Aviation Museum.
Intetesting project. A little over a year since last posting. What is current status ? Has it flown?
Unfortunately, this project had to move to the back burner for a period of time, but I plan to resume work soon. The mechanics have been flown several times, and the handling is just as expected. At this point, the fiberglass molds are the next focus.