By
Kyle Matthew
Photos by
Laurel Matthew
(see below)
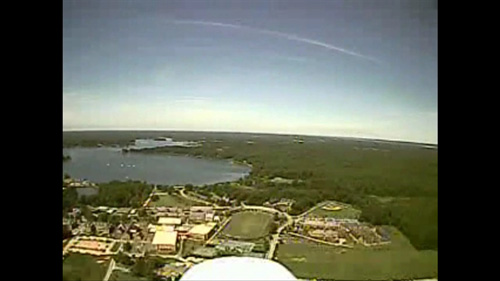
Have you ever been flying your airplane and thought to yourself, what a spectacular view it must be from up there. Now you can see for yourself! First Person View, FPV for short, is defined as remotely controlling a model aircraft by the pilot in command (PIC) by the use of an onboard video camera and wireless video transmitter which sends a live video image of the aircraft’s attitude in flight to a ground station consisting of a wireless video receiver and display devices such as a video monitor and/or video goggles. Although the concept of flying aircraft remotely via FPV has been around for over half a century, the adaptation of this technology for hobby purposes has only been around for a few years with a major surge in 2006.
For the average modeler FPV can seem quite complicated, expensive and intimidating. I’m here to tell you that getting into FPV is easier than you think. With today’s rapidly evolving technologies, FPV equipment is getting more user-friendly and less expensive. I’ll show you how I got a basic FPV system up and flying for under $500. Future articles will deal with upgrading the basic system for better performance, longer range and duration, higher quality video and other neat add-ons.
The Airplane
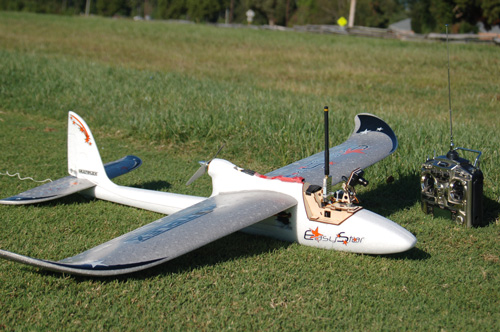
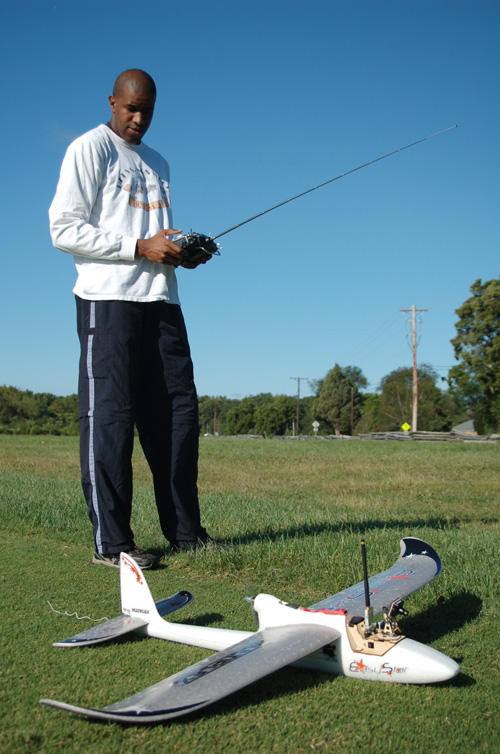
There are many different platforms in which to attach airborne FPV equipment, but the most popular is the Multiplex Easy Star. This airplane is very stable and easy to fly, plus the motor position (high and aft on the fuselage) accommodates the camera with a clear view. The Easy Star can be purchased as an ARF (almost ready to fly) or an RTF (ready to fly), which makes assembly, if any, very simple.
If you plan on using another type of aircraft here are some basic tips for choosing a good FPV platform. You’ll want the aircraft to have trainer-like flying qualities, which will provide a stable platform and longer flying times. A pusher-type configuration will keep the prop away from the camera lens and the motor away from the electronics, cutting down on interference. Also, you’ll want the aircraft to be able to carry the additional weight of the added FPV equipment.
The Easy Star was modified as follows to better handle the on-board equipment: I had a battery hatch carved underneath the fuselage (held in place by magnets), added ailerons, installed an EZ pod in place of the canopy, and replaced the stock motor with a brushless motor. If you do not add ailerons, you should enlarge the rudder for increased control authority. I also installed a GWS Be-Found—a small device that will beep when the transmitter signal is lost. This beep will help me locate the airplane if I’m forced to land far away from the field.
The Airborne System
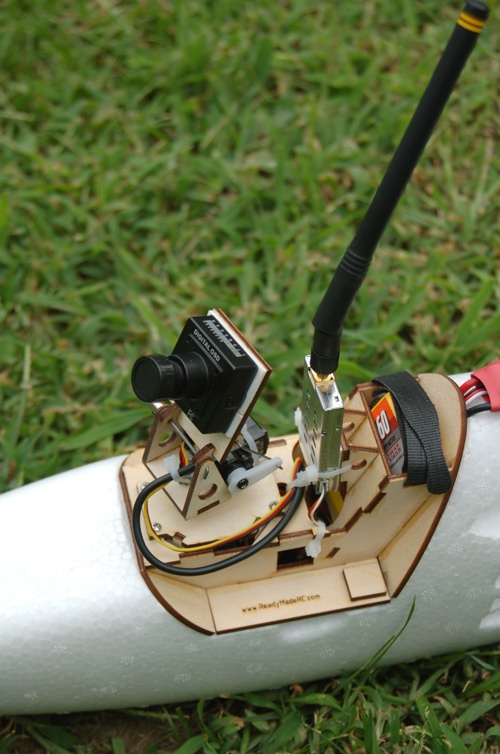
Once I had the Easy Star built, it was time to install the airborne gear. The plane holds the 900MHz 500mW video transmitter, FPV Pod with 180 degree pan/tilt for camera (with two servos), DPC 480A OSD camera, 460mAh 3S LiPo for transmitter, 2dBi whip antenna for transmitter, and 3A UBEC. Keep in mind all of this is in addition to the regular RC equipment already on board, which includes brushless motor, 2200mAh 3S flight battery, receiver, servos, and ESC.
So, where does all of this stuff go? Placement of the airborne video equipment is just as important as it is with regular onboard RC equipment. The video transmitter can’t be too close to the motor or receiver, the camera has to have a clear forward view and the center of gravity needs to be adjusted.
There are several manufacturers that make ready-made FPV pods that hold the camera, pan/tilt servos, transmitter and its battery. Readymaderc.com supplied my FPV pod, which includes a 180-degree pan/tilt system (I assigned the pan and tilt functions to the sliders on the sides of my Futaba 9C transmitter). It replaces the canopy and fits perfectly on the Easy Star. Other companies offer pods that fit various aircraft such as the Multiplex Easy Glider, Cularis Twin Star and Telemaster Electro, to name a few. If you decide to make your own setup, be sure to follow the guidelines above, forgoing the pan/tilt system will save weight and complexity.
The Ground Station
I’ve got my airplane setup, but that’s only half the equation. Next is the ground station, which can range from bare bones to ultra high-tech. I used a basic setup comprised of a standard 900MHz receiver, 750mAh 3S LiPo for power, a laptop for viewing and recording. A small LCD screen or video goggles could also be used for viewing, while a digital video camcorder with AV IN, portable DVR, or laptop can be used for recording. In some cases you’ll need a video splitter from the receiver to both your viewing and recording devices.
There are a few options when it comes to selecting a video frequency. The two most popular are 900MHz and 2.4GHz, but some others used are 1.3GHz and 5.8GHz. Each has its advantages and disadvantages. For example, 900MHz has no interference to or from 2.4GHz RC systems and propagates further given the same power output as 2.4GHz. On the other hand, all 900MHz video transmitters are “noisy” and can cause servo twitching in many servos; it can also interfere with some GPS receivers.
2.4GHz systems are usually newer electronics designs, which produce a slightly better video quality. Also, there are typically no problems with servo twitching and no GPS interference. However, using a 2.4GHz RC transmitter will significantly reduce range, even with frequency hopping systems. The system can also pick up interference on the ground if someone else is using a 2.4GHz RC transmitter or with nearby WiFi.
While flying FPV, you have to take three factors into consideration: 1) the power of your video transmitter 2) the sensitivity of your video receiver and 3) the power of your RC flight transmitter. These three factors will determine how far away you can fly and still be able to see video and control your aircraft. With my basic system I’ll only be able to fly approximately one mile (depending on terrain and obstacles) before video begins to drop out. At that distance, the airplane is too far to see visually, so a video drop-out will probably cause a crash. You must be mindful of your aircraft’s position at all times; this setup does not have a On Screen Display (OSD) to feedback distance from ground station readings or return home direction indicator. I would highly suggest using a spotter until you are intimately familiar with flying FPV. To get further distance will require upgrades to the three factors mentioned above; I’ll tackle those in future articles. Remember, this is a basic system and I am attempting to keep the parts count, complexity and price low.
Tips for Set up at the field
Before venturing out to the field for your first flight, make sure to thoroughly test everything at home. When the system is up and working, safely run the motor to see if you get any interference on the video signal. Try momentarily disconnecting the video cord to your viewing device, what does the screen do? How long does it take for the video to return? This simulates a hit to the video signal and it’s helpful to know how your
system will react in certain situations before the actual flight.
Packing up for the ride to the field is more of an art form than a science. I fit the Easy Star into a 43×19.5×6.7-inch plastic under-bed box, slightly modified to accommodate the tail and camera. The ground station equipment, including my airplane transmitter, is housed in an 18x6x13-inch metal tool case. That’s it, just two cases to bring to the field, not too bad! As you begin to upgrade your system, the parts count and size will steadily increase and you’ll need to start getting creative with your packing.
Once at the field, you’ll want some shade to better view your LCD or laptop screen. If you’ve decided to get the video goggles, use the provided sunshield to keep out any ambient light. I set up my laptop in the back of my SUV, this way I have shade as well as a 12V power supply. The standard receiver antenna can be placed on the ground or on a tripod; I chose to use a small tripod. Place the receiver in an area where it will have a clear line-of-sight to the plane. Make all of the necessary connections between the receiver and laptop, then power up the airplane. Don’t forget to start the recorder, if you have one.
Please see “The Rules” sidebar for setup and flying safety. The AMA and FCC have specific rules and regulations for flying FPV. Your local club may have rules as well, so if you plan on flying at your local field, make sure you are familiar with them.
Flying Techniques
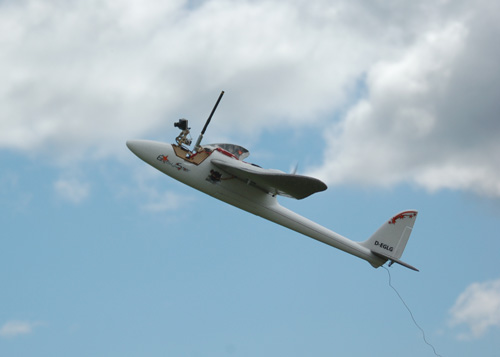
With the rules and regulations in mind, it’s time to get airborne. Use the first flight, without relying on the FPV system, to properly trim the airplane. The stock ready-to-fly weight of the Easy Star is one pound, 8 ounces, but with modifications and FPV gear added, the Easy Star weighs 2 pounds, 3ounces. It will fly differently with the extra weight; more wing loading equals a higher airspeed, so spend some time getting used to its flying qualities. Practice approaches are prudent now that there’s more to damage with poor landings.
The first few FPV flight should be done with a spotter nearby—preferably one attached via the trainer port. The spotter can take over if the pilot loses his bearings due to video drop out or a loss of visual reference.
At a safe altitude, get the plane stable and established on a known heading, then transition to flying from the screen. Make normal circuits around the field, picking out visual references to help with orientation. Things look much different from this point of view and it’s easy to quickly become disoriented. When it’s time to land, fly the airplane at altitude over the center of the runway or a known visual reference point (preferably something close and not directly in front of the sun). Now transition from the screen back to the airplane—it should be directly over the reference point or really close to it. Landings are made visually using normal procedures. FPV flying is just like anything else in aviation it requires practice, practice, practice.
Post Flight Debrief
After the equipment has been powered down, spend some time reviewing the recorded FPV flight. Take note of what you see and where you see it. These subtle clues will help in future flights with gauging distance and identifying reference points. Also note video quality and interference, if you are getting video hits in a particular location, especially in close, flying further away in that direction is probably not a good idea. Much can be learned from reviewing your flights, plus it just looks really cool.
Conclusion
Flight time with this particular setup is over 30 minutes with appropriate throttle usage. Power for the airborne FPV system and ground station will last well over one hour. I used a 900MHz video system to avoid any conflicts with the pilots at my club field, most of which use 2.4GHz radios. This setup is perfect for the beginner—it gives good flight time, a fair amount of range and is very affordable.
I’d like to give a special thanks to Tim Stanfield of readymaderc.com for his great equipment, hardware, Easy Star modifications (belly hatch and ailerons) and expert advice. He, along with a handful of other specialized companies, offers modelers an easy way to break into FPV flying. These ready-made FPV packages range from a single video pod to an entire airplane, complete and ready to fly.
Just when I thought this hobby couldn’t get any better, an innovative and exciting twist like FPV comes along and sparks a new interest. Now that you’ve been bitten by the FPV bug, the sky’s the limit. Fly safe, follow the rules and stay tuned for the latest and greatest upgrades.
GEAR USED:
RC GEAR
AIRFRAME: Multiplex Easy Star (multiplexusa.com)
RADIO: Futaba 9C transmitter, Hitec Electron 6 receiver, 4 Hitec HS-65HB servos (hitecrcd.com)
MOTOR: Turnigy HXT2835-2200 (hobbycity.com)
ESC: Turnigy Plush 30amp (hobbycity.com)
PROP: APC 6×5.5E (apcprop.com)
BATTERY: Zippy 2200mAh 3s1p 20c (hobbycity.com)
MISC: GWS Be-Found (gwsus.com)
Total cost (minus Futaba radio) = $240
FPV GEAR
CAMERA: DPC-480A Digital OSD (readymaderc.com)
TRANSMITTER: 900MHz 500mW, 2dBi antenna (readymaderc.com)
RECEIVER: 900MHz standard (readymaderc.com)
TX/RX BATTERY: Rhino 460mAh, 750mAh 3s1p 20c (hobbycity.com)
LAPTOP: Sony Vaio VGN-FZ240E (sony.com)
VIDEO CAPTURE: EasyCap USB 2.0 with Ulead video capturing software (usbfever.com)
MISC: FPV Pod with 180 degree pan/tilt with 2 HS-65HB servos (readymaderc.com)
Total cost (minus the laptop and upgraded HS-65HB servos) = $255
Total cost of entire setup = $495
Note: I used Hitec HS-65HB servos for their high tolerance to 900MHz video systems. Make sure to test all servos for their tolerance to 900MHz video systems before flying.
THE RULES
AMA
With the sudden increase in popularity of FPV flying, the Academy of Model Aeronautics (AMA) added a special section in their National Model Aircraft Safety Code. Section number 550 deals specifically with FPV operations at AMA covered flying sites. It states:
1. An FPV-equipped model must be flown by two AMA members utilizing a buddy-box system. The pilot in command must be on the primary transmitter, maintain visual contact, and be prepared to assume control in the event of a problem.
2. The operational range of the model is limited to the pilot in command’s visual line of sight as defined in the Official AMA National Model Aircraft Safety Code (see Radio Control, item 10).
3. The flight path of model operations shall be limited to the designated flying site and approved overfly area.
4. The model weight and speed shall be limited to a maximum of 10 pounds and 60 miles per hour.
FCC
The Federal Communications Commission (FCC) has issued six types of license operator class, each authorizing varying levels of privileges. For the purposes of operating FPV you’ll need the lowest class of operator, Technician.
The privileges of a Technician Class operator license include operating an amateur station that may transmit on channels in any of 17 frequency bands above 50 MHz with up to 1,500 watts of power. To pass the Technician Class examination, at least 26 questions
from a 35 question written examination must be answered correctly. Technician Class licensees also have privileges in four amateur service bands in the HF range (3-30 MHz).
No license is required for 2.4GHz or 900MHz in the USA, but only if you use extremely low power levels (0.5mW or less). A license is required for 500mW-1W, commonly used for FPV because of the increase in range.
More information can be found on the AMA and FCC websites:
(AMA) http://www.modelaircraft.org
(FCC) http://wireless.fcc.gov/services/index.htm?job=service_home&id=amateur