
Flying an aircraft upside-down can be challenging. Typically, this is because you need to push on the elevator stick and apply down-elevator to maintain altitude, which may seem odd at first. Depending on the bank angle that is established at the start of the maneuver, rudder input is needed to maintain altitude as higher bank angles require larger amounts of rudder. Like all things in life, though, these control inputs will become second nature with proper practice techniques.
BEFORE WE BEGIN
For a maneuver like the inverted circle, the “low-rate” settings recommended by the factory will generally prove to have enough control throw. If your aircraft did not come with an instruction manual, however, start off with 15 degrees of control-surface deflection on all control surfaces.
During the inverted circle, you may feel that you are only briefly touching the elevator input to initiate the maneuver and the airplane responds more quickly than you’d like. Adding exponential to the elevator will soften the plane’s response and make it feel smooth and more connected to your input. Add this percentage in small amounts, then take to the skies and pay attention to how the aircraft responds.
Now that the control throw and exponential values are set, let’s take a look at the center of gravity. For a maneuver like this, if the plane’s center of gravity is too far back, it will have a tendency to climb while inverted. This flight characteristic is highly undesirable as the airplane will become rather unstable at times. If this is the case, shift the flight battery forward in small increments until the airplane reacts exactly as desired. I like to fly parallel to the runway at full power and then roll the airplane to inverted to take note of the tracking. If the airplane dives slightly, the center of gravity is perfect. If it dives excessively, it is nose-heavy and the flight battery should be moved rearward. If it climbs, the flight battery should be moved forward as the aircraft is tail-heavy.
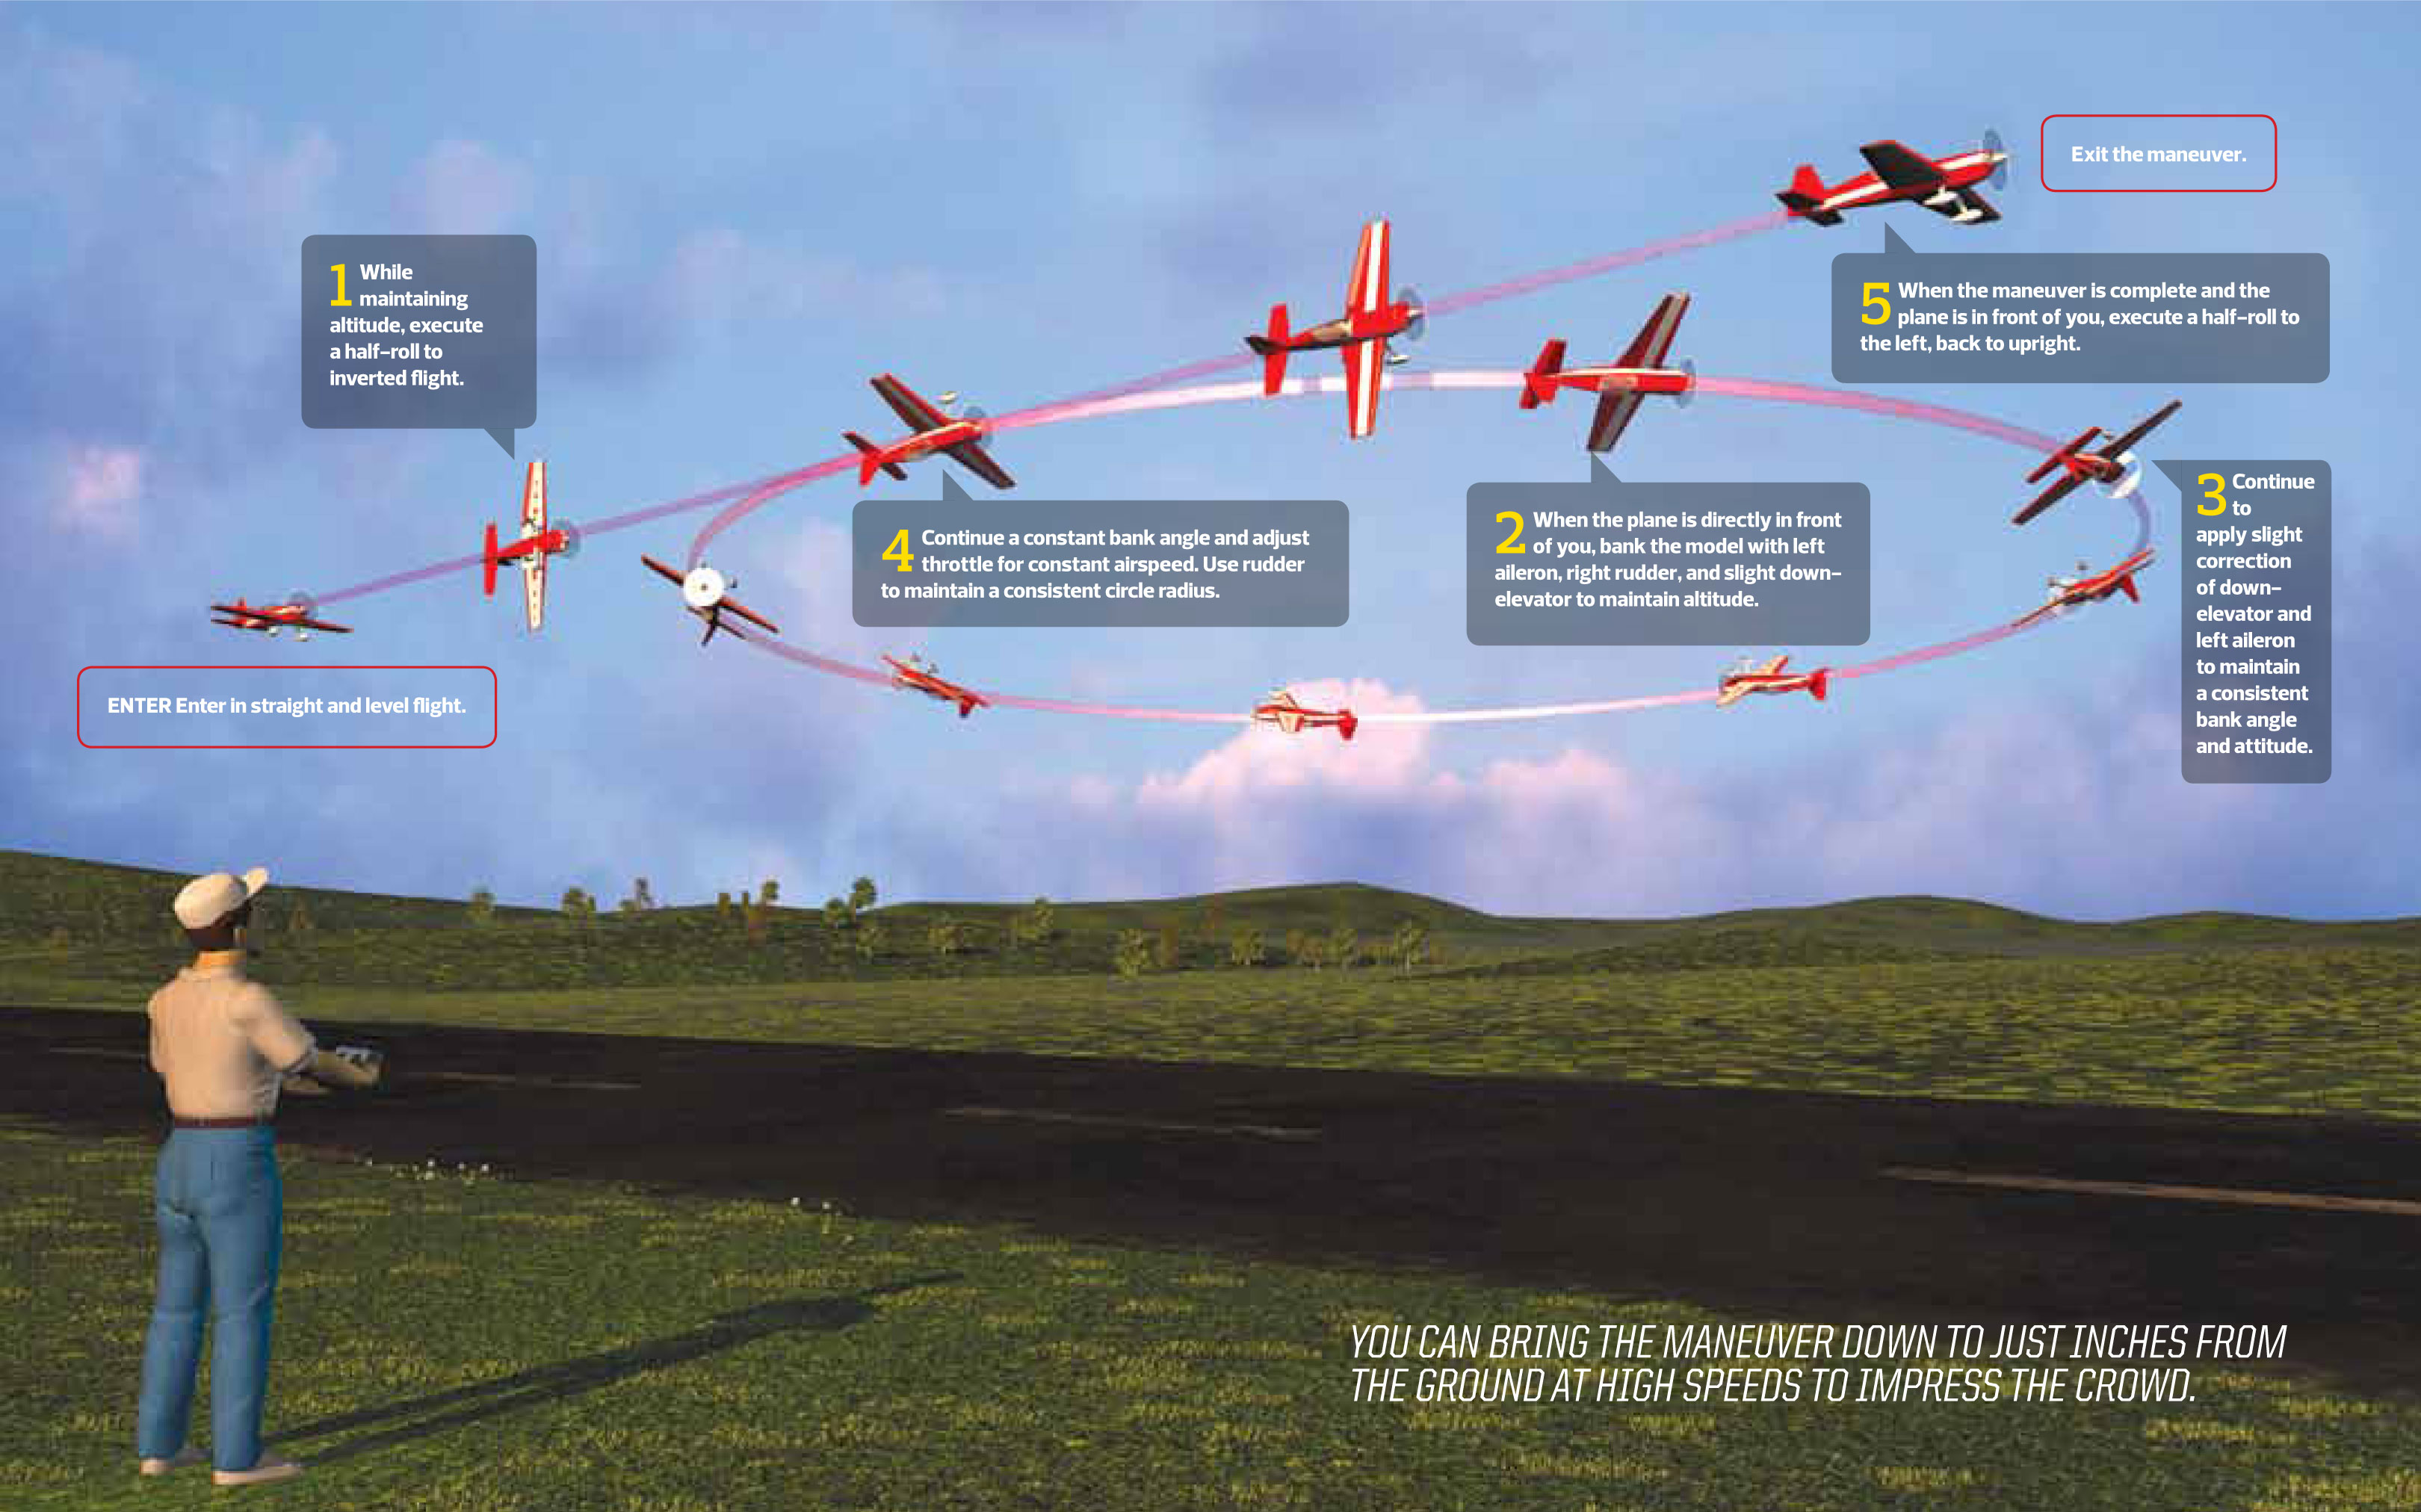
INVERTED CIRCLE OVERVIEW
With the aircraft flying upright and parallel to the runway at a moderate speed, perform a half-roll before it passes you. Then input a little aileron to initiate the bank, followed by down-elevator to start the circle. You’ll need to vary the amount of elevator and aileron input to maintain a constant bank angle and altitude. It is important to reach the cardinal points of the circle, and some rudder input may also be needed to keep the turn coordinated (i.e., keep the nose of the aircraft in the turn). Once the airplane is directly in front of you and has completed the 360-degree turn, it can be rolled to upright level flight. Now, let’s divide this stunt into four separate steps:
STEP 1
Orient the aircraft so that it is parallel to the runway and approaching you (i.e., the “center” position). At about 100 feet before the airplane reaches center, apply 60% power and begin the half-roll to inverted flight. In this example, a left half-roll will be executed, so a touch of left aileron will be applied to roll the airplane inverted.
STEP 2
When ready, bank the airplane by applying a touch of aileron input. Since the airplane is traveling from left to right and rolling left, bank it 15 degrees and then input elevator to start the circle. After the first cardinal point is met, the nose of the aircraft should be pointed out 90 degrees from where it began. Apply elevator and aileron input to maintain a constant bank angle and to maintain altitude until the second cardinal point is met.
STEP 3
The maneuver is now 50 percent complete. Continue a constant bank angle and apply throttle as needed to maintain airspeed. For the best aerobatic presentation, constant speed is mandatory. Also, depending on the bank angle of the aircraft, rudder input may be needed to maintain altitude.
STEP 4
As the airplane approaches the last cardinal point, it should be directly in front of you. At that point, roll the airplane to inverted flight by applying a touch of aileron input in the opposite direction of the bank. This will get the airplane back to inverted flight and parallel to the runway. You can then either stay inverted or perform a half-roll to upright level flight.
Click to enlarge
Like all maneuvers, practice is mandatory. A maneuver like the inverted circle can become somewhat tedious as the orientation of the airplane may become difficult at times for the aerobatic newbie. Most will experience some orientation issues when the aircraft nears the 75 percent completion point as the airplane will be headed toward you. At this point, it is important to know proper roll directions and what elevator input is needed to maintain altitude. Keeping the airspeed somewhat low and having a generous amount of altitude is beneficial and will give you time to respond to various corrections that may be needed.
FINAL THOUGHTS
You have now learned not only how to properly program and set up your plane but also how to perform the inverted circle. When you’re familiar with your airplane, its orientation at all stages of the maneuver, and the inputs needed, you can bring the maneuver down to just inches from the ground at high speeds to impress the crowd. Inverted flight is always a showstopper.
By John Glezellis Illustration by FX Models


As a Mode 1 flyer who flys with thumbs on sticks, I was taught to ‘push from behind’ when inverted. This helps prevent the accidental ‘up’ elevator if panic sets in.
It’s worked for me so far….