

Scale competition is a segment in this hobby that I really enjoy. Like many, I grew up wanting to be a fighter pilot, but when I had to get corrective contact lenses in junior high school, those dreams ended so I decided to become an aerospace engineer instead. A big part of why I enjoy scale modeling so much is that it provides me the opportunity to fly and experience the airplanes I would otherwise never get to experience in full scale. So, when the U.S. Scale Masters Championships came back to California in 2019, I knew that I wanted to give it another go.

In the absence of a fresh new competition airplane, I wanted to give the championships a try with my Jet Hangar Hobbies A-7 Corsair II, but to be competition ready, it needed a few upgrades. Most notably, the airplane needed a whole new cockpit with the proper model ejection seat, along with some additional details on the landing gear and around the airframe. These were things that I had wanted to do for quite a long time, so it was a good excuse to get them done at last. After all, you know what they say, a scale project is never done … you just stop working on it!
For this article, let’s talk about the cockpit and the finishing techniques used. I used a combination of traditional techniques and 3D printing, but the finishing and painting methods are applicable to any type of cockpit model, foam, plastic, or otherwise. With the advent of 3D printing it has simplified the process for scratch building many detail parts and that’s especially true for cockpits.
A New Cockpit
Although the cockpit isn’t a heavily judged part of a model in competition, a nice looking cockpit can completely transform the looks of a scale model. In the case of my A-7, I was never happy with the original one that I had built as it was something that I had rushed to put into the airplane. Plus, with the model representing a late-model A-7 Corsair II from Desert Storm, the seat was completely wrong for the airplane. Not that anyone would ever know (including the judges), but the problem was that I knew!
I dusted off some old silicone molds for the cockpit panels that a friend had given me many years ago along with some additional molds that I had made for some of the additional detail parts and made new resin cast parts. Additionally, using Rhino 3D I modeled up the correct SJU-8 ejection seat for the late Navy A-7E Corsair II. 3D CAD modeling is very much a process and takes time to learn, but is essential when you want to make your own 3D printed parts. The seat started with a 2D drawing which I used to create the 3D CAD representation.
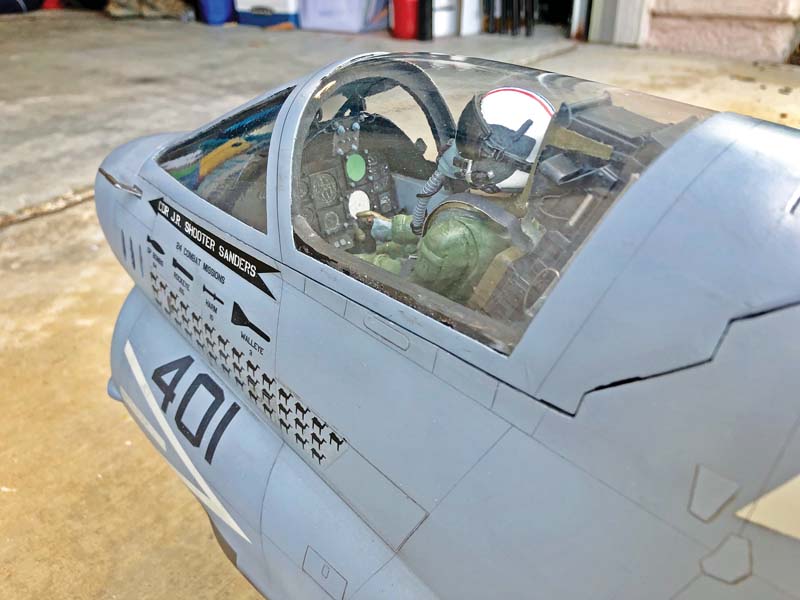
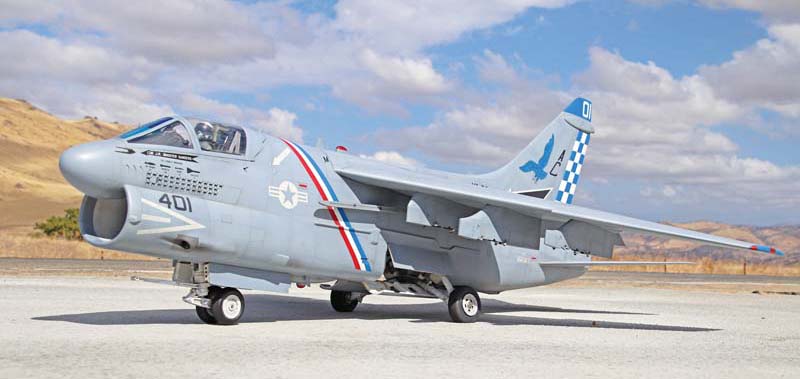
The completed cockpit installed in the A-7 and ready for duty!
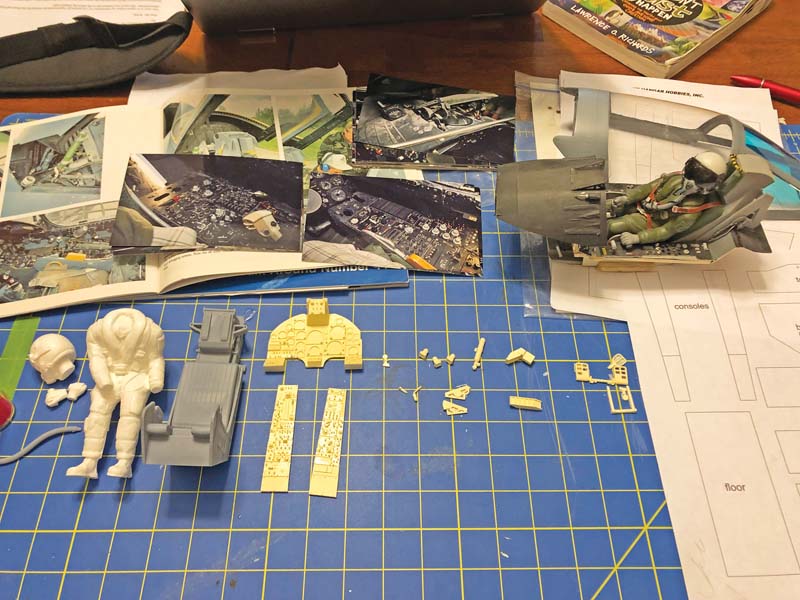
The process starts with collecting the parts (weather vacuum-formed plastic, 3D printed, etc.) and resource material. The goal is to simulate as best as feasible the full scale aircraft as represented in the pictures.
I created the instruments with downloaded instrument images. I printed them onto laser-printable white vinyl, cut them out using different sizes of sharpened brass tubes and then placed them onto each of the instrument faces.
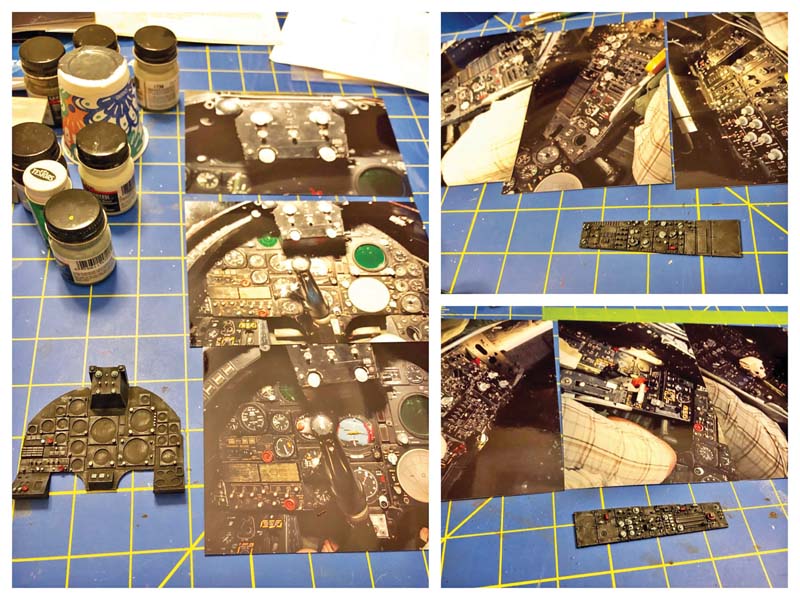
I spray-painted the instrument panels and console flat black and then dry-brushed a lightened black mixture (dark gray) over the panels to bring out the detail. From there, I brush-painted each of the individual knobs and switches as appropriate the match the reference material.
3D Printing & Painting
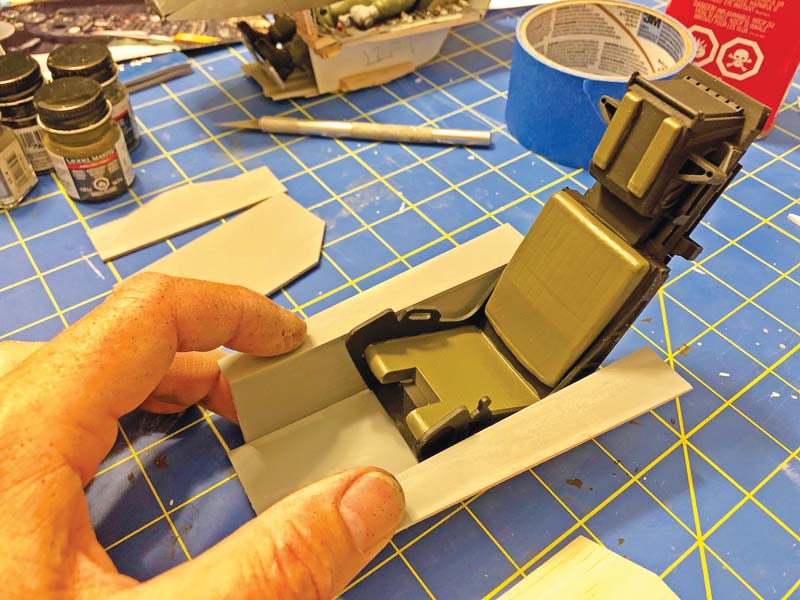
The ejection seat was printed using an Anycubic Photon Liquid Resin SLA 3D printer. The beauty of resin printing is the extreme level of detail that can be captured compared to a traditional extruded plastic printer. It’s a smelly and messy process, but the results are quite incredible as you can get a very small layer height in the print which means you don’t get the striations in the parts either. So the finish is very smooth requiring no prep before painting; it literally looks like a plastic model fresh off the printer.
To paint the seat, it was first spray painted flat black using Model Masters Enamel. From there, the seat cushions were brush painted Olive Drab and then allowed to fully dry. To bring out the detail while also give the seat a weathered and used look, some flat white was mixed with some flat black to create a dark grey. Using this color, the black areas of the seat were dry brushed all around. For the green areas, a mixture of white and olive drab was used for dry brushing. This process really transforms the look of the seat considerably by adding depth and realism.
Cockpit Tub & Instrument Panels
To keep it light the cockpit tub was built from 1/16-inch balsa. I had templates available already from the previous cockpit so cutting the parts was quick and easy. They were assembled and glued together with CA and to make it paint ready, the wood was sealed by applying an even coat of medium CA over the exposed wood. It was then lightly sanded smooth with some 180 grit sandpaper and given a coat of primer. The primer was reapplied and sanded a couple times to produce a nice smooth finish before painting it the proper interior gray.
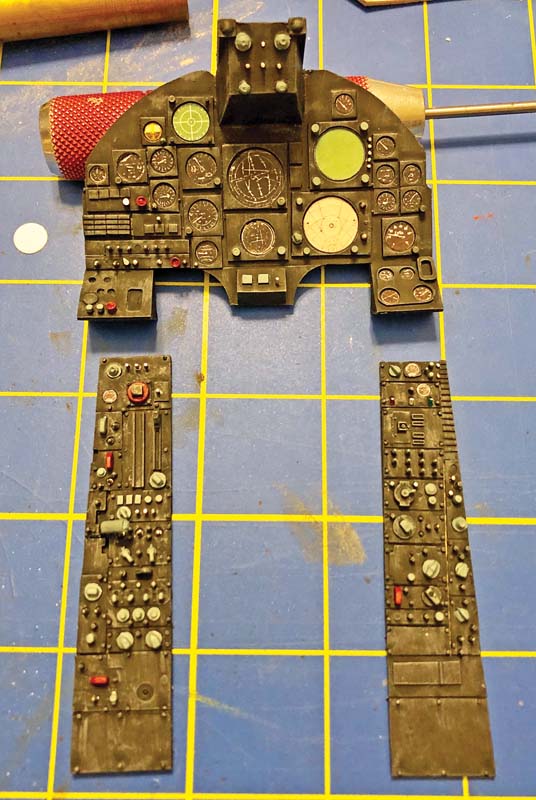
From there, it was a matter of painting each of the cockpit panels and then gluing them into the built tub. The panels were resin cast and had all of the details molded in. This simplified the work quite a bit. To paint the panels, I used reference pictures as a guide, and I painted them with a base color of black. From there, the panels were all dry brushed with the previously mentioned dark grey mixture to bring to life all of the molded in details. To finalize them, specific panel details were brush painted using the appropriate colors based on the reference pictures. It’s all about just spending the time to get it all correct.
To finish off the panels, the instrument dials were added. This was accomplished by utilizing a laser-jet printable white vinyl that I discovered in the process of looking for white water slide decal paper which ended up working out great! The instruments were created from downloaded images from the internet, sized in MS PowerPoint, printed on a laser printer and then cut from the sheet utilizing various sizes of brass tubes that I sharpened on one end. To sharpen the tubes, I used a bench disc sander to sharpen the outside edge and a hobby knife to sharpen the inside edge.
I built the cockpit tub out of 1/16-inch balsawood. To seal the wood, I smeared medium CA over the surface and when it dried, I sanded it with 180-grit sandpaper. After a few coats of primer (sanding between coats), I painted it.
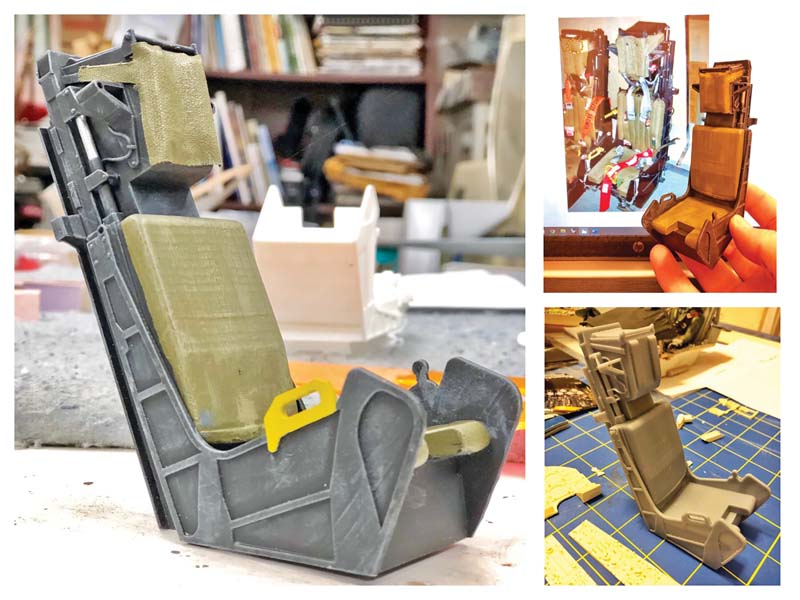
I first spray-painted the ejection seat black and then used a brush to paint all of the details in the desired colors. To finish it off, I lightened each of the base colors with white and then dry brushed over their respective colors. The dry brushing helps the details to pop and bring it to life.
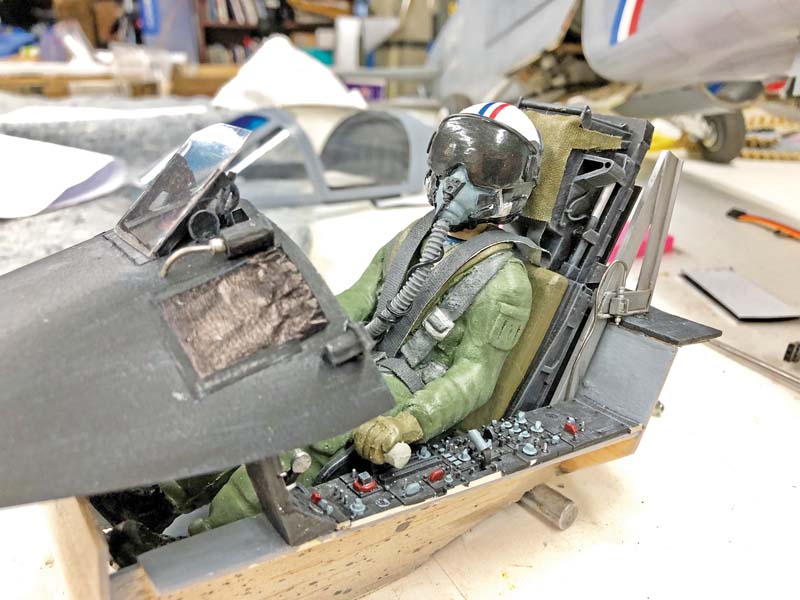
I made seat belts from Gaffer’s tape that I cut into thin strips with a hobby knife and a straightedge. I painted them dark gray before installing them. The tape provides a nice cloth/canvas look. I made the canvas head rest cover for the ejection seat the same way.
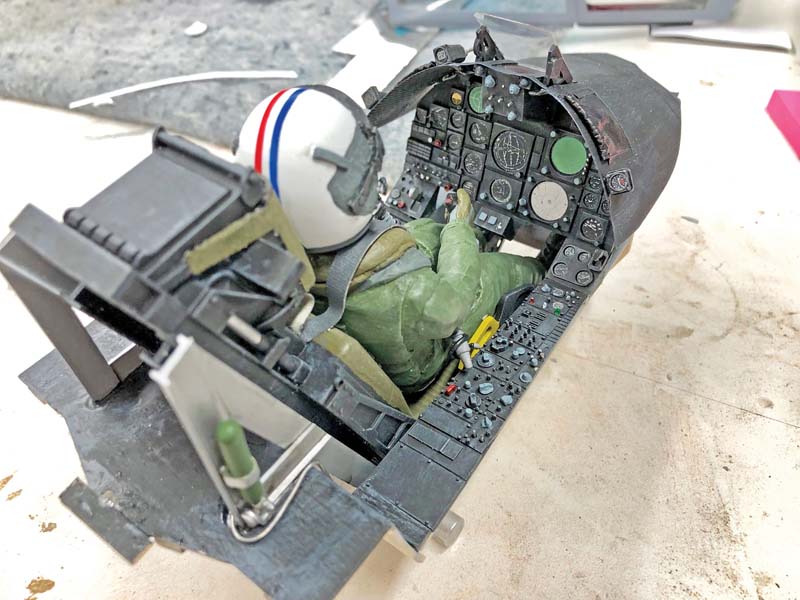
The final cockpit ready to install into the model. To finish it all off, I scratch-built the additional details on the seat (ejection rails) and panel hood out of styrene.
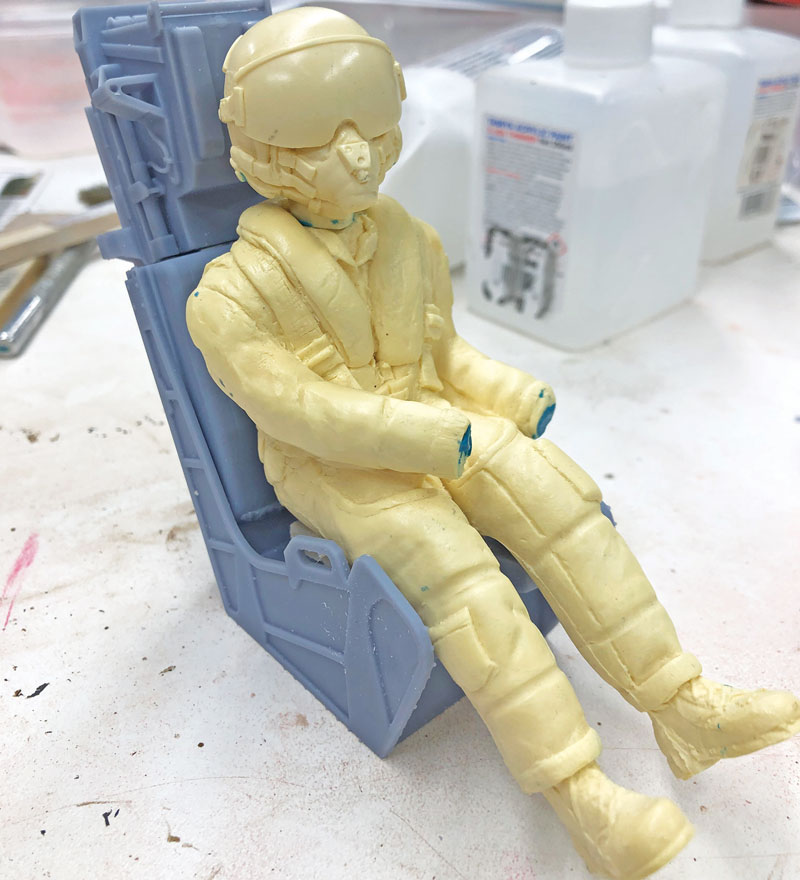
The ejection seat and pilot ready for painting. I 3D-printed the proper SJU-8 ejection seat for the late model A-7E on an SLA liquid resin printer; the pilot is the resin cast 1/10 scale pilot from jethangar.com.
Putting it all Together
With all of the cockpit components painted and finished, it was a simple matter of putting it all together inside the cockpit tub and sealing it all with a matte clear coat. Once the seat and panels were all glued in and the final details were added, I made seat rails from some strip styrene and painted them silver. I used a 1/10 scale Jet Hangar Hobbies full-body pilot and painted him using a combination of olive drab and medium green for the flight suit and other colors as required for the helmet, visor, and oxygen mask. The same dry brushing method using a lightened base color was employed to provide depth and color variation. To finish it all off, I made seat belts from Gaffer’s tape that I painted dark gray and cut into thin strips (the head rest cover was made from this material as well).
The goal in building the cockpit was to come up with something that looked better but didn’t weigh appreciably more. Following the completion and the necessary trimming to get it to fit, the weight ended up virtually the same as the original which I was extremely happy about!
Final Thoughts
I hope all this provides some insight into painting and finishing an already manufactured cockpit, whether it’s balsa, foam, vacuum formed plastic, or 3D printed. These techniques can be used in any case and doesn’t take much extra effort to really make the cockpit pop. Using dry brushing really brings out and highlights the details. Just take your time. The final result on my A-7 completely changed the looks of the front end of the airframe and I love it!
Text & Photos by Chris Wolfe


I flew with J.R. Sanders. He would be so proud to see this. Unfortunately he passed away at the beginning of February, 2021
I flew in DS from the Saratoga, we didn’t have any A-7’s embarked….well one day we caught one of the JFK’s A-7’s when they misidentified our carrier for theirs.
I sent the story onto a friend who actually flew the A-7 here is his comment:
Nice piece. I actually flew with JR Sanders. He was cag LSO in my nugget tour and we were the squadron he chose to fly with. I really looked up to him. Good guy. Actually, he just passed away two weeks ago.
RIP JR!
A master piece,well done.
You deserve your championship.