
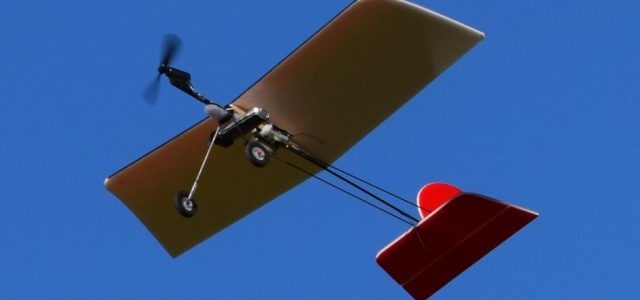
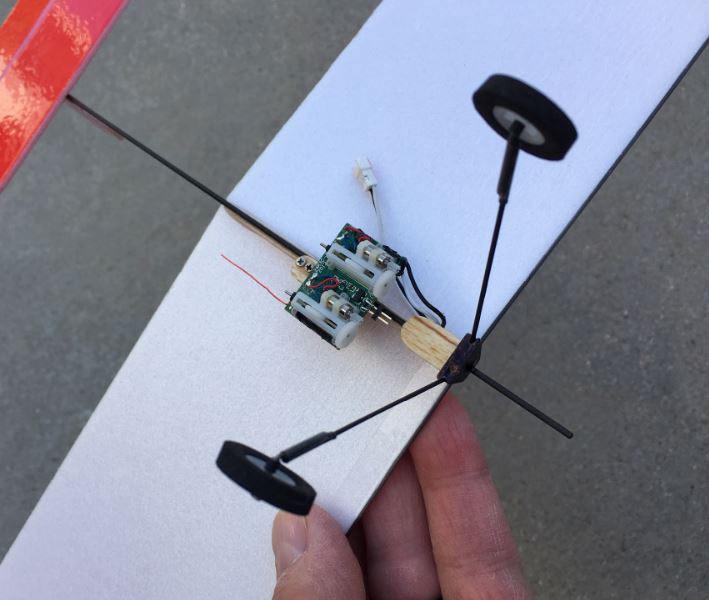
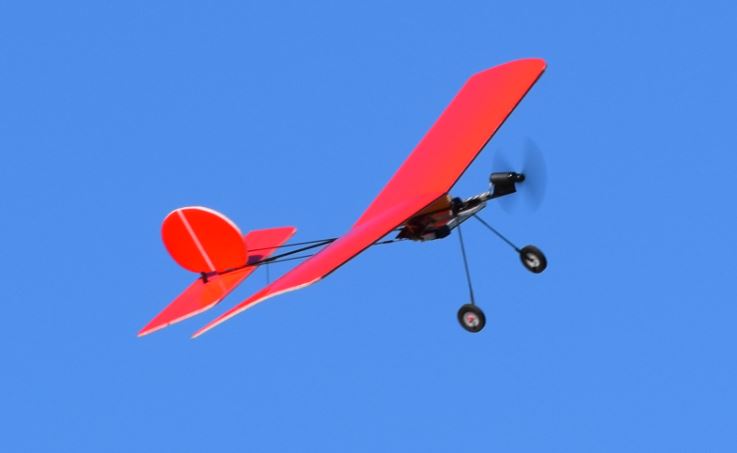
 This fun, easy to build front yard flyer is designed by Tim Bailiff, (Photos by Maggie Madril.)
 Ever since I was young, I have been drawn to small model airplanes. While my friends built big, I always built small. In those days my airplanes could best be described as smallish. However now, with brushless and coreless electric motors, modern batteries and micro-electronics, truly small (micro) airplanes are a reality!
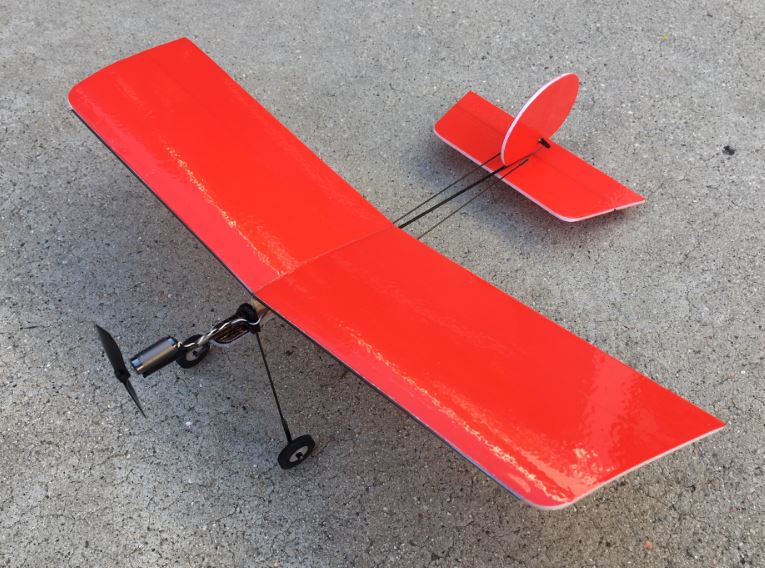
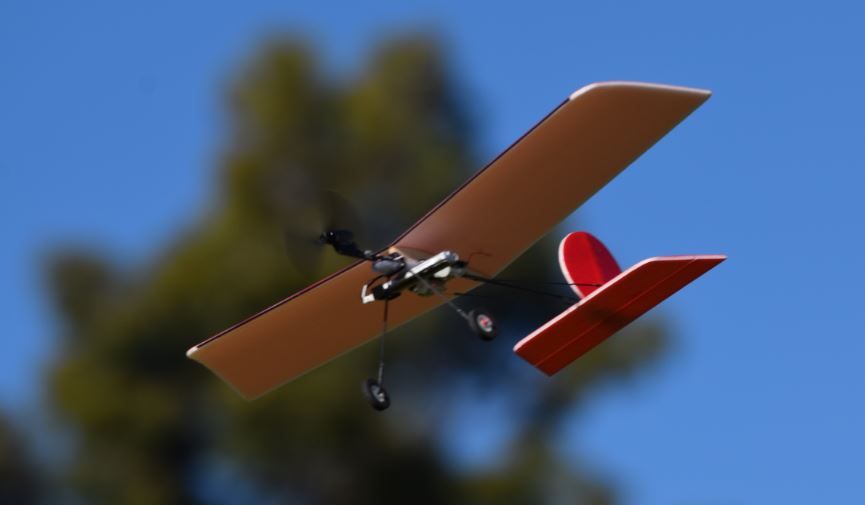
My goal was to keep it small, interesting and scale. Did I say scale? Well, yes. Electric flight enthusiasts will recognize the familiar lines of the popular “Slow Stick”. So using micro components taken from a Mini Vapor, I built a one ounce, 1/4-scale version which I named the Quarter Stick.
This miniature Stick really is loads of fun. It is super simple to build, fun and easy to fly and can be enjoyed both indoors and out. It’s just fun from start to finish. In addition, you’ll find it to be a great conversation piece at your flying field. So, if this all intrigues you, then read on.
Getting Started
Here are a few tips. First, I suggest you read through this entire article before you start building. Pay special attention to the material list, as you may already have much of what you’ll need. Also, try not to use an excessive amount of glue. Lighter models fly better, especially small ones! If you wish to color any wooden pieces, use permanent markers. Ink covers super well and weigh nothing! Pay attention to the CG (center of gravity). Finally, take your time and enjoy the build.
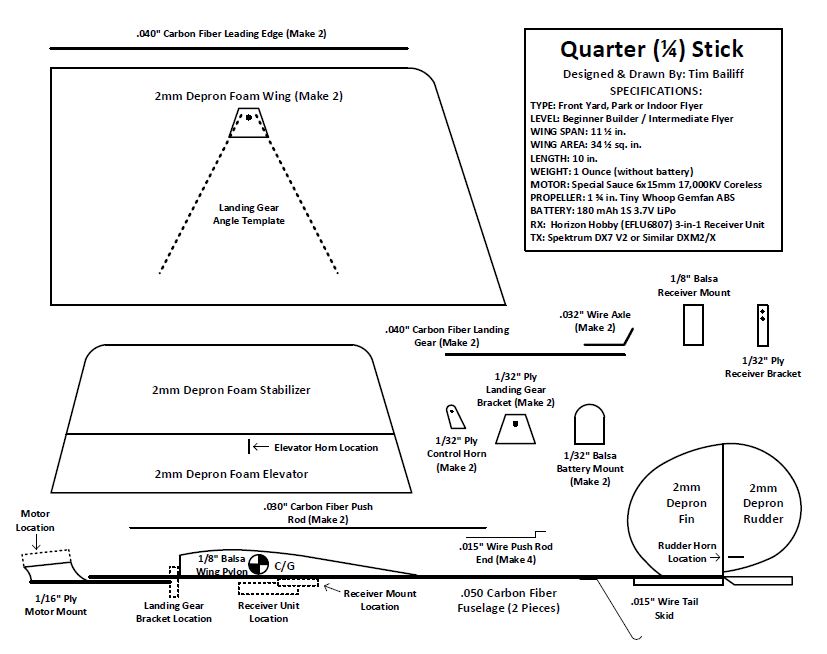
Free full-size plans/templates are on a single, easy to download, 8.5 x 11 inch sheet. Go to: (modelairplanenews.com/quarterstick).
To download plane, click below.
Material List
1) 1 Horizon Hobby (EFLU6807) All-In-One receiver unit.
2) 12 in.x12 in. 2mm Depron foam sheet.
3) 6x15mm Tiny Whoop Special Sauce coreless (17,000kv) motor.
4) 180mAh (or similar) 1S 3.7V lipo battery.
5) 1 ¾ in. (45mm) Tiny Whoop Gemfan propeller.
6) 1 roll 2 in. wide colored packaging tape
7) 1 roll 1 in. wide clear packaging tape
8) 1 roll 1 in. Blenderm medical tape
9) 12 in. .050 carbon fiber rod
10) 18 in. .040 carbon fiber rod
11) 12 in. .030carbon fiber rod
12) 12 in. 1/32 in. clear heat shrink tubing
13) 8 in. .015 in. piano wire
14) 3 in. .032 in. piano wire
15) 2 in. x 2 in. 1/32 in. plywood
16) 1 in. x1 in. 1/16 in. plywood
17) 2 #0 x 1/4 in. pan head screws
18) 2 GWS 5/8 in. Micro Wheels
19) .05 in. Male Nano-Connector
Obviously you will also need a Spektrum, or similar, DSM2/DSMX transmitter. You will also need 5 minute epoxy and CA (both thin and medium, plus kicker). There are also a few “scrap bin” items I will mention as needed. Now, if you find you must purchase something, I suggest you visit your local hobby retailer first. In these tough economic times I know they would appreciate your business. If, however, they fail to have what you need, the internet is always an option.
At the Building Board
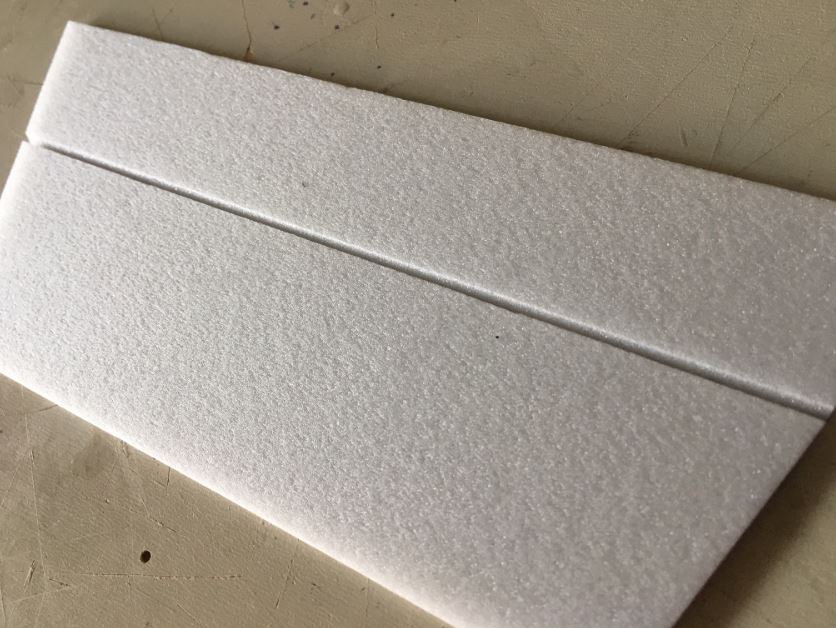
Use the plans as templates to mark all foam pieces on the 2mm Depron sheet. I suggest you join your left and right wings together and then cut them out as a single piece. Next, cut out your tail feathers. Take your time and try to make nice clean edges. Use the templates as a guide to remove the elevator and rudder where indicated. Now bevel (cut) both the right leading edge of the rudder and the underside leading edge of the elevator, back at about a 45-degree angle.
Hinging
Since you have them at hand, go ahead and hinge both your rudder and elevator to their respective stabilizers. Use sufficient lengths of ¼ inch wide Blenderm medical tape to cover their entire hinge lines. Hinge the elevator on its top side and the rudder on its left side. Be sure to leave a slight gap to allow for free movement in all directions.
Wing Prep
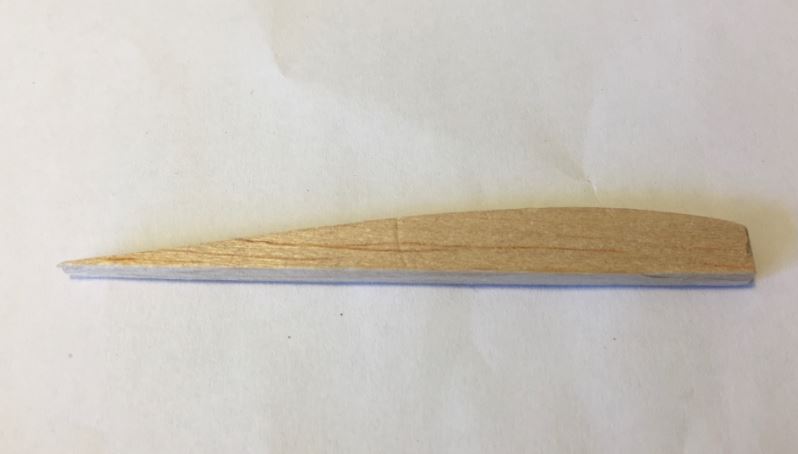
Now, let’s give your little wing its graceful airfoil. I suggest you first cut out your 1/8 inch balsa “Wing Pylon” to help you gage the correct airfoil shape. Said shape is crafted by carefully rolling the forward underside of the wing on a 1 ¼ inch dowel. I actually used a closet rod, but any similarly sized rod or dowel would work fine. Begin by placing the wing span wise along the top of the dowel.
Now gently, but firmly apply downward pressure from above, while slowly rolling the forward 1/3 portion of the wing back and forth. Allow the dowel to roll as well. Work carefully so you don’t crack the foam. Be patient. It may take a little time to get that nice even downward curve along your entire wing. When done properly, the top of your wing will remain smooth, but interestingly, you will find many micro creases have formed on the underside. That’s exactly what you want, because these tiny ceases keep that nice airfoil shape in place.
Next you will be prepping the wings for dihedral. Start by carefully cutting your wing exactly in half, giving yourself a left and right wing panel. Now prop each wing tip up 5/8 inch and carefully sand both center sections vertical and flat. Consider using the edge of your work bench as a guide. It doesn’t take much, so fine sand paper works well. When joined together, you should have a nice smooth joint with no gaps, but don’t glue together just yet.
Covering
Now it’s time to cover your wings and tail feathers. This is a very simple process using 2 inch colored packaging tape. I chose red because that’s the color of most of the full size Slow Sticks and I wanted mine to look scale. Obviously you can choose any color you’d like.
The little 3 inch wide wings are covered by carefully applying lengths of the 2 inch tape to the top of them span wise. It’s important NOT to change the shape of the airfoil or warp the wings. I suggest you support the underside of each wing as you cover it. Also, should the need arise, the 2 inch tape can be carefully removed from the foam, BEFORE it is rubbed down. That being said, after the first piece is successfully applied, carefully butt the second piece against it lengthwise. Work carefully and when you are satisfied, then gently rub the tape down…but don’t change the shape of that airfoil! Now trim neatly and your wings are done. BTW, I chose to only cover the tops of my wings, again keeping it scale.
Now, when covering your tail surfaces plan to do both sides. The method I found that worked great was to lay down a length of tape sticky side up and then gently set the little tail feathers onto it. If things don’t go as planned, you can carefully peal them off and try again. Once you are satisfied, then thoroughly rub the tape down keeping it flat and bubble free. Then, carefully trim the tape to shape, making nice clean cuts. Finally, flip over and repeat. BTW, you will find it covers over the Blenderm hinges nicely too. Done!
Wing Assembly
Now that your wings are covered, you can assemble them! First lay one wing down flat and secure to your building surface. Next apply a thin layer of 5 minute epoxy to the other wing’s center section. Now carefully align both center sections and gently join together. You will need to prop the unsecured wingtip up 1 ¼ inch for the correct amount of dihedral. Your wing joint should now be properly aligned, with no gap. Gently wipe off any excess glue and allow to set.
Ok, now add the two 4½ inch lengths of .040 carbon fiber rod to each wing’s leading edge. Begin by securing each rod in place with a very, light smear of epoxy. Also place a tiny drop where the rods touch in the center. Check for alignment as the glue sets. Then use a 1 inch wide 4½ inch length of clear packing tape to smoothly wrap each leading edge. This will greatly strengthen your wing and help minimize those unwanted leading edge dings and dents that invariably happen. Use the construction photos to help clarify.
Finally, while supporting the wing inverted, epoxy the 1/8 inch balsa wing pylon to the underside of the wing, right along the joint. Align the front of the pylon with the wing’s leading edge. Because you want it to secure both wing halves, use a sufficient, yet reasonable, amount of epoxy. Now, as the glue sets, be sure the pylon remains aligned, centered and is perpendicular to your building surface. BTW, you will notice the front of the pylon is ¼ inch higher than the rear. It is designed that way to provide the proper incidence for your wing.
Airframe Assembly
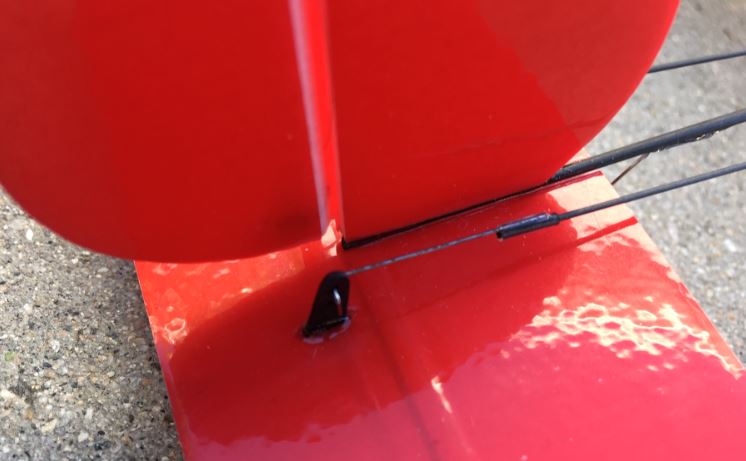
This is where your ¼ Stick really starts to take shape. Begin by cutting an 8 inch length of .050 carbon fiber rod. This is you fuselage. To the bottom side of one end, epoxy your horizontal stabilizer as indicated in the plans. I suggest you remove a very narrow strip of covering so the rod attaches directly to the foam. To the top of that same rod end, epoxy your vertical fin. As the glue sets, be sure your tail feathers remain straight, vertical and aligned.

Now is a good time to make and install your two 1/32 inch plywood control horns. Use your template page for the proper size and shape. The push rod holes are positioned as indicated and are .015 inch in diameter. The rudder horn goes on the left side of the rudder ¼ inch above the elevator. The elevator horn mounts on the top of the elevator ¼ inch to the right of the rudder. Use the templates to help with proper positioning. Note, they both angle slightly forward toward their hinge lines. Also, I used black marker to color mine before I epoxied them into place.
Measure back 1 1/8 inch from the very front of your carbon fiber fuselage rod. That is where you will position the leading edge of your wing and pylon. You can use either medium CA or epoxy to glue the pylon there. As the glue sets, be certain your wings remain level, aligned with the fuselage and the tail feathers. Be certain the pylon remains in position as well. Nice work!
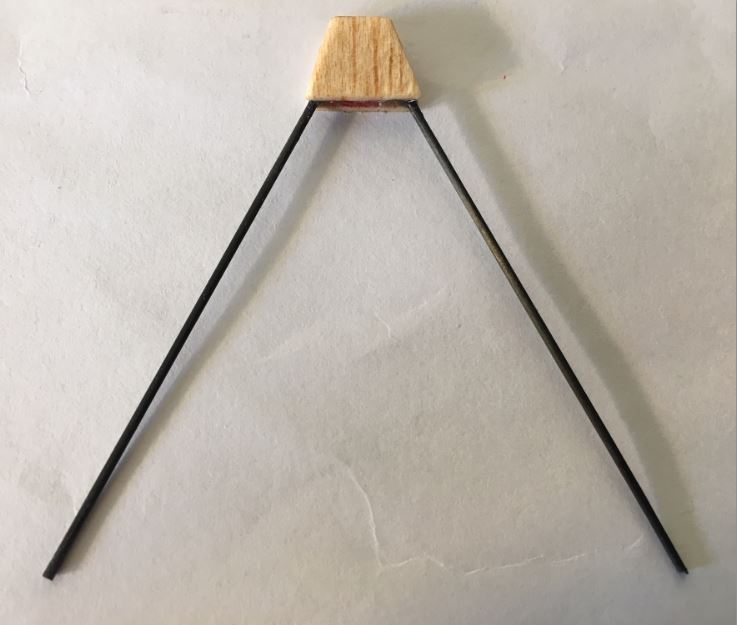
Landing Gear Assembly
The landing gear is up next. To start, locate the pattern on the template sheet labeled “Landing Gear Bracket”. Cut out two pieces using 1/32 inch plywood. The landing gear struts are made by cutting two 2¼ inch pieces of .040 carbon fiber rod. Now, using the diagram on the template sheet, sandwich the landing gear rods between the two ply landing gear brackets. Use enough 5 minute epoxy to completely fill the gap between the brackets. After the epoxy has set, sand off any excess glue and then drill the .050 inch mounting hole in the bracket where indicated. Again I used marker to color mine black.
Let’s work now on the lower end of the landing gear. The 2 wire axels are cut and bent, using .032 inch music wire. Again, the proper angle and length can be found on the template page. Now using ½ inch pieces of heat shrink tubing, attach the axels to the ends of the carbon fiber rods. Make sure both axels point directly away from one another and remain parallel. After the tubing has cooled, check the alignment and then put a tiny drop of thin CA at the top of each piece of tubing . Allow it to wick down between the carbon fiber rod and wire axels. This will secure the axels in place.
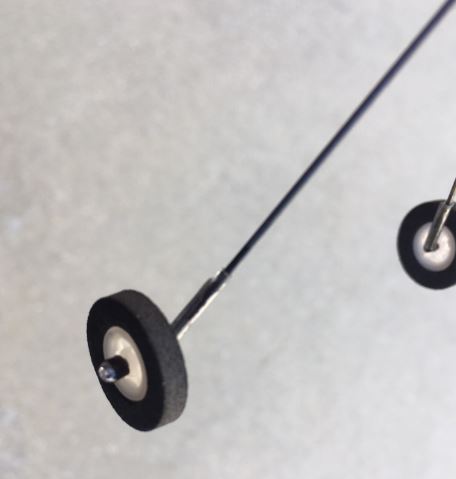
OK, time to mount your 5/8 inch GWS wheels. I used small pieces of wire insulation as keepers on both sides of each wheel. This holds the wheels nicely in place. A tiny drip of CA on the end of each keeper held them on securely. Hint: You don’t want any CA to wick along your axels and get to your wheels. Not good! So, put a drop of kicker on the end of your keepers first. When the CA is applied, it sets up almost instantly and won’t wick into unwanted places.
Mounting the finished landing gear assembly is super easy. Simply slip the hole in the bracket over the front of your carbon fiber fuselage. Slide the landing gear back until the bracket touches the front of the wing pylon. Now use medium CA to glue in place. Be sure not to allow the CA to touch any foam. Once again be sure the wings remain level and the landing gear squarely aligned as the glue sets. BTW, I found looking down, past the leading edge of the wings very helpful when aligning the landing gear.
Finally, use .015 inch music wire to fashion the tail skid, per the template page. Use medium CA to attach it to the bottom of the fuselage, ahead of the horizontal stabilizer. Kicker helps here. Again be sure not to allow the CA or kicker to touch any foam. Beautiful…nice job!
Electronics
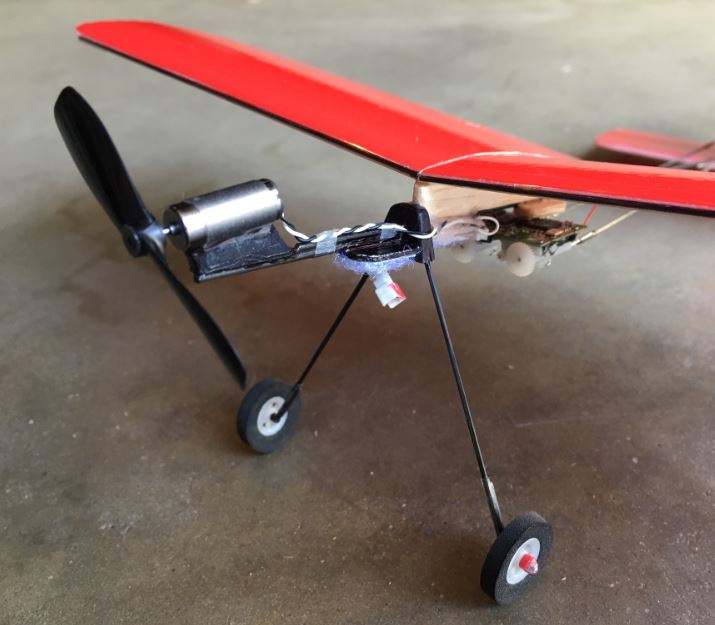
The all-in-one receiver unit is the heart and soul of your ¼ Stick. This little gem includes a DSM receiver, 2A speed control and two linear servos all mounted on a circuit board smaller than a US postage stamp! Although available at Horizon Hobby (EFLU6807), I harvested mine from a well used, but not abused Parkzone Mini Vapor. They can also be found on the UMX Vapor Lite as well.
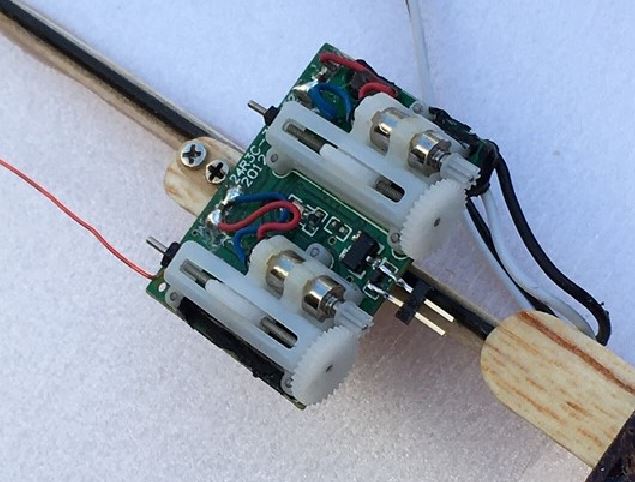
Now, before your receiver unit can be mounted, there is one small soldering modification needed. It requires that you unsolder the existing motor leads and replace them with a .05 inch Male Nano-Connector. I purchased mine online. The two soldering points are small and quite close together, but it’s very doable. It requires a pencil soldering tip, a fairly steady hand, but most of all patience. Also, don’t forget to tin your Nano-Connector before soldering it in place. When completed, it will allow you to easily connect and if necessary, reposition your motor leads.
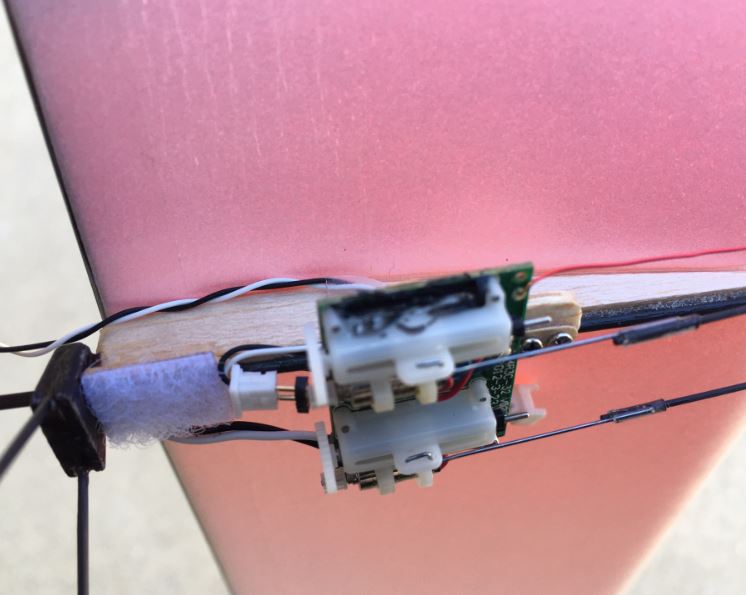
Now, the receiver unit should be mounted on the bottom of the fuselage, under the wing, 1 inch behind the leading edge. The servos should face down with their gears facing forward. The newly soldered Nano Connector should be facing forward as well.
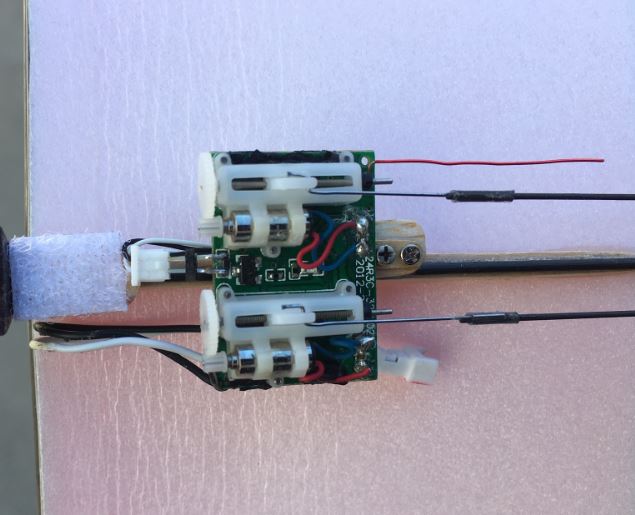
Although the easiest way to secure the receiver unit might be to hot glue it into place, I chose to make it removable. Begin by making a single 1/8 inch wide x ½ inch long mounting bracket from 1/32 inch plywood. Drill the two 1/32 inch pilot holes where indicated. Next epoxy it to the underside of the receiver unit leaving both pilot holes visible, protruding straight out toward the rear, a good ¼ inch The the remainder of the bracket should be located beneath and between the servos. See construction photos. Next make the ¼ inch W x ½ inch L mounting plate from a scrap piece of 1/8 inch balsa as shown on the template. Strengthen it by wiping a small drip of thin CA onto it, allowing it to soak in. I used a little kicker on mine so it set quickly. Then use medium CA to glue it to the fuselage bottom as shown in the construction photos and on the template sheet. Now carefully position your receiver and bracket over the mounting plate, and then drill through the two bracket pilot holes, into the balsa mount. Note that the holes are drilled slightly off center so as not to damage the carbon fiber fuselage. Finally, use two #0 x ¼ inch pan head screws to gently secure the little receiver squarely in place.
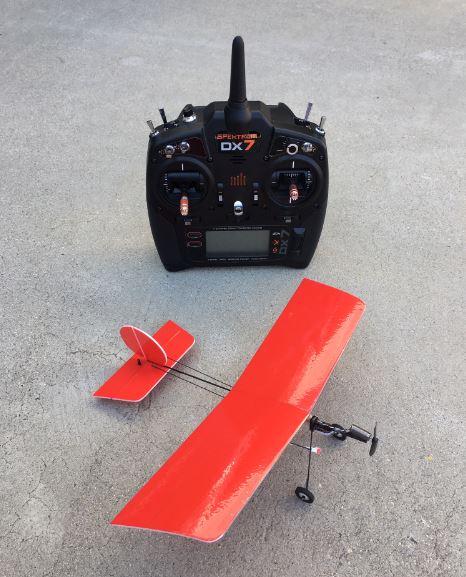
There is one more step I recommend at this time. Power up your receiver unit, with your little 180mAh, single cell, LiPo battery and bind it to your transmitter. I have a Spektrum DX7 V2, but of course any transmitter with the same DSM2 or X signaling protocol is fine. After a successful bind, simply center the little linear servos using your trim settings. That’s it! Remove the battery, turn of your transmitter and let’s move on.
Pushrods
The 2 little push rods are made of 4 ½ inch lengths of .030 carbon fiber rod with 1 inch lengths of Z bent .015 inch music wire attached to both ends. The 4 wire ends are secured to the carbon fiber rods using ¼ inch lengths of 1/32 inch heat shrink tubing. After the tubing has cooled, gently twist and remove the two Z bent wire ends that will attach to the elevator and rudder control horns. Now connect the pushrods, with the still attached wire ends, to the servos. Next attach the loose Z bent wire ends to the control horns and carefully slide the straight ends back under the heat shrink on the push rods.
Now, gently center the rudder and elevator by slowly sliding the wire ends in or out under the heat shrink tubing. When both control surfaces are centered, check that all the Z bends are aligned properly. Finally, place a very, VERY small amount of thin CA on the carbon fiber ends, where the wire ends enter the heat shrink. This will wick in and secure the carbon fiber and wire ends together. Need mention getting any CA on your servos? Not good, as it will instantly destroy them!
Motor Mount
The motor mount is made next, using 1/16 inch plywood. The pattern for it appears on the template page. Once made, use medium CA to glue it to the front, top of a 1 3/8 inch length of .050 carbon fiber rod. I again used Magic Marker to color the plywood mount black. Then use medium CA to glue the short carbon fiber rod to the underside and parallel to the existing carbon fiber rod, protruding from the landing gear bracket. The plywood motor mount should face up with the back end of the short rod touching the landing gear bracket. See construction photos. Now run a small bead of CA along either side of the carbon fiber rods to insure a good secure connection.
Special Sauce Motor
Now it’s time to mount the little 17,000kv Tiny Whoop Special Sauce motor. This little coreless 6mm x 15mm, motor was purchased at Tinywhoop.com. Likewise the cute little 1 3/4 inch (45mm) Gemfan propeller can be purchased there as well. The ply motor mount is designed to provide about 6 degrees of down thrust. However, you will also need to offset the motor itself, several degrees to the right when it’s mounted. It may not seem like much, but it does the job. Next, decide what part of the motor housing will be the bottom and lightly rough it up with a little sand paper. That will give the metal housing some tooth for the glue to adhere to. I also suggest you press the propeller on now before you mount the motor. It’s a snug fit, so be careful not to bend the prop shaft. Nicely done!
Now, use literally a touch of medium CA to first tack the motor into position, on top of the mount. It’s simple to readjust if you haven’t used too much glue. When satisfied, carefully run a small bead of the CA along both sides of the motor. Once again, avoid at all cost, allowing any CA to get on the prop shaft. Using kicker is a good idea here. I finished with a ½ inch piece of Blenderm wrapped over the motor and pressed down onto the mount.
One nice thing about the Special Sauce motors is they come with a connector on their lead wire. Be gentle as you push the connector onto the .05 inch Nano Connector you soldered onto your receiver unit. FYI, you may need to unscrew and remove the receiver to do this. Seriously, be careful when connecting the motor lead. Those two little solder joints can’t take much pressure. Now, once the motor lead is connected, it’s time to test it. Turn on your transmitter and power up your receiver unit. If as you advance the throttle, the motor spins the prop in the correct direction, you are golden. If not, simply unplug the motor lead, turn the connector over and push it back on…carefully.
Now, gently remount your receiver and check that your pushrods are still in position. Then, route your motor leads back from the motor along your fuselage using a few tiny pieces of Blenderm along the way. You will likely have a little extra motor wire back by the receiver, so secure it out if the way, against the wing pylon.
Secure the Battery
The battery attachment locations are the last things to deal with. First cut two ½ inch x 3/8 inch pieces of 1/32 inch balsa as shown on the template. Now use medium CA to glue them both in front and behind the landing gear bracket. Again, use the photos for clarity as needed. After the glue has set, stick the fuzzy side of one self-adhesive Mini Velcro Dot Fastener onto both battery locations. Then, stick the hook side of one fastener onto your battery.
The reason for two attachment locations is it works out nicely for balancing. Should you choose, it also enables you to place smaller lipo batteries (80mAh etc.) at the forward location and larger lipo batteries (180mAh etc.) at the rear location. In other words, it allows for some flexibility when balancing your plane. Hey my friend, you are done!
Preflight Check
I hope you enjoyed building your ¼ Stick. Now all that remains is the preflight. First check the center of gravity (C/G). Your plane should balance 1 inch back from the leading edge. A little nose heavy is OK. A little tail heavy… not so much. Next, turn on your transmitter, power up your plane and check that the control surfaces are still centered and move freely in the correct direction. I suggest that you initially set your rudder throw to move ½ inch in either direction. Then set your elevator to move ¼ inch up and 1/8inch down. You can adjust the throws more to your liking after your first few flights. Finally check that the motor powers up and hey, your preflight is done!
At The Flying Field
What fun awaits you! This is the moment you’ve been waiting for. Your ¼ Stick is ready for its maiden flight! Pick a nice clear morning for your first flight. Still air would be best, but your little plane can handle a slight breeze as well. Might I also suggest flying over grass as well. If you are a frequent flyer, then you are all set! If not, consider asking a flying buddy with a little more time for a check ride. There is never any shame in playing it safe!
Now fasten your seatbelt, call the tower and tell them you are ready for takeoff. When cleared, simply head into the wind and give it full throttle. You’ll find that your ¼ Stick can take off from the ground exceptionally well. Expect a ground roll so short it can literally be measured in inches rather than feet. With even the slightest head wind, your plane will seemly hop off the ground.
Once airborne, allow your ¼ Stick to climb to a reasonable height and then throttle back. That little motor provides more than enough power, so you can conserve your battery. Now trim for straight and level flight. As you get the feel of your new ¼ Stick, you will find it maneuverable yet easy to fly. BTW, I suggest you keep it in pretty close. Although it’s not fast, it is very small and that’s a really big sky you are playing in!
When you feel confident, try some gentle aerobatics. It will do 2 foot loops from level flight and turn on a dime. At a little higher altitude, mine does the cutest little spins and I’ve been able to do some interesting looking rudder rolls.
Now, when the motor starts to pulse, that’s your signal to head back to the runway. As you line up on short final, reduce throttle and fly it all the way to the ground. If there is a slight headwind, you may need to use more power to help carry you in. When your plane is just a few inches above the runway, cut the power and gently flair. Nice landing!
In The Pilot Lounge
You did very well! Congratulations on a successful first flight. Fun wasn’t it? I’m sure your fellow pilots will get a kick out of your new ¼ Stick and have some questions for you. Encourage them to build one as well. It’s easy to build, fun to fly and a breeze to transport! Plus, it’s scale!!! Don’t forget, you can fly it inside as well. Enjoy you’re your time in the air my friend. I wish you much success and many happy landings. Fun stuff…


Thank you for sharing your skills in the models you have designed. I was wondering it you could send me a copy of the downloadable plans. In the model airplane news there are no dimensions and that would prove helpful for me.
I was wondering if you have a set of all the parrts that can be purchased from you including the motor and wheels. I would like to build this Quarter Stick. Anyh informastion you can provide regarding that would be helpful.