

These tips may not change your life, but they may make building and flying RC planes a little easier! Have a tip of your own to share? Send it to us at MAN@airage.com.
Hatch Leash
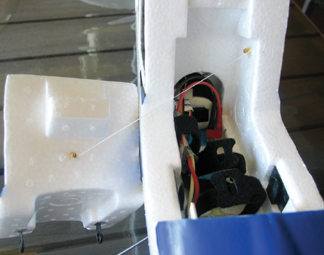
A great way to ensure your canopy arrives attached to your plane, rather than flying off one way and the plane going the other, is to use two small pieces of wood from a matchstick or a wooden BBQ skewer. Epoxy one for the inside of the foam canopy and the other for the inside of the fuselage, then wrap a small length of dental floss (which is strong and light) to each piece. Do this before pushing them into the foam while the epoxy is still wet. This system adds minimal weight to the plane, but ensures you won’t end up losing the canopy!
The Perfect Building Guide
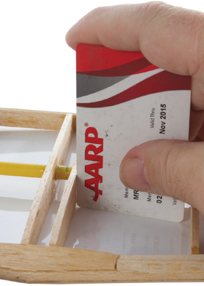
Here is the way to use your old credit cards and build straight at the same time. While building wing panels on plans, you have to ensure the ribs are 90 degrees to the building board. Old plastic credit cards are great building guides as their edges are perfectly square and the corners are rounded so they don’t get glued to the rib during construction. When they get ratty, just throw them away.
Custom Sanding Sticks
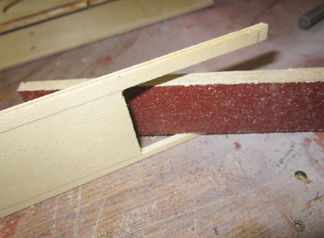
For neat and straight edges on parts I cut for my airplanes, make custom-sized sanding sticks to fit into tight areas. Simply get some stick-on sandpaper (usually for electric sanders) and cut it into strips. Make your sanding stick to fit and then apply the sandpaper. The result is clean edges for a professional-looking job.
Quick Connections
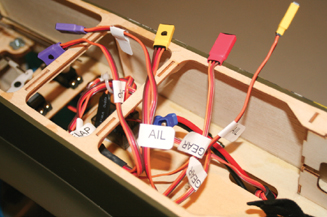
Even when servo labels stay on, it is much too tedious to plug them all in properly. To solve this, buy several different colors of heat-shrink tubing: 3/8 inch for the female connectors and 1/4 inch for the male. To make it easy to determine the correct polarity, draw dots on the tubing with a felt-tip marker to make connecting them a snap.


Instead of using different colours, if you are not able to obtain those there is another way. If you write the name of the control onto the heat shrink tube so that 2 pieces match, when you place each one over the connectors and heat them you will have matching plugs. Make sure you have the names oriented to the mating polarity.
Easy to hook up multiple plugs quickly, easy to identify and no mis-connections.
Ian
Nail polish in different colors works well too, just use the same color on both halfs on the same connector!
I use the smallest Zipties in a variety of colors to accomplish the same. Green to green red to red etc
Easy and inexpensive way to mark servo leads. Purchase several colors of finger nail polish from Walmart, Kmart, Target, Walgreen. Attach the two leads correctly. Then mark one side of both connectors with the same color. When disconnected you can not only locate the proper pair but the proper orientation.
I use model paint and the tip of the handle on a paint brush (or toothpick) to put one dot or two dots on matching connectors. Two colors yields 4 pairs of connectors.
I use different colored tye-wraps. They are available at Lowe’s or Home Depot.
Probably an easier way would be to put”Hashmarks” on the signal wire of the servo connector usually orange or yellow or white. For instance for channel 1, put one mark, for channel 2, put 2 marks etc.
Why not just use One-Cliks from Electrodynamics. Plug in up to four servo leads at a time. Can’t get them on backward or out of order and they are locked together. They come in 2, 3 and 4 servo connectors. No need for coding. If you use two, you can just swap the connectors so that the male is on one wing harness and the second connector’s female in on the other wing’s harness. Use them in my jets and giants all the time. Can also have them customized so that you can have 2-wire lighting and gear circuits w/o the weight of the third wires.
Oh, … One other thing – If you put tape or heat shrink on the connector itself, How are you going to put a safety clip on the connector? on my first plane I built I had and expert come over and check it out. I asked if I should use some sort of safety clips on servo connections. His answer was: You want them to stay connected don’t you?”