
The Avalanche will cause spectators to gasp, especially when performed close to the ground. The surprise is that both maneuvers date back to a time long before 3D was even an aerobatic style. We enlisted the help of our good friend, aerobatic pilot and designer Mike McConville, to guide you through this maneuver and offer some tips on execution.
THE PLANE
Many models from 40-percent gassers to small foamies are able to do the avalanche. A model needs only the four basic functions: rudder, elevator, aileron and throttle. Typically, a low- or mid-wing design that doesn’t have much dihedral but has enough elevator authority to do an inverted flat spin and snaps is perfect for these maneuvers.
THE AVALANCHE
The name suggests that it must be a wild 3D maneuver, right? Well, not really. In the world of aerobatics, the avalanche was around long before 3D aerobatics were ever dreamt of. It has appeared in various forms and has been a maneuver in the precision schedules of many F3A, IMAC and TOC competitions.
I’ve often said that even if your interest in aerobatics is only in the 3D arena, learning the fundamentals of flying precision maneuvers will improve your 3D flying immensely. The discipline you gain from flying precision will help make your 3D flying more deliberate; it will have a much more planned and well-executed presentation. Of course, if you do compete or aspire to do so, read on; I’ll describe how to execute the avalanche properly.
WHAT IS THE AVALANCHE?
In simplest terms, the avalanche is a loop with a snap roll at the top. Although this sounds easy, it can be difficult at first, but once you understand the elements of the maneuver and what should be done and when, it becomes quite easy.
THE LOOP
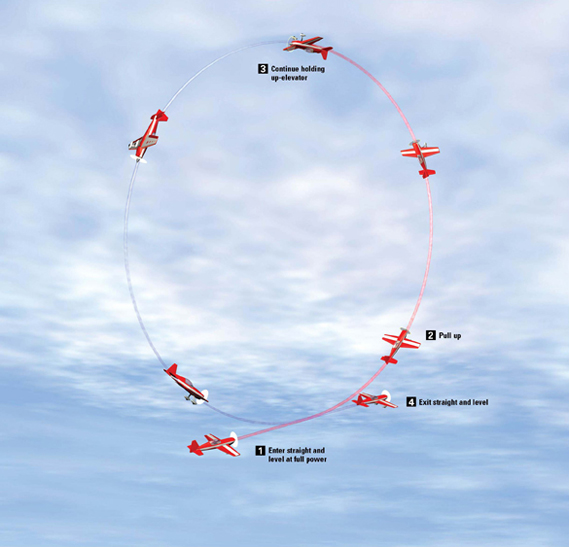
To start, you have to learn how to do the loop properly. A loop is simply a circle done vertically in the sky in the pitch axis of the model. That just means that starting from level flight, pull up-elevator and hold on until the model loops through 360 degrees and returns to level flight.
The Precision Loop
Now let’s take the ordinary loop and turn it into a well-presented precision loop:
- Step 1. Put it in the right place. When starting the loop, the model should be flying parallel to the runway in front of you. Don’t start the loop if the model is flying at an angle toward or away from you. If you do, it will be impossible to see the symmetry of the loop.
- Step 2. Center the loop on yourself. The loop should start just as the model reaches center or is exactly in front of you. Just as it reaches that point, pull back on the elevator.
- Step 3. Shape it right. The loop should be a perfect circle drawn in the sky, not an oval. It should start and end at the same altitude, and when done correctly, it should actually start and end at exactly the same point in the sky, no closer to or farther away from you. Trying to do this may bring some trimming issues to light.
In addition to making the loop perfectly round at the proper location, you also have to make it the proper size, not too small and not too large. If it’s too small, it looks rushed and leaves you little room and time to place the snap at the top. If it’s too large, it becomes more difficult to make the loop round and to hold it in the proper heading. You may also start to run out of power at the top, and that will make the snap roll impossible to do.
The correct size of a loop is determined by the hardware you are flying. A larger airplane with a lot of power will be more natural doing a larger loop than a smaller airplane or one with less power. Experiment with your model until you arrive at the loop that is the correct size for your airplane.
The loop is a simple maneuver, but it is one that you fly through. Don’t pull full up-elevator and watch it go. In fact, you should never be at full up-elevator. Pull back a little, and vary the amount of elevator to make the loop the correct size and shape. Since gravity is at work, you have to pull more elevator at the beginning of the loop than when the model passes through vertical. When the plane goes through the inverted point of the loop, relax the elevator to keep the loop round. As the model starts down the back side of the loop, increase elevator again to overcome gravity and keep the loop round. It’s also a good idea to reduce power as the model starts to come over the top of the loop and down the back side. Full power makes the loop appear rushed, and with larger airplanes, full power in a dive is a big no-no. This could even cause problems such as control-surface flutter and structural failure. Practice doing the “perfect” loop several times until you’re comfortable with it.
ADD THE SNAP
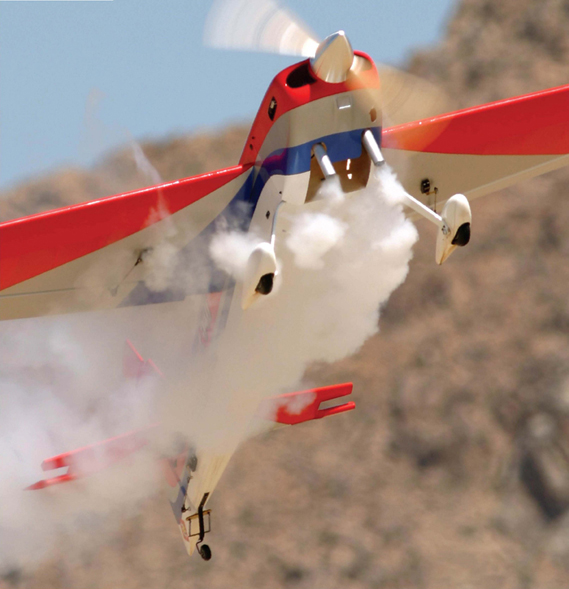
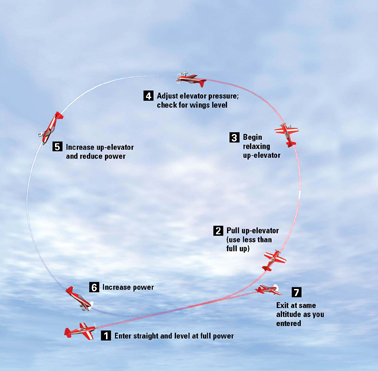
Once you have mastered the loop, work on turning it into an avalanche. Do the same loop, but just as the model reaches the top of the loop, do one snap roll. Stop the snap at exactly one turn, so the model is in the same attitude as it was before the snap. Now reduce power, and complete the loop just as before.
The technique you use to do the snap roll will affect the attitude with which the model exits the snap. The art of the snap roll is a topic that I could easily write an entire article about, but since I don’t have room to go into detail on snap-roll techniques here, I’ll just go into some basics. For now, do the snap simply by cornering both sticks, i.e., full up-elevator, full aileron and full rudder in the same direction as the aileron. Here are some tips for doing a snap roll on an avalanche:
- Don’t throttle back before the snap. This will cause the model to drop its nose through the snap, and it will exit the snap nose down, making it impossible to keep the loop round. Keep the power up until the snap is complete.
- Don’t snap too early or too late. When done properly, the snap should be at the top of the loop. Don’t get trigger-happy and snap while the model is still climbing or wait too long and snap after the model is on its way back down.
- Don’t over- or under-snap. Be sure to stop at one snap. If you over- or under-snap, the wings won’t be level. As you start to pull through the back side of the loop, the model will start to corkscrew unless you first level the wings.
To make the avalanche look its best, here’s a pro tip: always snap away from the flightline. If you enter the avalanche from your right, do the snap roll to the right (right aileron and rudder); if you enter from the left, roll to the left. This makes the model stay in line better and not step in the direction of the snap. The only exception to this rule is if you are flying in a strong cross-wind blowing out (away from the flightline). The crosswind requires you to learn to snap roll equally well to both the left and right, and that’s an important part of becoming a well-rounded aerobatic or 3D pilot anyway.
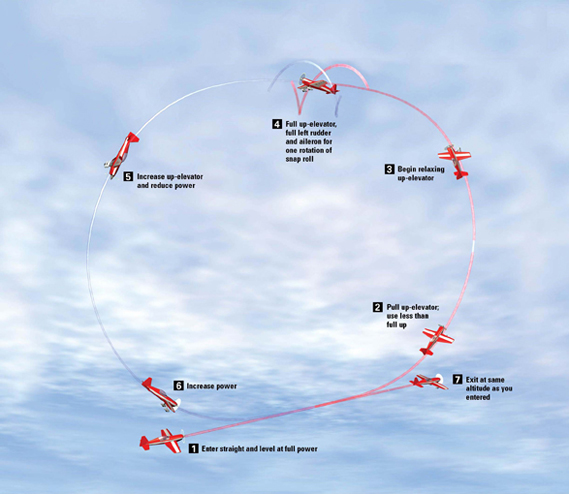
FIGURE 4 Avalanche
Master the avalanche, and you’ll become a more disciplined pilot who’s in better control of his model.
VARIATIONS
An almost infinite number of variations on the Avalanche can make it much more challenging to do. Through years of aerobatic competition, I’ve had the opportunity to tackle a lot of them. If you want to try more challenging variations on the Avalanche, here are a few good ones:
- Do the same maneuver but start inverted. Make the loop an outside loop, and at the top, do a negative snap (full down-elevator, full aileron and full opposite rudder).
- Do the Avalanche normally but do only two complete snap rolls at the top, or try it inverted with two complete negative snaps at the top.
- Start inverted, and do an outside loop. At the top, do 1 1/2 positive snap rolls so the model stops inverted at the top; then immediately do 1 1/2 negative snap rolls in the opposite direction back to upright, and complete the outside loop. When you do one like that, you need to start the first snap before the airplane reaches the top because the snaps take up so much space. After the last snap, the plane should be over the top of the loop and at the same point past the top as it was before when the first snap was done.
- One of the most difficult variations requires you to start high and do a loop starting from the top; then, at the bottom of the loop, do the snap, and continue back up to finish at the top.


Yes, many ways to make a loop, try whith a trainer first