
Sometimes it’s good to get back to the classics. Whether its movies, music, dancing, or aerobatics, there’s a reason why certain genre-defining films, songs, steps, or maneuvers withstand the test of time and become classics. The Cuban-8 is one of those classic maneuvers that will always amaze and please. It is a mixture of symmetry, grace, skill and daring and, when done well, it leaves a lasting impression with the spectators.
PREREQUISITES
The required skills needed for a Cuban-8 are not extreme. You need to be able to perform loops in both directions, rolls in both directions, and have decent throttle and rudder control (no stick banging here, it’s all about “smooth”). And you might as well add a few hours of flying time as a prerequisite as you will need to practice this maneuver to get it just right. Fortunately, this is a maneuver in which it is very easy to practice the component parts separately before putting it all together, so it’s a great one to use to hone your skills.
POSITION 1
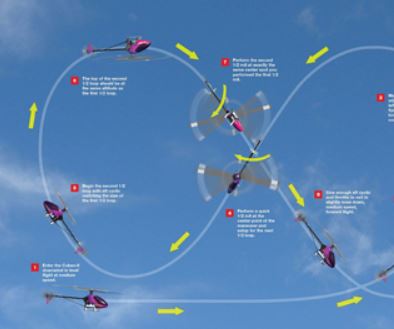
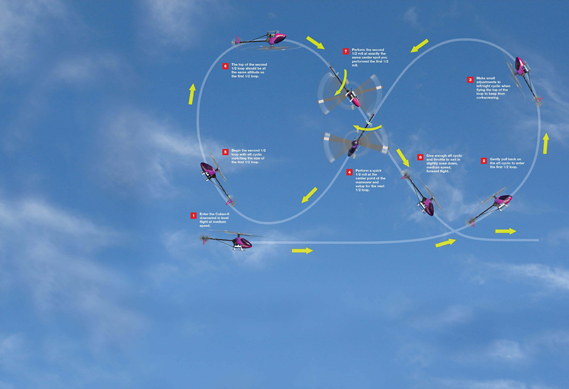
The Cuban-8 is the only looping maneuver I can think of that nearly requires you to start downwind. You usually enter all other looping maneuvers into the wind, but you will find that it’s extremely difficult to keep the Cuban-8 symmetrical if you use a normal approach into the wind. This is the biggest key to performing this maneuver well. (Just for the heck of it, try it a few times the other direction and you’ll see what I mean!) So, start the Cuban-8 in straight and level, medium speed flight downwind, parallel to the runway.
POSITION 2
Gently pull back on the cyclic to begin the first loop, taking care not to use too much aft cyclic, which will make the loop small and quickly bleed off speed. The amount of aft cyclic you use here will decide the size of the maneuver, so unless you want a very small Cuban-8, resist the urge to use too much aft cyclic; you’ll have to fly the rest of the maneuver based on this decision. Tip: start practicing this maneuver with a medium-size loop; it’s easier to get your timing right than with a large or small loop.
POSITION 3
Approaching the top of the loop, it is important to use left/right cyclic and rudder to keep the heli from corkscrewing. If there is any side wind, you will need to adjust left/right cyclic to compensate for the wind. Ease off the aft cyclic a bit and reduce throttle to keep the loop round as you come over the top. Tip: many pilots prefer to use rate mode on their gyro for this maneuver so the tail will weathervane and stay straight behind the heli, requiring very little rudder correction.
POSITION 4
It’s time for the first roll. Generally, it is best to start practicing this maneuver with a brisk half roll to upright rather than a slow roll. A slow roll can get you into trouble by not allowing enough time to begin the second loop until you are well below the entry height of the first loop. This will make the maneuver lopsided and generally unappealing. So, complete the half roll quickly and begin the setup for the next loop. I prefer to roll away from the pilot position so that if you blow out the roll, the heli is not coming toward you or the crowd. In this case, you will roll to the right if you follow the entry direction in the maneuver diagram. Tip: this position marks the exact center of the Cuban-8; note this position because if you don’t hit this same position after the second loop it will be obvious to all you “missed your mark.”
POSITION 5
Hopefully, you stopped the Ω roll with the rotor disc level, or you will have to make some serious corrections before you start the final loop. Make sure your rotor disc is level before beginning the last loop (unless there is side wind you need to adjust for). Add some throttle, probably quite a bit of throttle depending on your 45-degree downline speed, and use just enough aft cyclic to mirror the same entry into the second loop as used in your first loop. Symmetry is everything now, and you need to mentally “see” the first loop and duplicate it.
POSITION 6
Nothing special here; you’ve done this before in the first loop but now it’s the other direction. Just make sure you have flown the backside of the loop big enough to have the same altitude at the top as the first loop. Just as you did in the first loop, ease off the aft cyclic and reduce the throttle so you don’t start speeding down the inside line of the maneuver. (You will surely overshoot the center point if you go too fast!)
POSITION 7
Remember the exact center of the maneuver you noted in step 4? If you’ve done things right up to now, you are approaching that point, and you need to begin your final half roll to match the speed of the first half roll and exit with left/right cyclic level and ready to fly out of the maneuver. Tip: remember to roll away from the pilot’s position for safety!
POSITION 8
It’s time to fly out of the Cuban-8. Gently pull back on the cyclic and add enough throttle to exit the maneuver at the same altitude you entered and at the same speed. Because you’re adding throttle at the same time that you’re pulling aft cyclic, it’s easy to overdo the cyclic and wind up ballooning the exit. You want a slightly nose-down attitude as you exit from the loop to keep from ballooning. You worked hard to make the rest of the maneuver symmetrical, so don’t lose focus now and pull too much cyclic on exit.
CONCLUSION
The first few times you try this maneuver, it may seem as if there are too many things to remember, so break it down into a half Cuban-8 by just flying one side and flying out of the maneuver. (Practice this both ways to develop the reflexes needed for the full maneuver.) When you are comfortable with each individual half, try the complete maneuver. When you fly the Cuban-8 well, your helicopter will stay above the entry line, so when you are well practiced and comfortable, you can fly at low altitude to add to the crowd appeal.


