

Together with loops, rolls are the bedrock upon which aerobatic flying is built. Learning to perform them correctly and efficiently is integral to opening the door to thousands of different maneuvers. There are varying opinions regarding the best approach to teach rolls, and certain methods can promote faster rates of learning and more successful results. This article features the timeless crawl-walk-run method which, during 1st U.S. RC Flight School’s aerobatic courses, proved to be one of the most time-effective approaches for developing roll proficiency.
BASIC ROLLS
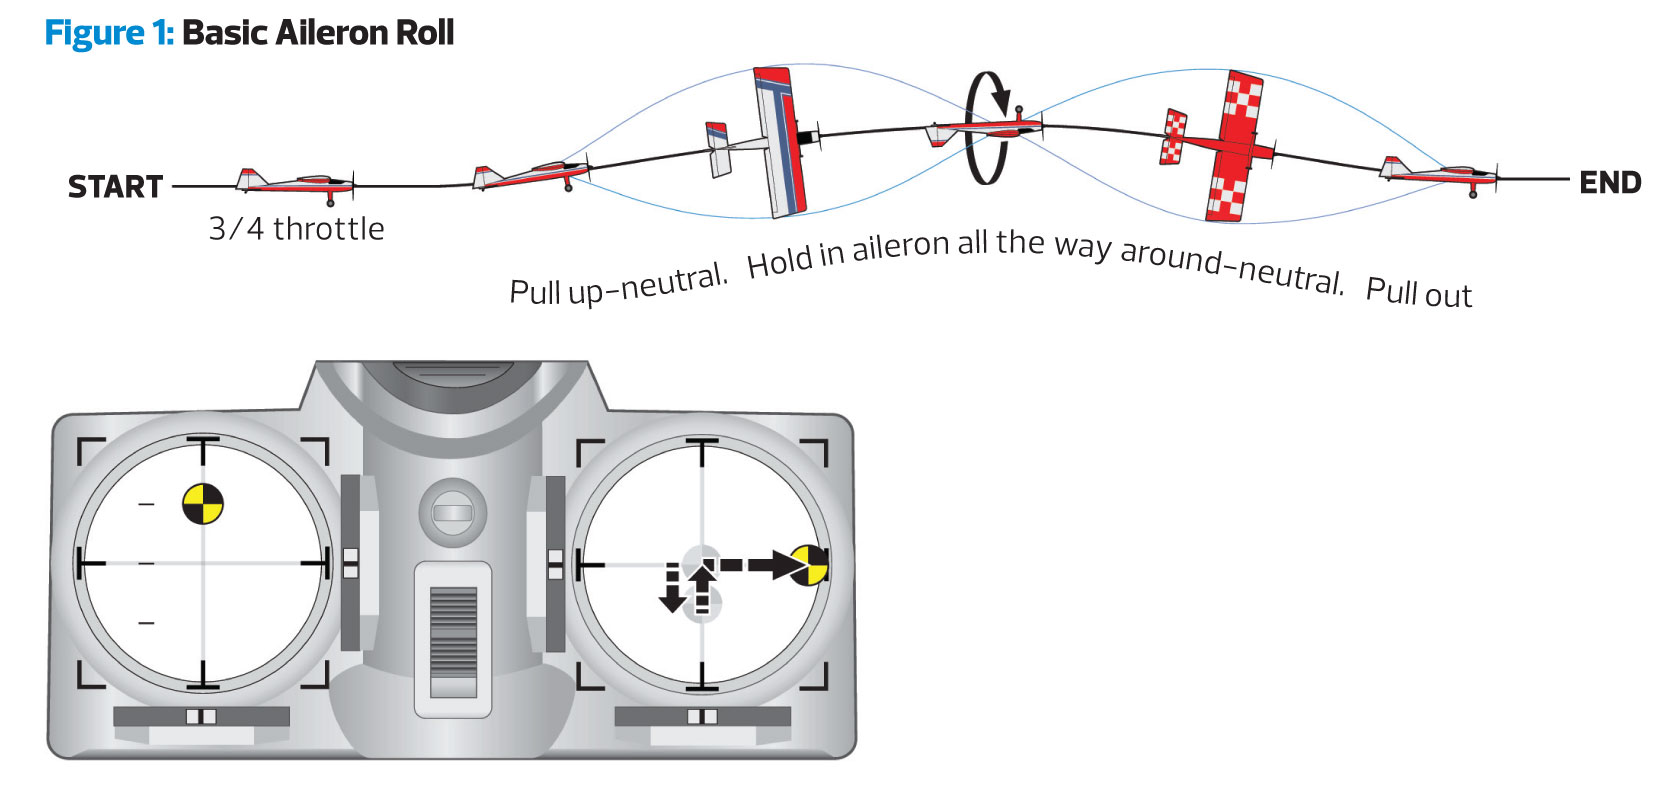
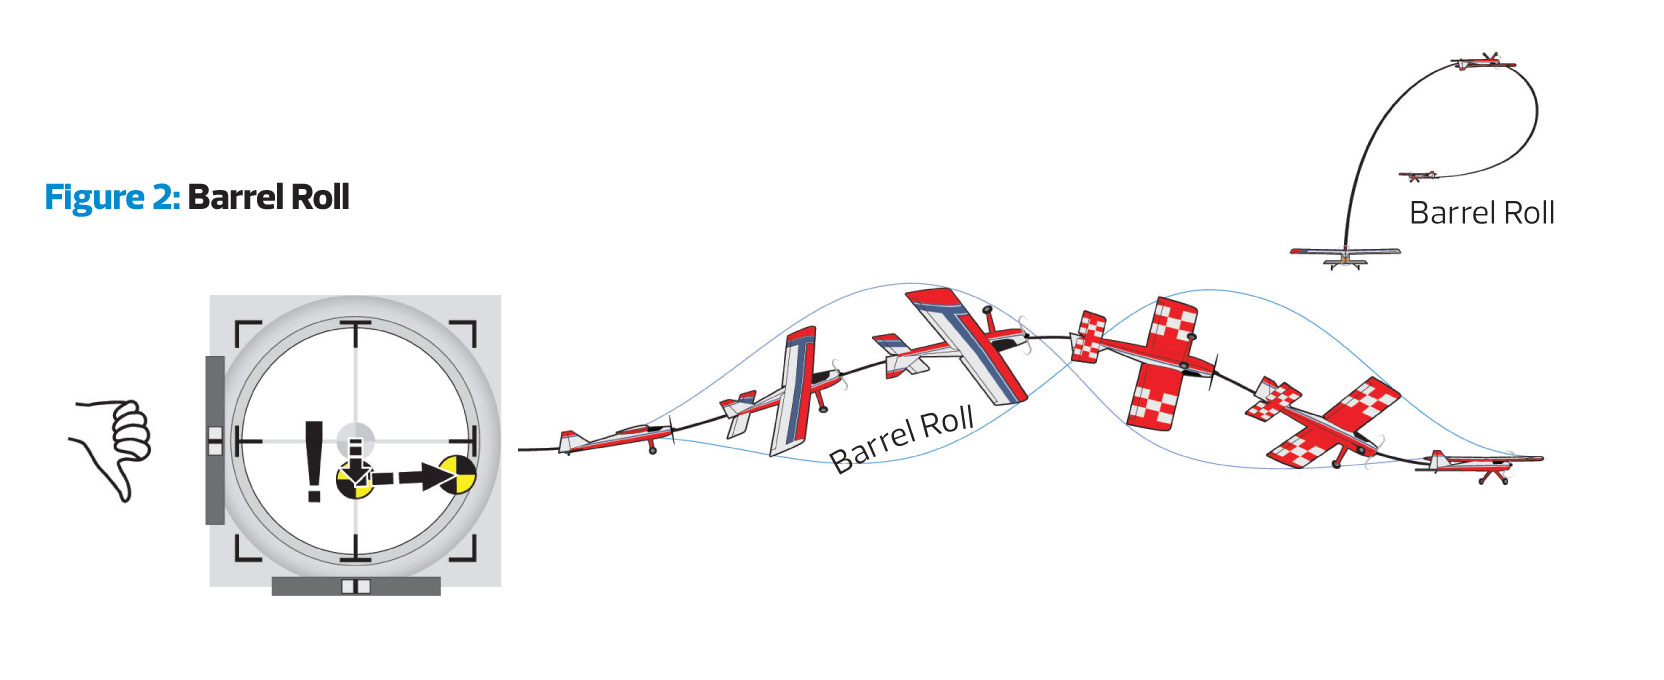
The basic aileron roll starts by pulling the airplane up into a 10- to 20-degree climb. This way, the pilot doesn’t have to worry about altitude or the ground and can then apply full left- or right-aileron and roll all the way around (Figure 1). The most important step in this sequence is making sure that you’ve neutralized the elevator used to set the climb before you apply aileron. This precaution ensures that the roll remains axial and on the same heading. Novice pilots must be especially careful not to get ahead of themselves by directly applying aileron while holding in the elevator. This can result in a clumsy barrel roll and loss of heading (Figure 2). Once you have initiated the roll, you need to focus all of your attention on preparing to quickly neutralize the aileron the instant the wings approach level.
Since most rolls only take a second or two, you’ll have to wait until after the roll is completed to consider the result and reflect on whether or not you need to make any changes. For example, if you find that your roll finishes lower than where it was started, you might want to try a steeper entry next time. When learning new maneuvers, I’ve found that it’s best not to muddy the waters by making corrections during the maneuver. If there are deviations, you want them to be obvious and to leave no doubt about what you need to improve next time.
While nearly all symmetrical wing airplanes will roll just fine at half throttle, rolls performed at lower airspeeds tend to be more influenced by gravity and, as a result, tend to drop more toward the end. Rolling at higher speeds reduces the influence of gravity and therefore lessens the drop. Applying full aileron also makes the basic roll easier because it’s completed before it has a chance to lose any appreciable altitude.
HORIZONTAL ROLLS
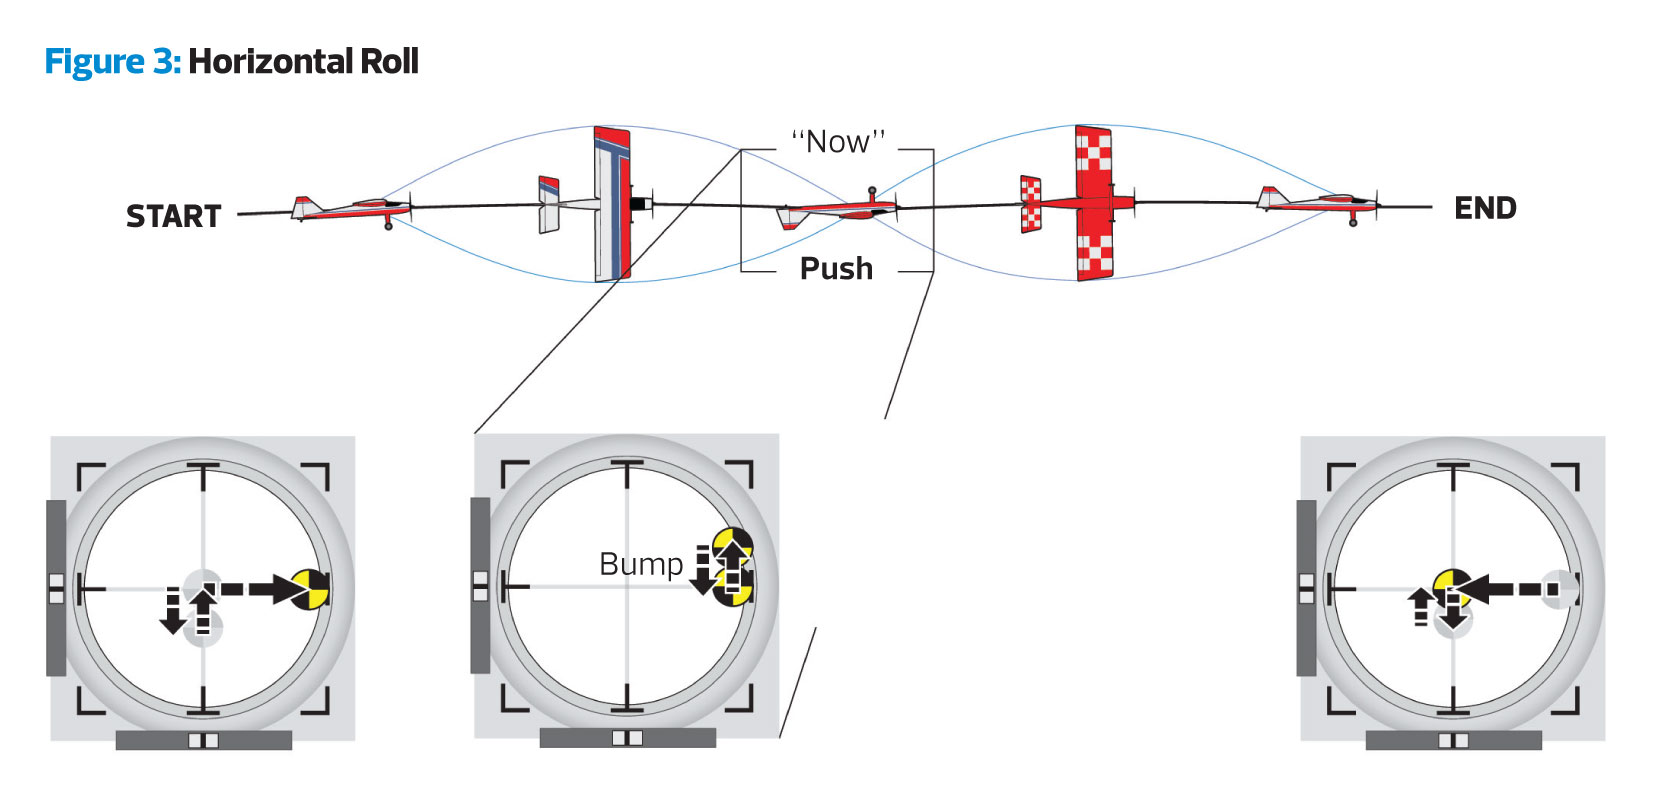
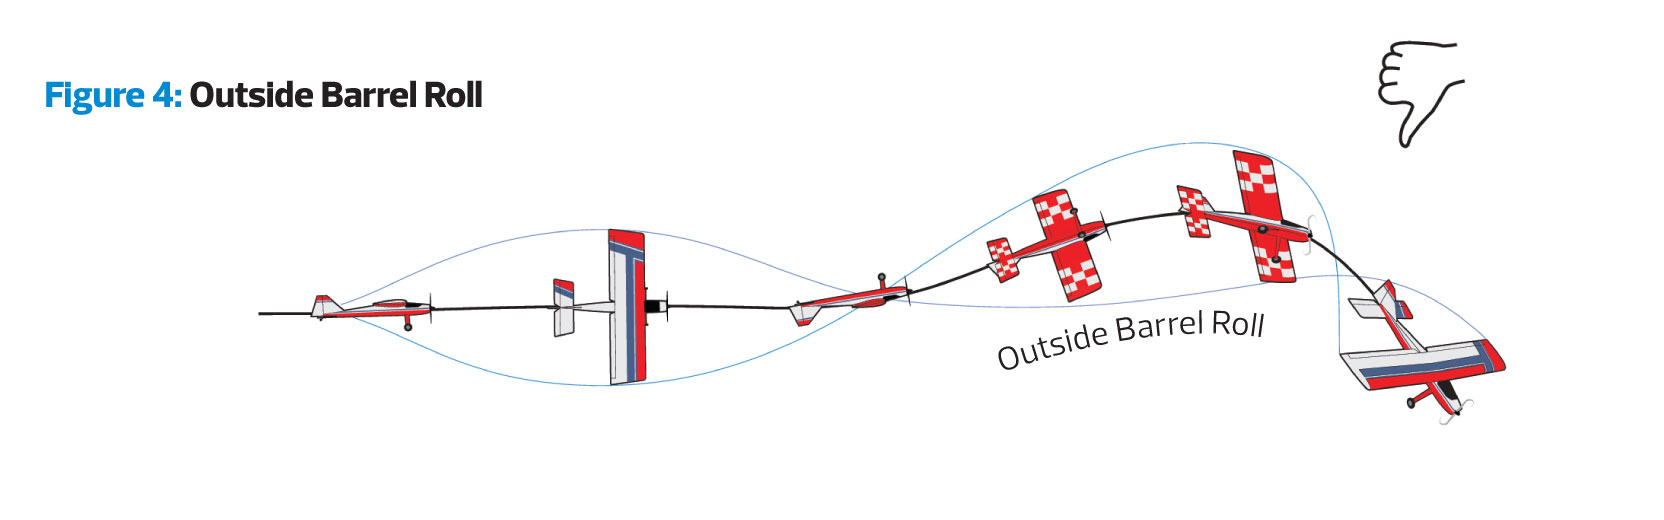
When you’re comfortable with basic rolls, you’re ready to add a bump of down-elevator (push) to keep the airplane level through the inverted portion of the roll (Figure 3). Since the airplane is inverted only for a brief moment during a roll, the down-elevator input will have to be brief as well, i.e., a “bump.” It’s worth mentioning that those who attempt to base their down-elevator input on watching the plane will often end up holding in the elevator too long while evaluating its effect. Consequently, the plane will perform an outside barrel roll, which will result in a loss of heading and altitude (Figure 4). A proper elevator bump input is just enough to keep the roll level without actually being seen. If the bump is seen or causes the airplane to change altitude or heading, it was either too large or, more likely, held in too long. Thus, as a rule, you’ll do better to bump less, rather than more. Remember, refinements, such as the elevator bump, will only help to perfect an otherwise perfectly good basic roll. If the bump of down-elevator causes you to botch your rolls, leave it out until you’re comfortable with the basic roll again. As soon as you’re all set with the basic roll, that’s the time to reintroduce the down-elevator.
As your confidence increases, the addition of the bump of down means you can start to shallow the entries of your rolls. The eventual goal is to pull just enough up-elevator to keep the plane from dropping through the first part of the roll.
CONSECUTIVE ROLLS
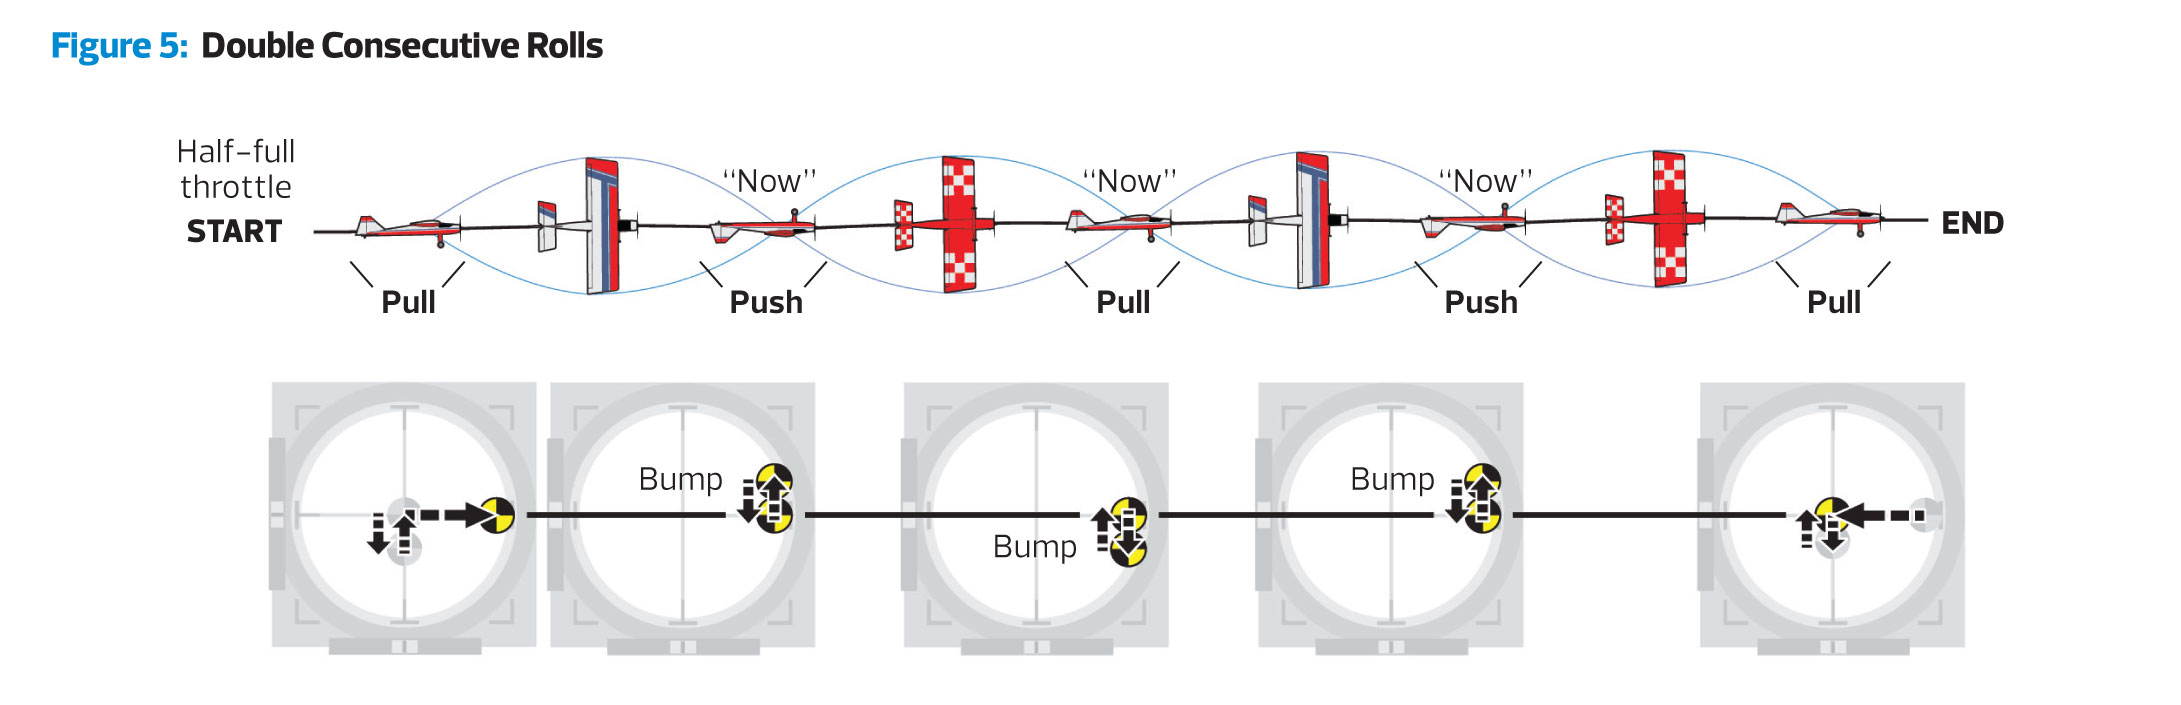
The logical progression from a good single roll is to a double (consecutive) roll. Start by pulling the nose up and then commit to holding in the aileron through two complete rolls. Each time the airplane approaches inverted, briefly bump down-elevator (push). As the airplane approaches the start of the second roll, briefly pull up-elevator again (Figure 5). Using the climbing start will make learning when to input the elevator bumps at the appropriate times much easier. When you have mastered the timing of the elevator, you can then easily start to shallow the entry.
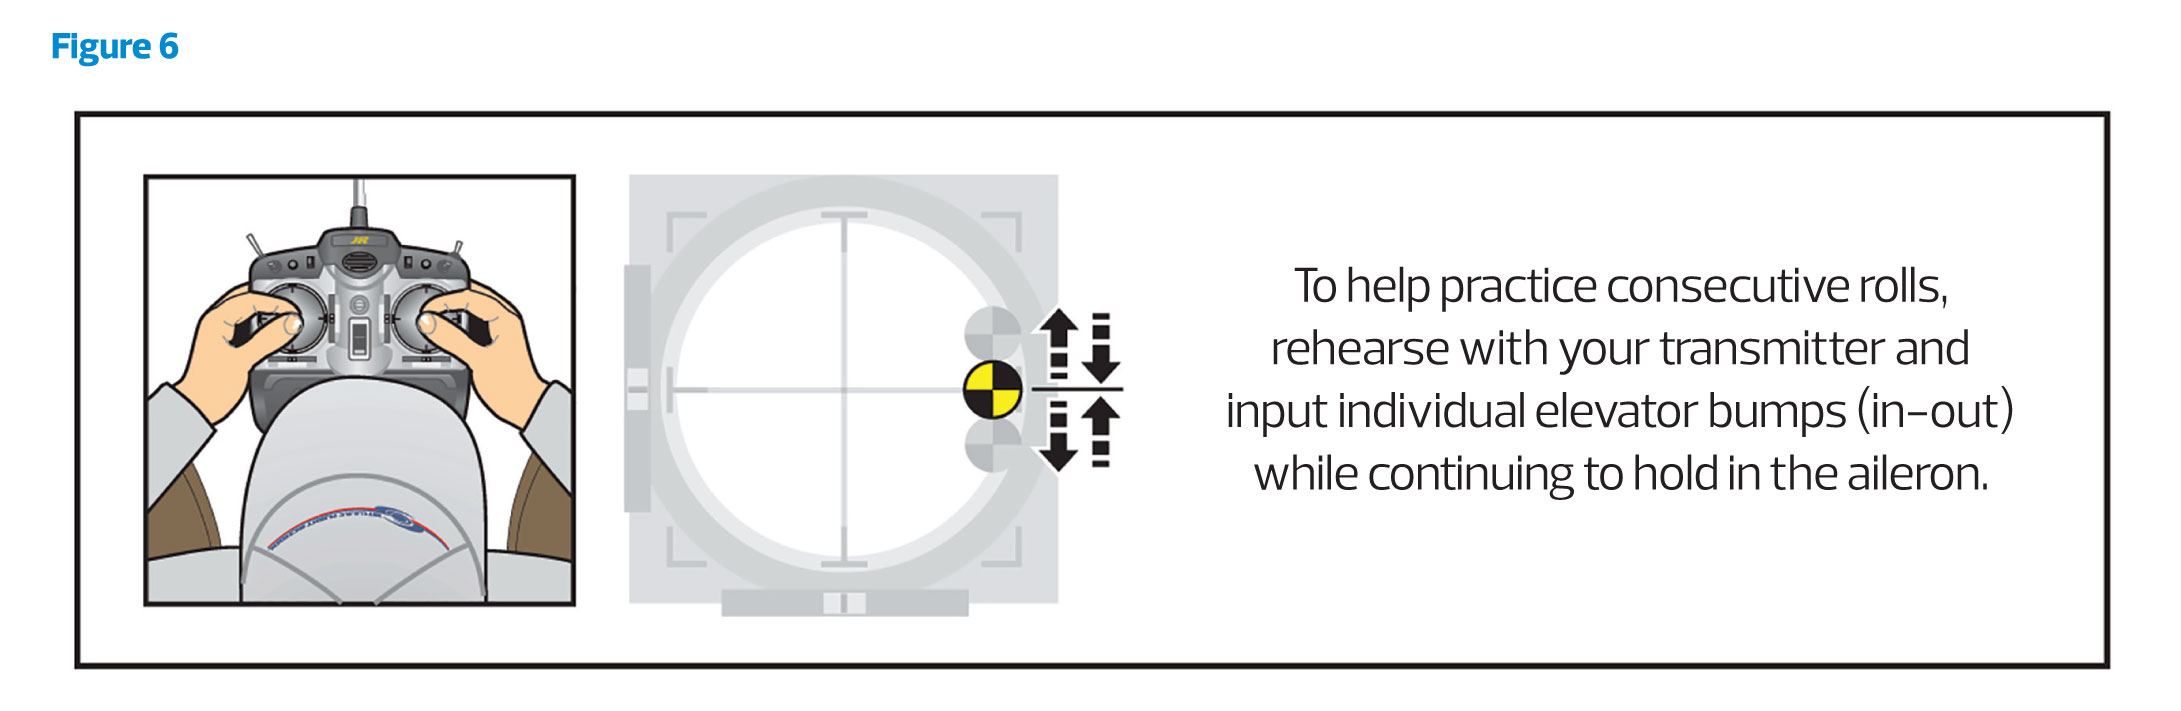
While the type of elevator inputs used during rolls are predetermined, i.e., brief bumps, you’ll need to watch the airplane to determine when to input them: “Inverted, upright, inverted, upright.” Remember that the elevator bumps need to be applied individually at the appropriate times. If you go directly from one bump into the next prematurely, you’ll cause the roll to change heading. Keep in mind that you can save hours of practice by taking some time to rehearse on your transmitter and to input individual elevator bumps (in-out) while continuing to hold in the aileron (Figure 6). When you do fly, all you’ll have to concentrate on is when to apply each bump.
ADVANCED UPRIGHT SLOW ROLL
Few maneuvers truly demonstrate pilot skill like the slow roll. You don’t see slow rolls performed by stunt pilots or those who feel equipment upgrades and programming are substitutes for flying skills. The day that you can perform a slow roll the length of the flying field is the day you can truly call yourself a good aerobatic pilot!
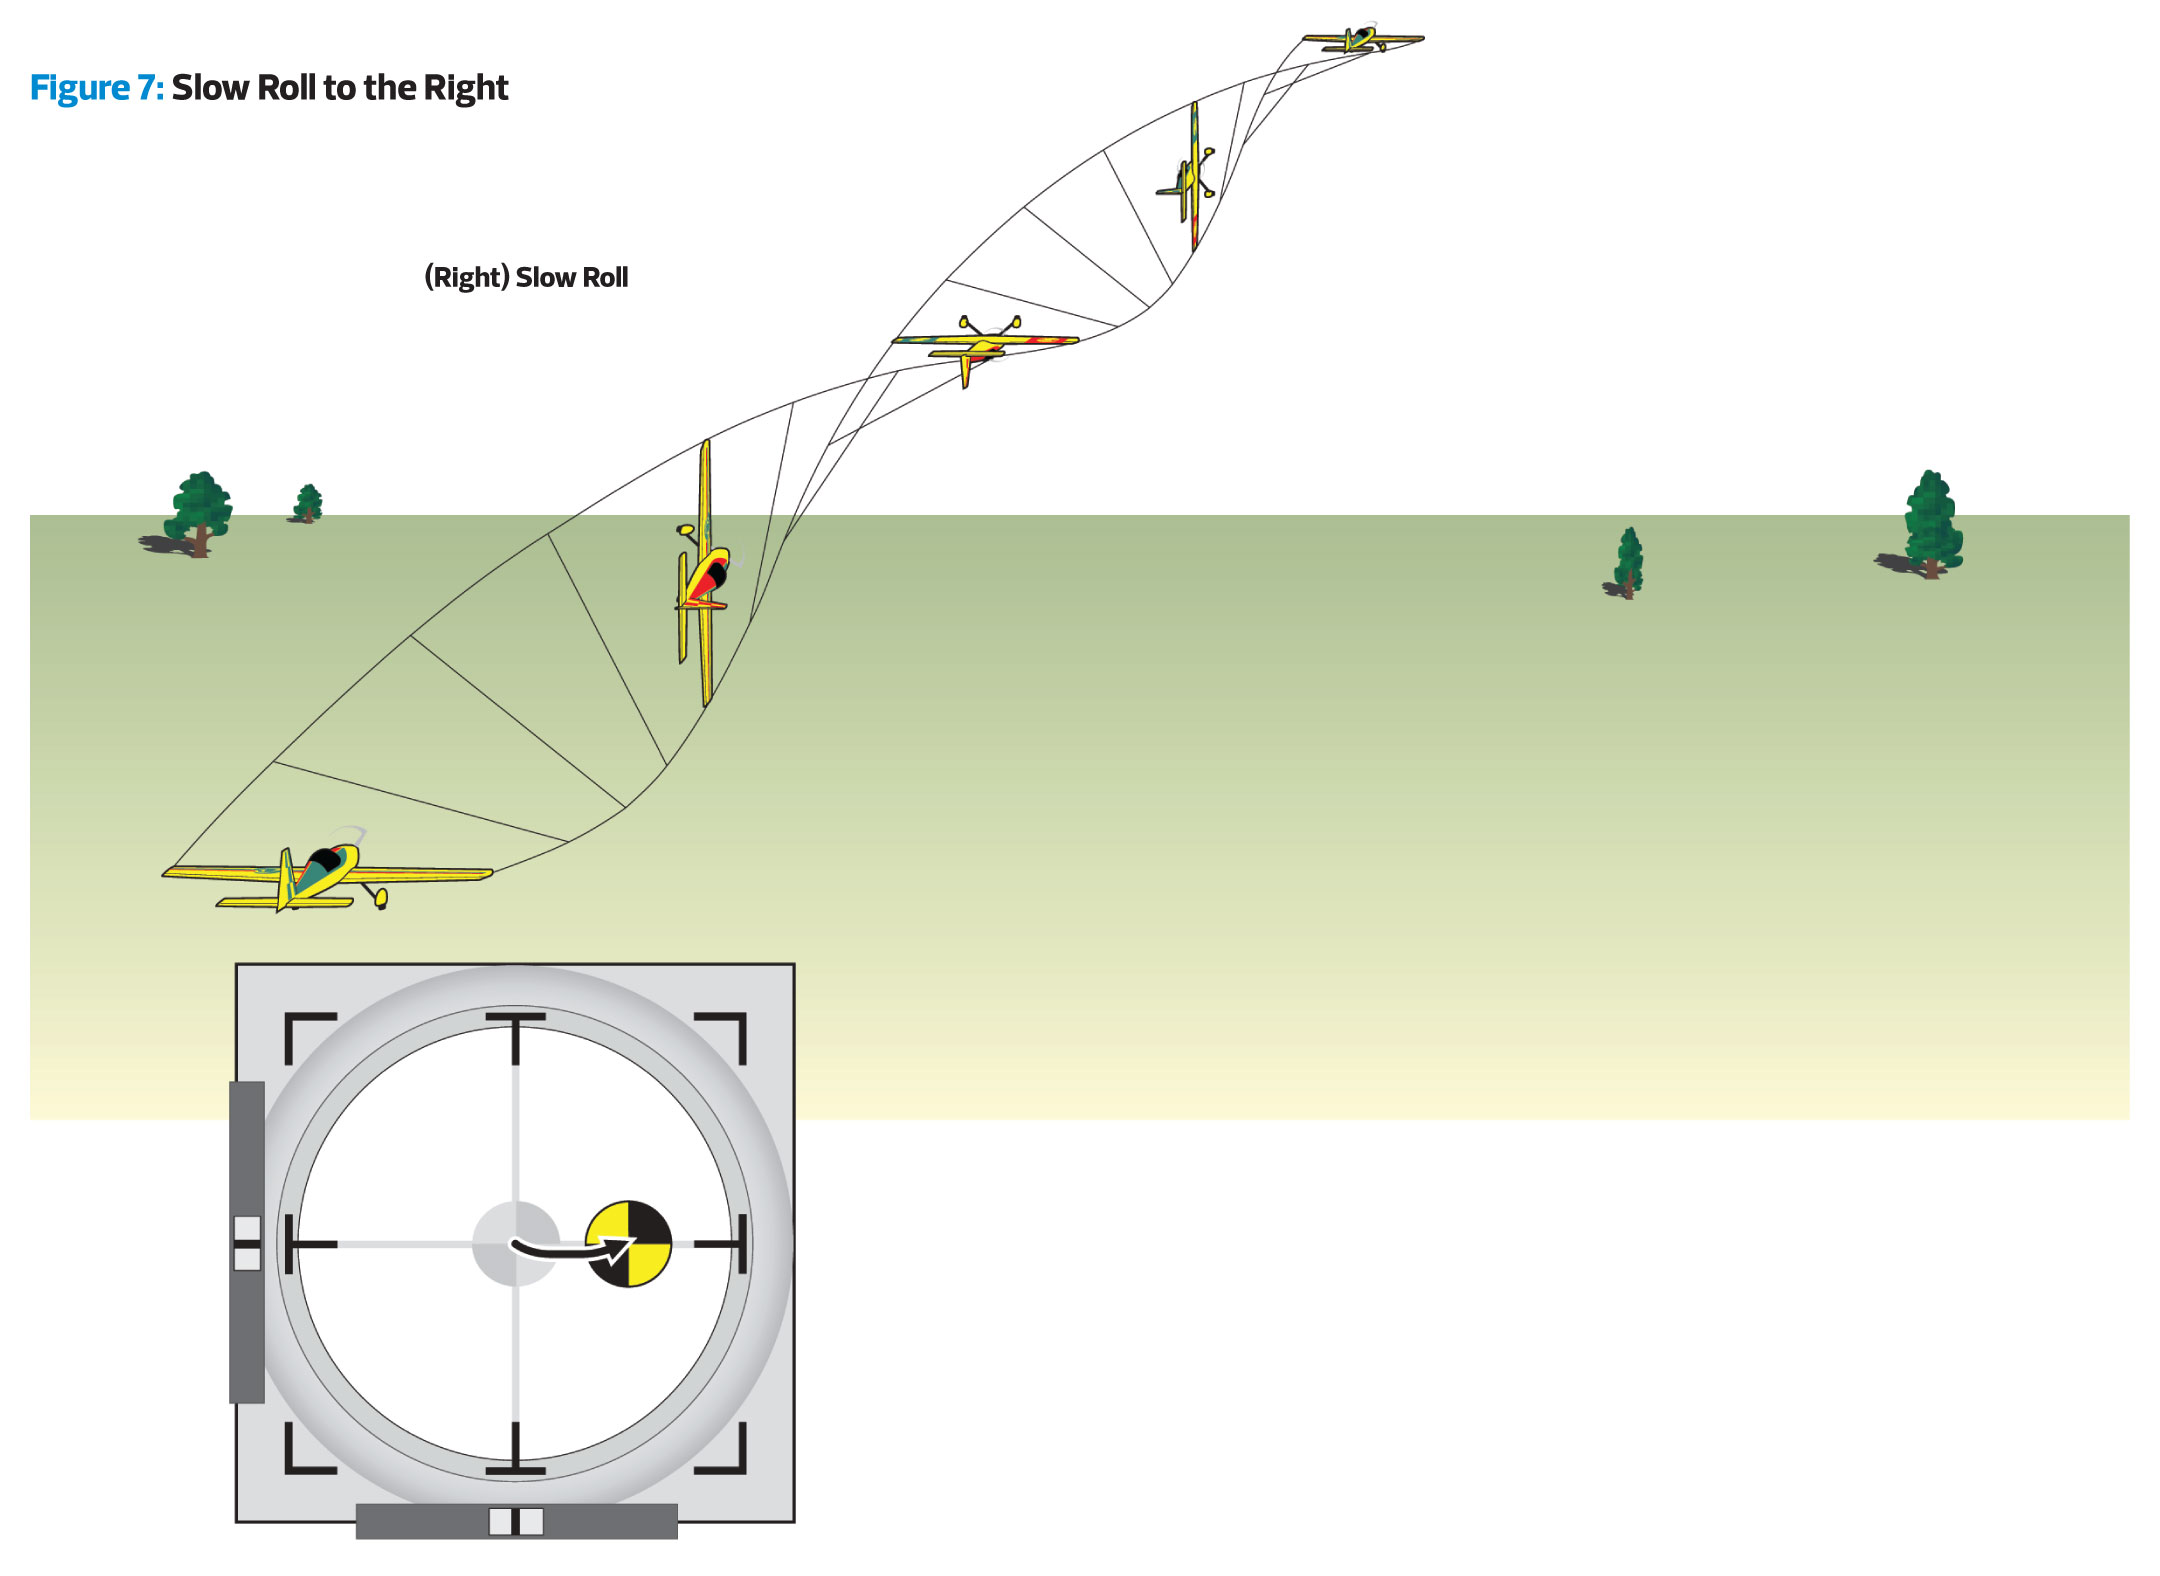
After mastering horizontal rolls with timely elevator inputs, you’re ready to start holding in less aileron to slow the roll rate and add rudder during the knife-edge portions of the roll to keep it level. First, keep in mind that it doesn’t matter if the top or bottom of the airplane is facing you; the rudder should always be applied in the “opposite” direction of the roll/aileron input. The rudder is then applied in the “same” direction of the roll entering the final knife-edge. Thus, if you’re rolling right, the opposite left rudder is smoothly applied to maintain altitude through the first knife-edge. Remember to smoothly push down-elevator through inverted and apply right rudder (same direction as the roll) through the final knife-edge (Figure 7). Keep in mind the correlation between the amount of aileron you’re holding in and the pace of the rudder and elevator inputs: The slower the roll rate, the slower you’ll need to apply and take out the rudder and elevator inputs. This is where applying maximum stick tension and paying attention to your control inputs really helps in comparison to merely reacting to the airplane. Be sure to note that the rudder inputs should be just enough to maintain level flight. Visible yaw is not the object; the object is to locate and repeat the control inputs that consistently produce the best results.
The most common error during slow rolls is neglecting some or all of the required elevator inputs and keeping the roll level with larger earlier rudder inputs. Not only can neglecting the elevator result in descents, but applying large rudder inputs before the wings are noticeably banked can also initiate a slight turn. At every skill level, the most influential factor and what dictates the quality and ease of the remainder of the roll, is the roll’s entry. It’s crucial that you input a small amount of up-elevator at the start of the slow roll to prevent it from dropping. You should also delay inputting the rudder until the wings are banked at least 30 to 45 degrees. Don’t forget to smoothly push forward elevator through inverted to keep the plane level before “same” rudder is introduced when approaching the final knife-edge.
BOTTOM LINE
The success of any maneuver, even advanced ones, hinges on good fundamentals. Advancing pilots often assume that any difficulties they run into will require learning more involved techniques or more stick time to solve. In truth, it’s often just the opposite. If you experience difficulties attempting to add refinements to your rolls (or any other maneuver), get reacquainted with the basics and reaffirm the foundation you need to propel yourself beyond the trouble spot. Practice can only make perfect if you maintain a solid foundation on which to build. Happy flying!
Text & Illustrations By Dave Scott, 1st U.S. R/C Flight School


Brilliant explanation, thank you.
When learning ANY new aerobatic maneuver, begin the sequence “three mistakes high” so that errors resulting in loss of orientation can be recovered in time to try again.
An excellent explanation, one small comment that will definitely help the newcomer to aerobatics regarding determining which rudder direction to apply during a roll:
You correctly stated “the rudder should always be applied in the “opposite” direction of the roll/aileron input”. This is perfect but only if commencing the roll from upright.
The technique I find most helpful in the long run is:
As you roll if you see the top of the plane then the rudder stick direction goes towards the tail of the plane. Conversely if you see the belly of the plane then the rudder stick direction goes towards the motor. When this becomes second nature rolling becomes a lot easier and you don’t have to remember if you started from upright or inverted.
The best explanation I’ve heard to date. Thx.