
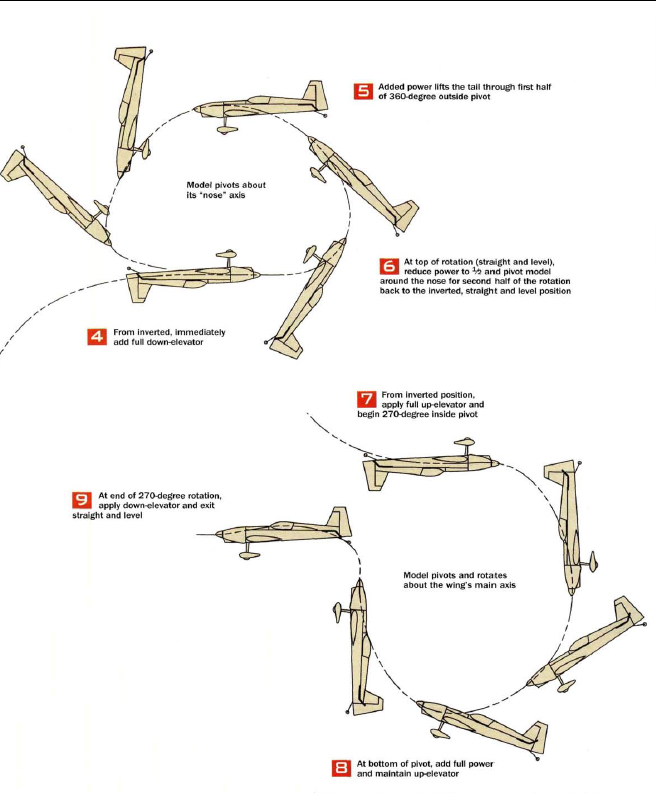
To do the Roller Coaster, start by flying downwind, straight and level at about 1/3 of your model’s top speed. Pull up the elevator to full deflection. The model will execute a big pitch change: its nose will go up past vertical to about 130 degrees, and at the same time, the model will slide backward so its tail is in front of its nose. Immediately add full down-elevator, and the airplane will again execute a big pitch change; its nose will push down and past vertical again (nose down), and the tail will look as though it is jumping and pivoting on the model’s nose and past vertical (nose up) to get to an almost flat inverted position. Then, from that position, pull the elevator full up again to rotate, and pivot around the wing’s main axis (CG) to move the nose back to the vertical up position. The model will rotate nearly 270 degrees around its main wing axis. Then push it to level, and recover upright.
The Technique
Keep in mind that the airplane you use to fly the Roller Coaster should have generous aileron and rudder surfaces. The keys to this maneuver are to first come downwind at the right airspeed (about 1/3of your model’s top speed) and then play with the elevator and throttle at the right time. The combination of elevator and throttle makes this maneuver possible. The elevator is very involved in this maneuver, and your model’s elevator should be at least 40 percent of the total stabilizer area. You also need a lot of deflection—at least 40 degrees up and down. Without this area and deflection, you won’t be able to properly execute the maneuver. Throttle use is also very important; you must manage it well to generate the right forces at the right time to help the airplane go into such deep elevator turns. When the plane is coming straight and level and you pull the elevator for the first time, simultaneously reduce throttle to idle to allow the airplane to slide and lift its nose without gaining much altitude. For a moment, the model will look as though it is flying backward (especially if the wind is strong). Then, when that slide is finished and the airplane is nose-up and past vertical, the model will look for a moment as though it is frozen in the air. That’s when you should push the elevator to full down and add 1/2 to full power, depending on how far the airplane slid past vertical. When you push the elevator and add power, all that propwash will blow over the elevator and make the airplane (which is nearly static in the air) lift its tail. If you correctly coordinate the elevator, throttle and airspeed, the tail should lift and pivot on the airplane’s nose to pass vertical and return to an almost flat inverted position, i.e., it will rotate almost 360 degrees. From that position, reduce the power for just a moment to avoid any forward airspeed, and pull full up-elevator to make the airplane rotate around its CG and move from that almost inverted flat position so that its nose is nearly vertical. The airplane will rotate about 270 degrees and lose some altitude. When the airplane is nose down and its nose is about to rise, add all the power the airplane has to help make the elevator control more effective. This is the end of the maneuver, so push and recover upright.

When you push or pull the elevator, it is important to keep it at full deflection regardless of engine, aileron, or rudder position. While you’re executing this big, fast attitude (pitch) change, many forces act on the airplane: gyroscopic, engine torque, a tendency to tip-stall because of the plane’s high angle of attack and P-factor force from the prop. Use aileron and rudder to fight these forces, and keep the lateral and yaw axes as stable as possible.
BY QUIQUE SOMENZINI


