

By Kyle Matthew
Photos by Laurel Matthew (See more photos below)
In this last installment of “Geeking Out Your FPV,” I’ll be streamlining my First Person View (FPV) ground station and adding some new features to both my ground station and my Multiplex Easy Star. These upgrades allow for more reliability as well as 360-degree long-range tracking. Having a stable and reliable ground station is extremely important for safety of flight as well as for overall enjoyment. I’ll be adding three items to my system: Eagle Tree Systems EagleEyes ground station, ReadyMadeRC’s pan/tilt tracker, and Airscaperc’s Easy Star Tundra landing gear.
EagleEyes Ground Station
Eagle Tree Systems has been on the cutting edge of radio control technology with their unique brand of data logging and telemetry equipment. Now they’re leading the pack once again with their innovative products for FPV, the latest being the EagleEyes ground station. The EagleEyes ground station combines four pieces of FPV equipment into one compact unit while adding many other useful features.
In this one unit you’ll get a receiver diversity switcher, antenna tracker, telemetry, and six-channel A/V distribution (two inputs/four outputs). Coupled with the Eagle Tree On-Screen-Display (OSD) Pro, this is a seriously powerful piece of gear. Here’s a brief description of its main features:
Receiver Diversity – When two NTSC or PAL audio/video receivers (of any frequency) are connected, EagleEyes picks the better signal at any given time to display. A variety of diversity settings are configurable with a single-push button on the ground station along with associated LED indicators.
Antenna Tracking – When coupled with the OSD Pro, the EagleEyes acts as a full-featured pan/tilt antenna tracker. The built-in regulator drives pan/tilt servos, with no need for an external BEC. This system will work with the tracker of your choice and, depending on the type of servo, used can rotate the antenna more than 360 degrees.
Telemetry – When coupled with the OSD Pro, all Eagle Tree data (not just GPS position) are transmitted to your laptop via the video signal, using the EagleEyes USB port. You can even use Google Earth to display your flight, either in real-time or after the flight.
Six Channel A/V Distribution – The EagleEyes has two built-in A/V inputs and four outputs, eliminating the need for an audio/video splitter.
The EagleEyes ground station comes with one unit and an instruction manual—you’ll need to provide everything else (A/V cables, 2mm center-pin barrel power input, battery and USB mini-B cable). This helps keep the per-unit cost down and lets you decide which equipment you want to use. The ground station can run as a standalone unit but you will need the OSD Pro to use the telemetry and antenna tracking features.
The detailed 16-page technical manual may seem intimidating at first glance, but setting up the system is surprisingly intuitive. The key is to read through the entire manual first, get familiar with all of the ground stations capabilities, have a clear idea of what you want your ground station to do and to take your time. Also, be sure to check out this extensive discussion forum on the EagleEyes ground station—you’ll find the answers you need there (http://www.rcgroups.com/forums/showthread.php?t=1048046).
My setup consists of one 8dBi 900MHz patch antenna, one standard receiver with vertical Omni antenna, one 3S 1200mAh LiPo battery to power the two antennas and one 3S 750mAh LiPo battery for the ground station. I attached my FatShark FPV goggles and JXD990 digital recorder to the A/V outputs; this leaves me with two more A/V outputs in which to attach additional equipment if needed. I also connected my laptop to the EagleEyes via the mini USB port for real-time telemetry readings.
Once set up and calibrated, the ground station is very easy to use. Before each flight you’ll need to set the pan zero angle so the EagleEyes knows the actual compass direction in which it’s pointed. This is a simple process that can be done quickly and is clearly explained in the manual. Once this angle is set, you are ready to fly, sit back and watch the EagleEyes work its magic.
Some of the other features include a programmable low-voltage alarm for the ground station that alerts you when the battery is below a chosen voltage, manual antenna switch, telemetry indicator and alarm, as well as many others.
The EagleEyes ground station is a great leap forward in FPV technology. With its built-in diversity switcher and pan/tilt capability, it makes long-range flights in any direction much easier and safer.
ReadyMadeRCAntenna Pan/Tilt Assembly
ReadyMadeRC has released an antenna pan/tilt assembly kit designed to work with the EagleEyes Antenna Tracker. It has been designed with direct mounting points for L-Com 8dBi, 14dBi, and as well as other diversity Patch antennas. The kit includes two HS-485HB servos, gear and rotation hardware, a Velcro strip and zip-ties, mini magnetic compass, 1/4-20 tripod mount, along with standard ½ inch 1/4-20 and 10-24 bolts for antenna mounting. Also included is a “sidecar” attachment, which can be used to mount a second receiver with a vertical whip antenna or as a spot to mount additional equipment.
Assembly of the pan/tilt tracker was straightforward and quick. Before gluing, I dry fit all the pieces and was impressed by the fact that there were no binding or excessively tight-fitting parts. Next, I followed the written instructions and color photos and completed construction in less than two hours.
The equipment I attached to the rig includes one 8dBi 900MHz patch antenna, one standard receiver with vertical whip antenna, one EagleEyes ground station and two 3-cell LiPo batteries. The power of motion is provided by two Hitec HS-485HB; these servos are strong and have Karbonite gears. The HS-485HB’s had no trouble handling the weight of my setup and they are, like all of my Hitec servos, ultra reliable.
The patch antenna is placed on the antenna mounting bracket and the supplied nylon screws fit perfectly. The receiver for the patch antenna was attached to the back of the same bracket, helping to counter-balance the antenna. The smaller standard receiver with vertical whip antenna was attached to the outside of the sidecar with the supplied screws. I mounted the EagleEyes ground station on the opposite side with small zip-ties. Since I chose to use two batteries, one is placed inside the small compartment on the sidecar and the other is behind the EagleEyes on top of the main structure.
This is a fairly compact rig, and dea
ling with long cables can be a nuisance, so I made sure each cable was secured to the rig and that they would not bind while it moves. I also did my best to make it look nice and tidy; “tried” is the key word here. I attached my recording device to the tripod; I also use it as my backup viewing device so I wanted it in plain view. The entire rig is attached to a sturdy tripod.
ReadyMadeRC has produced a low-cost, high-quality tracker that works flawlessly. The EagleEyes ground station is a perfect fit and completes the overall tracker package.
Airscaperc Easy Landing Gear
One of my favorite things to do in both full-size aircraft and RC aircraft are touch-and-gos. Unfortunately, this wasn’t possible with the Easy Star, until now! By manufacturing landing gear, Airscaperc has introduced a whole new dimension of flight to the Easy Star. Now I can taxi out, takeoff, fly a sortie, land and taxi back; all viewed from the cockpit.
The main landing gear is made from sturdy 5052 aluminum along with a stainless steel tailwheel wire. The main wheels are 1-3/4-inch Lectra Lites from Dave Brown Inc. and the tailwheel is a one-inch Du-Bro. One of my favorite features of the landing gear is its quick release capability; I can install or release the main gear in seconds by unscrewing two nylons bolts by hand.
Since I fly off of a grass field with some rough spots, I chose to use the new “Tundra” wheels upgrade kit. The Tundra upgrade kit includes 3-inch Du-Bro Diamond Lite wheels, heavy-duty axles, nuts, tail skid to protect the Easy Gear from damaging rocks and bumps, and an instruction manual.
Installation on a standard Easy Star is simple and quick (there is even a 10-minute installation video on their website), but my FPV Easy Star is far from stock. My Easy Star is packed with wires running from the cockpit to the belly, which makes mounting the metal backplate inside the fuselage against the rear bulkhead of the cockpit impossible. So, I removed a small amount of foam directly underneath the cockpit’s rear bulkhead in the shape of the backplate. I then glued the backplate backwards (nuts into fuselage) and flush to the belly with epoxy. Next I attached the main gear via the two nylon screws to the outside of the fuselage. The entire system weighs less than 5 ounces, is extremely durable and handles my Easy Star’s 2 pound, 12 ounce body with ease.
The wide wheel base makes ground taxiing easy and I’ve noticed no negative effects on the Easy Star’s flight characteristics. The extra weight of the gear is located near the center-of-gravity, so I didn’t need to add any additional weight for balance. The main landing gear position is also adjustable (fore and aft) so you can fine-tune the landing gear balance point to your taste and flying field conditions.
Performing touch-and-gos while in FPV is both fun and challenging, but be sure you are comfortable with the performance of your aircraft before attempting this. The Airscaperc landing gear is a great addition to my already pimped-out Easy Star.
Conclusion
These three upgrades are just the latest in a long list of up-and-coming FPV products. This portion of the hobby is growing quickly as more and more people are literally seeing how much fun FPV flying can be. Most of these new products are giving the pilot more situational awareness as they fly, which in turn, makes it a safer and more enjoyable experience. Even with such advances in technology, it is still up to you, the pilot, to know your limits and be mindful of your environment. Until next time, follow the rules, be safe and most of all—have fun!
Gear used
Eagle Tree Systems EagleEyes FPV Ground Station – eagletreesystems.com – $89.99
Antenna Pan/Tilt for EagleEyes Antenna Tracker – readymaderc.com – $89.95
Easy Gear – airscaperc.com – $34.95 (Tundra tire kit $14.98)

The pan/tilt for EagleEyes tracker from ReadyMadeRC.com comes in an easy-to-assemble package. Everything needed for operation is included.
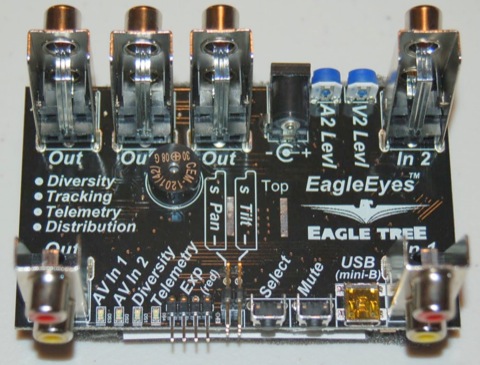
The EagleEyes ground station is small in size but packed with FPV applications. A hard plastic casing for the EagleEyes will be available from Eagle Tree Systems soon.

The standard EZ gear comes with the smaller wheels, the Tundra upgrade tires are seen in the upper left and right corners for comparison.
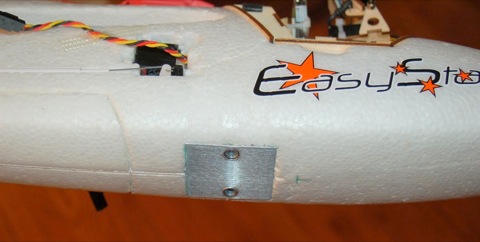
Here you can see where I glued the backplate flush to the belly with epoxy. Normally this plate would be on the inside of the fuselage.

The main gear attaches se
curely to the modified location of the back plate.

The Tundra tires work well on the grass runway and look good too.

The wide wheel base makes ground taxiing easy and helps with unwanted lateral movement on crosswind takeoffs.
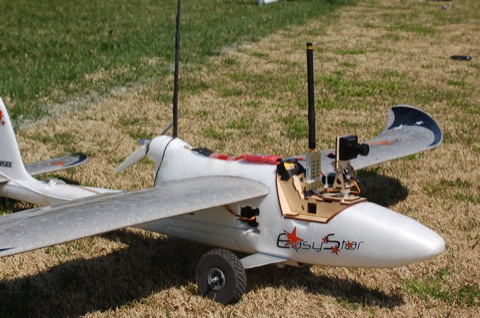
My fully decked-out FPV Easy Star, ready for its next sortie.

I’ve noticed no negative effects on the Easy Star’s flight characteristics. The extra weight of the landing gear is located near the center-of-gravity.


Receiver number one is attached to the 8dBi patch antenna, receiver number two, with its vertical Omni directional antenna, is attached to the sidecar on the left. The EagleEyes is zip-tied to the right side of the tracker and both batteries are tucked in the middle.


