

Last summer I flew noon demos at several RC events and was alarmed by how many pilots struggled with or lost control of their models during simple turns, leading therefore to additional difficulties trying to line up with the runway, handling wind, etc. As one who diagnoses pilots’ flying skills for a living, it was obvious to me that the problem wasn’t that they needed more practice, but that they lacked an understanding of basic flight control.
If you’ve ever watched a proficient pilot fly (you can often tell by their mirror image perfect landings), you may have noticed how their general flying appears casually routine. In other words, they make it look easy. That’s because their control of the airplane has become mostly automatic. For example, instead of reacting to the airplane every time they perform a turn, proficient pilots simply repeat the same turn control inputs and the airplane predictably and consistently follows along. By focusing on controlling the airplane and repeating the same control inputs, you too can experience the same predictable results as pro fliers, and therefore experience greater proficiency in wind, easier transitions into new and different aircraft types, and more consistent landing setups.
Procedure (Aileron) Turns
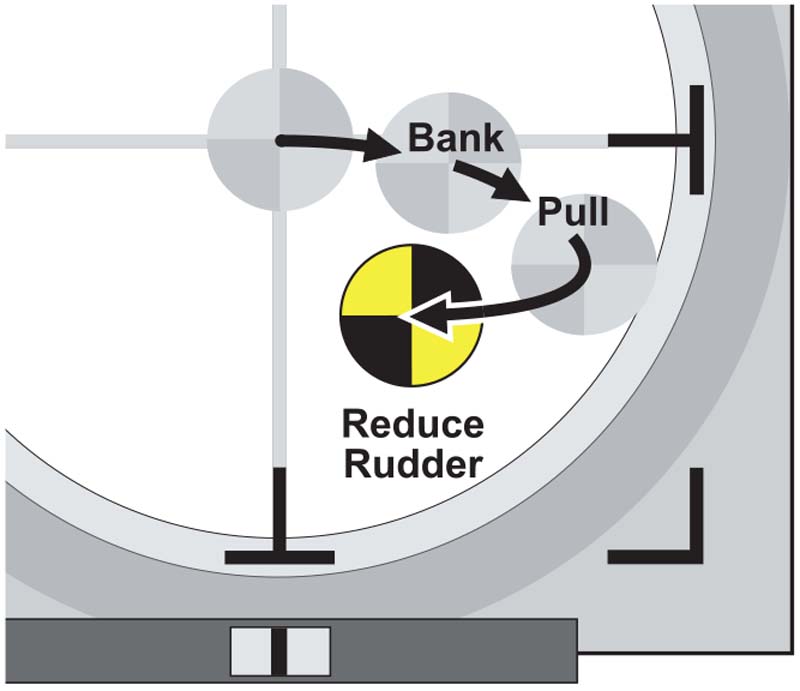
The procedure that pro pilots use to turn most aileron equipped airplanes starts by “setting the bank” with a smooth, yet brief, aileron input. Note that the aileron input is neutralized to avoid needless adjustments or entering a downward spiral and then up-elevator is applied to pull the nose into a turn and to keep the turn level. The turn is then kept level mainly by adjusting the elevator versus “fiddling” with the ailerons as so many pilots mistakenly do.
The size of the aileron input determines the degree of bank and therefore the size of the turn, as well as how much elevator will be needed to keep the turn level. For example, a smaller aileron input produces a shallower bank and therefore a wider turn, whereas a larger aileron input produces a steeper bank and a tighter turn. The initial objective of every proficient pilot is to find the aileron input that consistently produces the degree of bank that we are comfortable with, and then determine the correct amount of elevator to pull each time to keep the turn level. You can anticipate that during a mild bank, most of the wing’s lift is still opposing the pull of gravity, and thus very little up-elevator will be needed to keep the turn level. During a steeper bank, there’s less upward component of lift to oppose gravity, thus more up-elevator is required to keep the turn level.
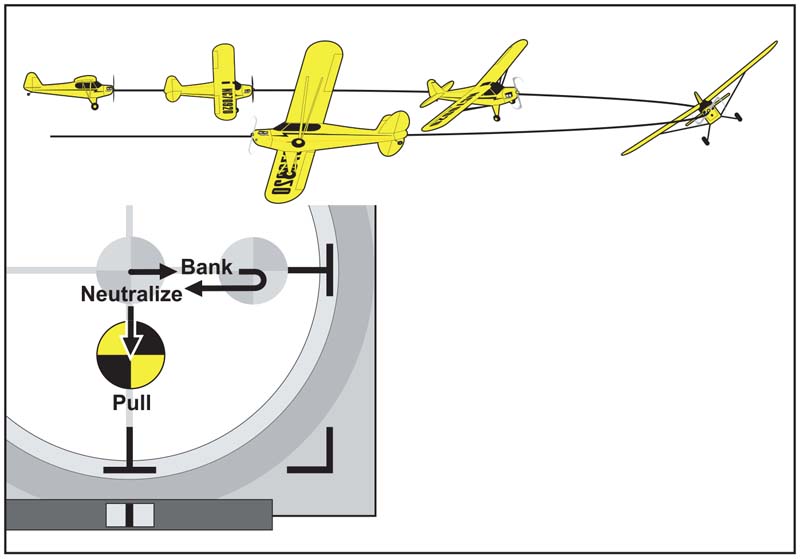
A brief aileron input establishes the bank angle. Pulling up-elevator begins the turn and keeps the turn level. The key to avoiding tight or spiraling turns is to not hold in aileron during the turn!
Consistent Turns
The neutral stick position provides a distinct point from which to gauge the size of each of our control inputs, therefore making correct amounts easier to repeat and incorrect amounts easier to modify correctly. For example, if your turns are too tight, rather than “fiddling” with the ailerons throughout your turns, simply reduce the size of your initial aileron input from neutral to produce a shallower bank and wider turns. Or, if you initially pull too much elevator and effect a climbing turn, repeat the same aileron input next time, but pull less elevator from neutral and the turn will be more level.
Performing a procedure turn can be summed up by the motto “Trust, then adjust.” That is, proactively initiate your turns trusting your inputs, then adjust (fine-tune) the amount of elevator you’re holding depending on what you see to keep the turn level. If you see the plane start to lose altitude during the turn, pull more elevator. If the plane starts to climb, lessen the amount of elevator that you’re holding in throughout the remainder of the turn. Keep in mind that as a rule, it is easier to add more input than it is to recover after over-controlling. Therefore, the best procedure is to target a small amount of elevator at the start of a turn, and then fine-tune the elevator, if necessary, to maintain a perfectly level turn.
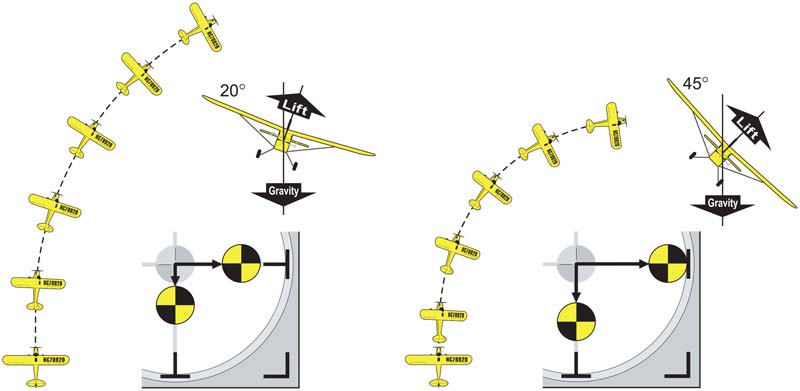
A larger aileron input produces a steeper bank, a tighter turn, and requires more up-elevator to keep the turn level.
Restarting & Tightening Turns
In the event that a turn needs to be tightened or restarted, the correct procedure is to smoothly apply an individual small bump of aileron (in-out) in the direction of the turn to steepen the bank angle while continuing to hold in the elevator. Remember, to avoid over-controlling, the aileron bump needs to be briefly applied in-and-out, not held in!
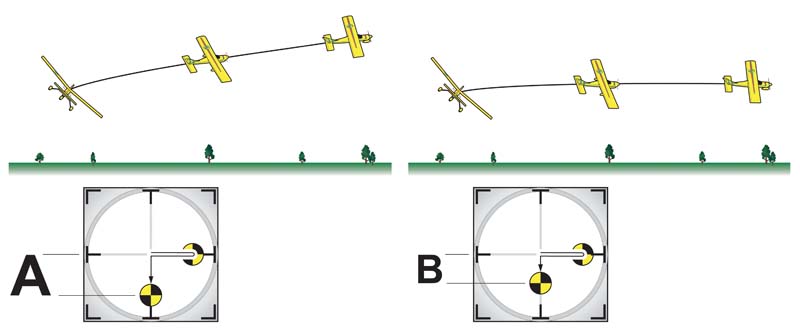
If you pull to much elevator at the start of your first turn, resulting in a climbing turn, next time repeat the same aileron input and bank but pull less up-elevator from neutral to effect a more level turn.
Procedure Turn Correction
At the point that you want to exit the turn, neutralize the elevator and smoothly apply opposite aileron to level the wings. Note that the key to applying the aileron in the proper direction is reminding yourself which way you’re turning and anticipating opposite aileron before it’s time to correct. The temptation to look at the wings to determine which way to apply the aileron produces hesitation and confusion whenever the position of the wings is not clear. Ultimately, correctly applying the aileron will hinge on how well you start and maintain level turns, because the less demanding the turn is in general, the easier it will be to remember which way to apply the aileron to level the wings. In fact, as long as the turn was kept level, you can actually get away with correcting the wrong direction, catch the mistake, and level the wings correctly with only minimal altitude loss. On the other hand, it can spell doom for an airplane if the pilot corrects the wrong way during a diving turn! Thus, prioritizing elevator adjustments to keep each turn level should be the top priority for most pilots.
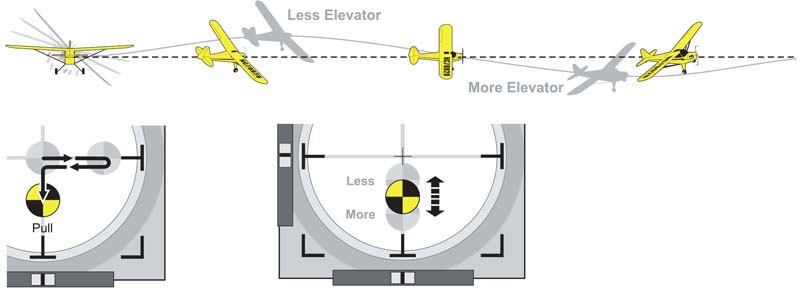
“Trust, then adjust.” Focus on your inputs when initiating the turn, then adjust the amount of elevator you’re holding in to keep the turn level.

Ailerons bank the wings. Pulling up-elevator turns the airplane. To exit the turn, neutralize the elevator and apply opposite aileron to level the wings.
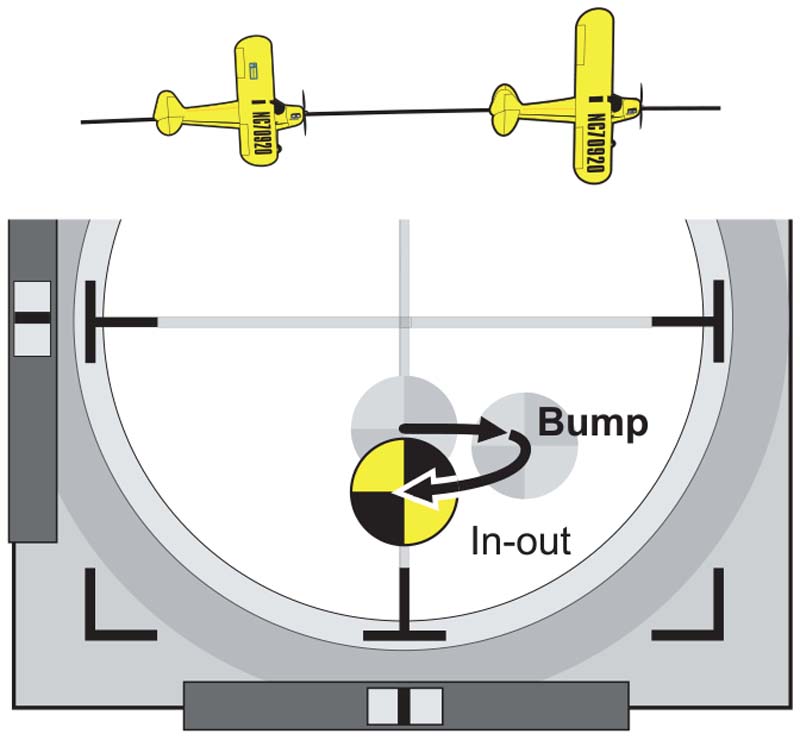
Briefly bump the aileron to restart or tighten a turn.
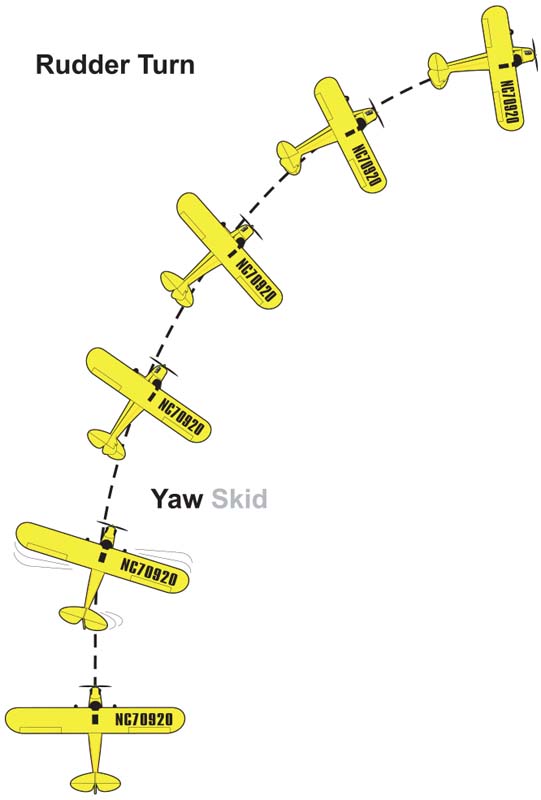
Rudder Turns
A rudder turn is performed using the rudder to yaw the nose of the airplane in the direction that you want to turn, and while space does not permit going into all the details, most airplanes will also inherently bank in the direction that the rudder is applied.
There are basically two different techniques required to turn an airplane without ailerons using the rudder. Planes that exhibit a lot of upright stability, such as a high wing powered glider, typically resist banking and therefore require you to continue holding in rudder to keep turning. These aircraft typically require a larger rudder input to get the turn started, but once started, the rudder has to be reduced to keep the turn from becoming too tight. Note: The inherent skid and subsequent speed loss when applying rudder will most likely require you to combine some up elevator with the rudder at the start of the turn to keep it from dropping.
Other rudder planes require a technique similar to an aileron turn, where the rudder is applied only long enough to bank the wings, and then it is neutralized to avoid over-banking and entering a downward spiral. Similar to an aileron turn, the degree of bank and the size of the turn are dictated by the size of the rudder control input. Keep in mind that rudder banks are less precise than aileron banks and will tend to lag behind your inputs if applied too quickly. Thus, to achieve results that more closely match your intentions, you must apply all your rudder inputs very smoothly to give the plane a chance to keep up with your inputs.
Once the turn is started, you’ll need to adjust the elevator to keep the turn level, then level the wings with opposite rudder to exit the turn. Returning the wings to level usually takes longer with rudder than it does with aileron, thus you’ll have to start leveling the wings prior to the point that you want the turn to stop, and then continue holding in the rudder until the wings are level. Note that prolonged rudder defections and the resulting skids tend to scrub off airspeed, thus you will most likely need to hold in a little up-elevator while leveling the wings to keep the plane from dropping.
Smoothly apply rudder to bank the wings, then neutralize the rudder to avoid over-banking and entering a downward spiral. Maintain up-elevator to keep the turn level throughout.
Glider rudder turn inputs.
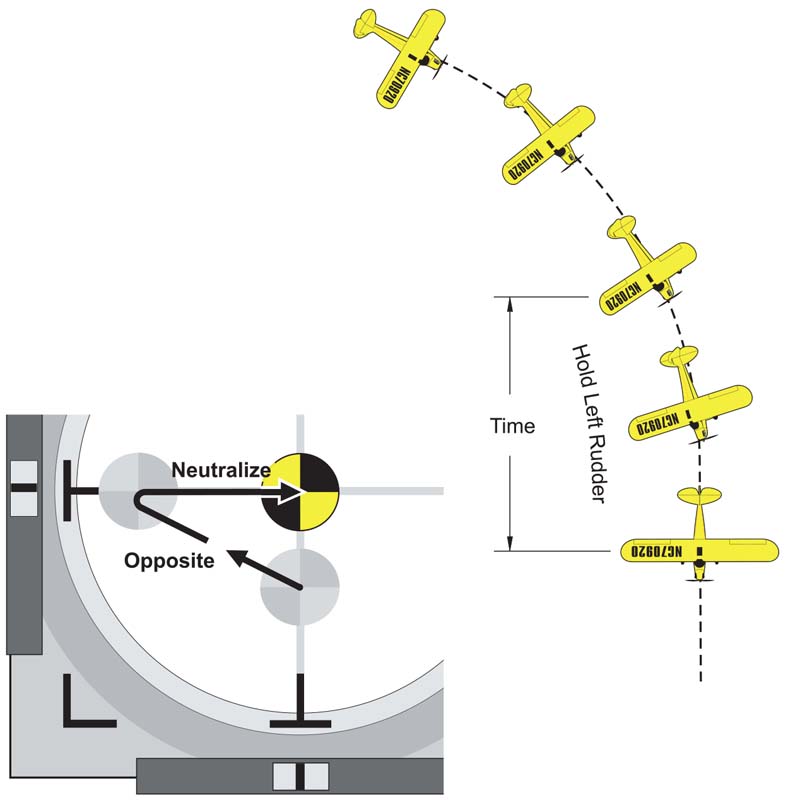
Prolonged rudder deflections tend to scrub off airspeed. Therefore, you will likely have to hold in some up-elevator while leveling the wings to keep the plane from dropping.
Conclusion
Proficient pilots don’t endeavor to get better at making corrections. Proficient pilots apply control inputs that reduce the need for corrections altogether. The key, therefore, is for you to pay attention to making consistent control inputs, and then if you don’t like the result, look to proactively change your inputs/commands rather than react to deviations. Consider that when your turn inputs are made correctly, the need for additional corrections may not even exist, and that is when you will be free to think ahead of the airplane just like a pro. Good luck and happy flying.


Thank you for the article. It is very good and it has taken me a long time to realize these things. The one thing I notice in this hobby is people change planes very often and each one responds very different. So, keeping that in mind is helpful. I also hear a lot of people talking about tip stalling, and what you talked about can definitely help eliminate that. Although, there is something I have noticed quite a bit when flying at lower altitudes. The air flow changes and I find it has a tendency to push the wings down. To compensate I apply a bit more elevator and more rudder in turns, and apply a little more throttle. Too much angle of the wing can make some very abrupt descents at the lower altitude. Just my observation.
You didn’t cover co-ordinated aileron/rudder turns. That is the first thing a CFI teaches. My full size flying has translated to my model flying and aileron/rudder combination is automatic