
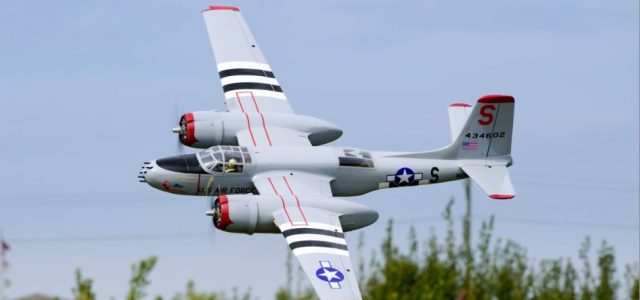
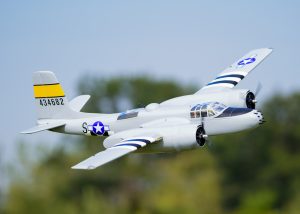
Not everyone has the patience or the many hours it can take to build a large scale model, so the availability of ARF warbirds such as the Phoenix Model A-26 Invader has been a boon for time-challenged builders. The only drawback is that you are limited to the livery the manufacturer chose for their subject, and if anyone else at your field shows up with the same plane, well, you just can’t have that. While researching info about the full scale A-26 for my review, I came across an image of a currently flying Invader called “Sugarland Express” and thought its livery would look great on my model. Here is a quick run-down of the makeover.
The first thing I did was prep the wings and tail feathers for the red tips. I opted to use regular spray paint since my model was electric. If the model was glow/gas powered, I would’ve used fuel proof paint or covering film. After masking off the tips, a scouring pad was used to remove the gloss from the covering. Just prior to painting, I removed any contaminants with a bit of acetone on a lint free rag.

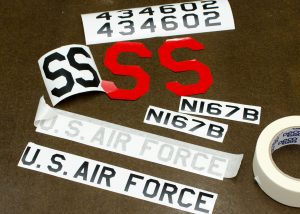
Then it was time to remove any of the markings and lettering that didn’t match the subject I was copying.
When pulling off decals its best to double back over itself at an angle and work slowly. This limits the amount of covering that could be pulled away from the structure (which then needs to be resealed), and eliminates virtually any adhesive residue. A little acetone or Goo Gone removes whatever might be left behind.

A heat gun made removing the yellow covering quick and easy. Don’t go overboard on the heat; too much and adhesive is left behind that then needs cleaning. Of note on this particular model was the pin-pricked surface underneath the trim covering to eliminate bubbles (a nice touch from the factory). They were very small and barely noticeable and I decided it wasn’t necessary to recover that portion.
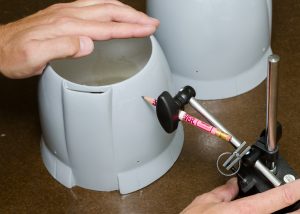
I used a soft pencil in an indicator stand to mark off the masking line on the cowl. This makes it easy to get a nice straight line on a compound curve. Make sure you use a soft pencil or temporary marker to avoid indenting the paint.
Because there were some compound curves involved, I used narrower masking tape to avoid any buckles that would allow the paint to bleed. When you get sharp inside corners such as this intake vent, avoid stretching the tape as it will lift away as it tries to return to its original un-stretched state. Instead, use a soft squeegee to press it into the valley or groove.
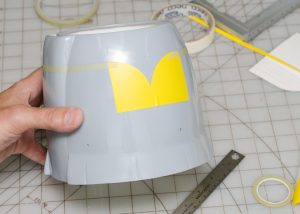
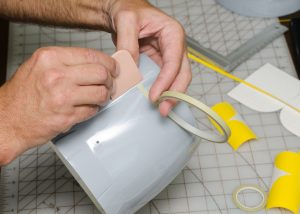
This portion of the cowl trim could’ve been done using even narrower tape, but I decided to use inexpensive shelf lining vinyl. I’ve used it for quite some time to make more complex masks. Since there was more than one piece needed, I made a card-stock template to mark the material.
Here is the result. One reason I liked the full scale subjects’ paint scheme is the minimal amount of painting required, which meant less time masking things off. It took just a couple of hours to mask and paint everything.
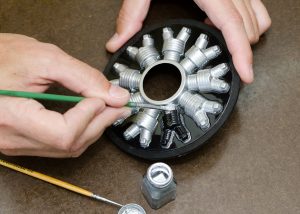
A scale model has to have some engine detail. The Phoenix A-26 came with lightweight vacuum formed dummy engines. I removed them from the cowls to simplify things (necessary since they were glued in place for the review flights) and painted the cylinder heads with plastic model paint. Using a fine brush on the edges of the cylinder first really helped in keeping a defined outline.
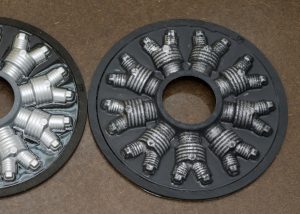
When the paint had fully dried, I thinned out some black paint and washed it across the molded-in cylinder fins. It took a little trial and error to get the mix just right. Too thick and it covered the silver whereas the other extreme caused it to flow out of the recess. I think this gave the engines a lot of character.
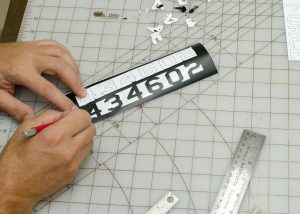
Next on the list was making the various letterings. Using pictures of the full-scale A-26, I created and sized a set of markings in my computer which I then printed out and taped onto the trim sheet using a temporary glue stick. Using a sharp blade, I used just enough pressure to cut through the paper and decal without cutting the backing itself so the spacing stayed intact. Last I removed the template paper and weeded the cut material.
Here is the complete set of markings. If you’re lucky enough to have a vinyl cutter at home this portion would’ve been quick. Alas I did not, so I had to resort to the old fashioned hand in knife method. I used wide masking tape as transfer paper which I first stuck to my palms to reduce the tackiness a bit. I found that the cheaper tape for works great for this purpose as it is a little more transparent which aids in alignment.
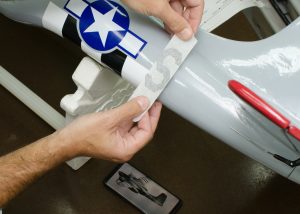
Using images of the full scale subject, I marked out the locations for my custom decals. To eliminate the chance of air bubbles, get the center stuck first, and then work towards the edges. If you do get a bubble, just use a pin to prick a tiny hole and squeeze out the air.
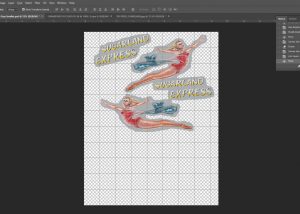
No warbird is complete without nose art. I was able to find a decent quality picture of my subjects’ artwork, which I scaled to size and cleaned up a bit in Photoshop. Then I duplicated the image and reversed it to give me one for each side. At this point I could have sent it out and had it professionally made into a decal, but I wanted to try to make it in-house.
I opted to use a sheet of adhesive label paper as my decal material. Using the highest print quality, I was able to get a very crisp image. Since Sugarland Express’ artwork was pretty intricate and difficult to hand cut, I decided I would make a gray background that matched the models covering material that would allow me to simply cut around the main image. This took a few test prints to get the color just right.
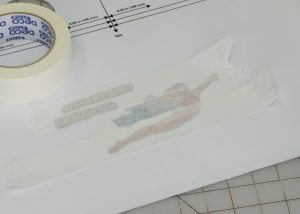
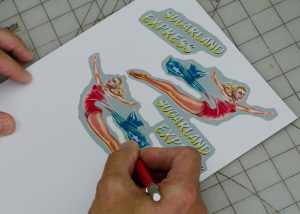
After cutting out the nose-art, I used remnant clear decal material from a previous project to seal the paper and provide a glossy surface, trimming it a bit oversized to provide an edge seal once in place. The same masking tape method was used to transfer it to the model. In a pinch you could use thin clear packing tape, though it might not be fuel proof and a wider image will require multiple pieces, leaving a joint seam.
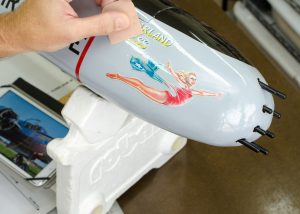
Again using the full-scale Invader as reference, I placed the Sugarland Express nose art in its spot. While the transfer tape was still in place, I used a soft squeegee to secure the decal and after removing the tape, I made sure the edges where sealed against the covering. This method should also work for gas powered planes as long as you use fuel proof decal material. One caveat about paper decals: they don’t like compound curves. So keep that in mind if you try this technique.
Adding wing walk markings were done using red trim tape. Though it didn’t seem like much, it really made the top surface pop. Just like on the cowling mask, avoid stretching the tape in low spots to avoid having it lift off. I was thinking of adding oil and exhaust streaks to match the full scale, but I wanted to keep things on the simple side.

I decided to add a little detail to the props as well. The center portion was masked and painted to give the appearance of a constant speed hub once mounted. To ensure symmetry, the tips were marked for paint using a prop balancer and a sharpie mounted on a block. As with the wings, I scuffed and cleaned the surface prior to painting.
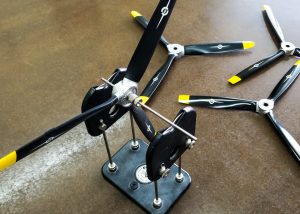
Anytime you paint props, it is imperative you take the time to properly balance them. I tried to keep the application even between tips and let them fully cure to make sure all of the carrier solvent had evaporated. The light end received a little touchup on the backside from paint sprayed into a cup. Again, let it dry and recheck. Repeat as necessary.
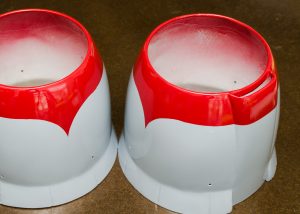
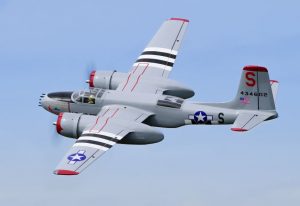 Yes, these are pictures of the same model. There’s quite a difference after just a few hours’ worth of work. I think you’ll agree the result was worth it.
Text & photos by Michael York


