
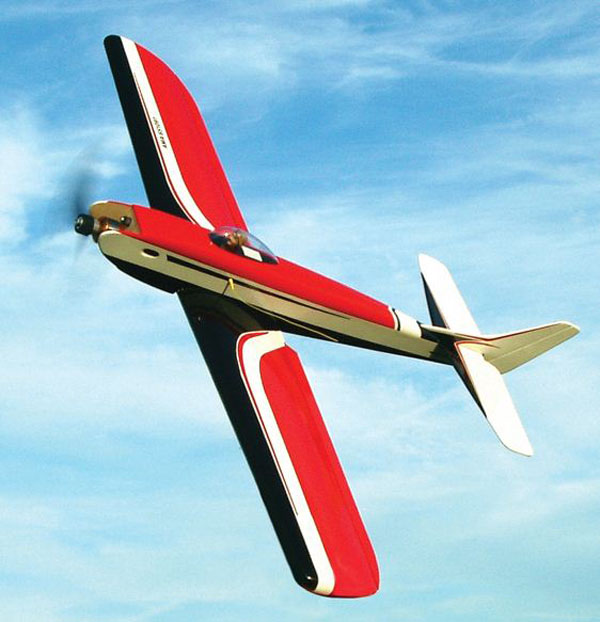
If you are looking for a great flying, easy to build vintage pattern ship, but are also looking for something easy to build without breaking the bank, than this miniature electric powered version of the 1960s era Taurus is for you. It’s now on sale at the Air Age Store. Here’s a close up of this great flying project designed Mark Rittinger.

A while back I built a half-scale Prettner “Curare”, called the Min-E Curare, which flew incredibly well. Then while talking “RC” with MAN senior tech editor Gerry Yarrish, he suggested that a “Min-E Taurus” would also be a lot of fun and affordable too. So, I drew up a simplified, very easy to build smaller model of a model! With a 32 1/2-inch wingspan, it’s not quite half-scale, and it can be built for just a few bucks worth of wood and foam. My Min-E models use the old “Ace RC” Mini molded foam wing, which unfortunately is now out of production. However, Flyingfoam.com can cut cores for just about anything from plans or files, and Bob Hunt (robinhunt@rcn.com) has also agreed to cut them as well.


FUSELAGE The fuselage is a very simple box affair, and shouldn’t require too much time or balsa. Cut two matching sides, and add the square balsa stringers and vertical pieces. Glue in balsa doublers from the trailing edge to the rear of the firewall. Add the balsa stabilizer mount. Cut square balsa as cross pieces at the leading edge and trailing edge on top and bottom. Install them square to one side. Cut out a firewall from plywood, and install it square to the same side then align and glue on the opposite side. The top of the fuselage is flat, this can be done over the top view to ensure proper alignment.

To Order the Plan Click Here: https://www.airagestore.com/min-e-taurus.html
Now glue the balsa parts in front of the firewall, and add the balsa cross grained sheeting under the rear fuselage. Add the top rear tail block and sand to shape. It can be hollowed out to save tail weight. Now sheet the lower front fuselage with balsa. Make the hatch, and add the wing hold-down system of your choice (screws or dowels and rubberbands.) I used an alignment tang in the front and a strong magnet in the rear. Carve and sand the fuselage to shape, and hollow out as much as possible to save weight. Pretty simple!
[nggallery id=209]
TAIL SURFACES & WING Cut the stabilizer and elevators from sheet balsa. Add the end caps and sand to shape. Bend a wire joiner for the elevator halves. Cut the fin and rudder from balsa as well, and sand. The wing is based on the ACE Mini Foam Tapered Wing sections. Airfoil templates are also shown on the plan if you want to cut your own core. Cut the root to proper angle, and then sand it to the proper dihedral angle. Cut the tips off as shown on the plans and sand the tip to shape. Glue on the balsa trailing edges after cutting them to a nice straight edge. Cut out the servo openings then epoxy the wing halves together and wrap the center with fiberglass cloth or nylon tape and resin. For added strength, I installed a small carbon rod in the wing bottom as shown on the plan. This has proven more than strong enough to take the highest loads I have put on it. Cut out two matching ailerons from 1/8″ balsa and taper. Notice that they do not go all the way to the fuselage. This was done on purpose, because it isn’t far from “scale”, but also it allows you to hold the model and hand launch without pushing on the ailerons. Make two opposite aileron torque rods/tubes from aluminum or plastic tubing and 1/16 in. (.062) music wire, and glue these in place on the trailing edge. The wire will get glued to end of the aileron after they are covered.
POWER SYSTEM Any brushed or brushless setup of around 100 to 150 watts will do just fine for this model. I used a Scorpion motor and a 7×5 APC prop that together pull 16 amps for about 170 watts with a 3-cell 1320mAh ThunderPower Lipo pack.
RADIO & COVERING Install the radio gear before covering, for the most part. This makes it easier to get at things and modify if needed. I ran tubes for pushrod wires on the rudder and elevator, and made small pushrods for the ailerons. Install the aileron servo and small pushrods before gluing the wing to the fuselage. I ended up with the servos as shown on the plan, the ESC behind the firewall, and a Berg 4L receiver at the wing rear.
I tried to copy the original Taurus colors using Econokote red, black and white. I applied the covering directly over the foam on the wing, and it looks fine as long as you give it a good smooth sanding first. I used “over and under” alternating hinges for all surfaces. Surfaces should always be free of load yet tight. Mini control horns were used on the elevator and rudder. Add a 4-inch Sig bubble canopy, and of course, a pilot bust! I used the head from a 1/12 -scale Williams Bros pilot.
FINAL ASSEMBLY Glue the fin to the stab, then the stab to the fuselage. Epoxy the wing to the fuselage, and make sure everything is nice and straight. I cannot stress just how important it is to have everything in proper alignment! Hook up all of the radio gear, and set the ailerons to 1/8″ low rate, 1/4″ high rate, elevator to 1/8-inch (low rate) and ¼-inch (high rate), and set the rudder for a half inch or so. One reason for that swept rudder was to aid in getting the bird to do a nice flat spin, a big maneuver at the time. There wasn’t all that much throw back there, and the sweep acts aerodynamically to help spin. Check CG, and run a wattmeter to make sure you are under the ESC and motor limits . Ready to go!
FLYING THE MIN-E TAURUS Check the CG one last time, and check the surfaces for proper direction and throws. I tend to be very cautious on maiden flights, with good reason. It just pays to play it safe.
TAKEOFF: The Min-E Taurus requires little more that a toss into the wind slightly nose elevated. With ample power, it should climb well. Get it up, and trimmed for flat and level flight. Perform a half-roll or half loop and see how much down-stick you need. Any more than 1/3 stick tends to indicate a nose heavy setup. Bring it down, and go over all clevises, servo mounts and hinges to see if anything shook or broke loose. If everything is good to go, go back up.
SLOW FLIGHT: The Min-E Taurus does pretty nice at 16 ounces with the thick wing. It will slow very well for wing cores cut or molded with no washout. The tapered ailerons near the tips may have something to do with this as well.
FAST FLIGHT: This little bird will really zip using 150 plus watts. There is plenty of vertical, and level flight is quite lively. I would suggest flying over a field at least twice the size of a standard baseball diamond, as a minimum.
AEROBATICS: Well, it will easily do the 1962 Pattern! The biggest problem is keeping an eye on it…it gets small fast if you are not paying attention. It rolls fairly axial, loops very large, and spins decent with high rate setup. Cuban-8s,vertical 8s, 4-point rolls, and stall turns all flow very well.
LANDING: The Min-E Taurus does well in the wind. Watch the tall fin for some weather-vaining on the crosswind, but nothing major. At one pound it’s a floater, and can glide pretty well, so be prepared. Just line it up into the breeze, and guide it down.
Overall, it’s a blast to fly, and looks the part of its heritage when in the air.
SPECS
Wingspan: 32 ½ in.
Wing area: 165 sq. in.
Weight: 16 oz.
Wing Loading: 14 oz./sq. ft.
Length: 25 ½ in.
Power Req’d: 100 to 150 watts ounces
Radio Req’d: 4-channel (Aileron, Elevator, Rudder, Throttle)
Plans number M0312A
Min-E Taurus Designed by Mark Rittinger, this is an electric powered reduced version of the classic 1960s Ed Kazmirski Taurus. It uses traditional balsa construction and a foam wing available from Flyingfoam.com. It has excellent performance and uses inexpensive power systems and radio gear.
Wingspan: 32 ½ in.; Length: 25 ½ in.; Radio: 4-channel; Power: 100 to 150 watts/oz.; LD: 2; 1 Sheet: $14.95
The Inspiration
In the early 1960s, Ed Kazmirski’s Taurus was a groundbreaking design. Winner of the National Championship, and Detroit Invitational, Ed’s design signaled a new direction in precision aerobatics. The Taurus, with its graceful swept-back fin, venerable Veco .45 and gorgeous paint job, really stood out far and above the competition. A full construction article on Ed’s Taurus was published in the January 1963 issue of MAN and Ed and his iconic pattern aircraft was featured on the cover. Ed’s original model however is still with us today, and was discovered, purchased and preserved by the Vintage R/C Society.


Hi Gerry,
I have been in contact with Bob at Flyingfoam.com about availability of the foam wings. He wasn’t aware of what wing you had used. Could you be more specific on what I should order from him. I want to be sure I can get the wings before I order the plans.
Sincerely,
Steve Erbe
It’s the old ACE RC Mini foam wing.
Hi Gerry,
Flyingfoam has two versions of the tapered wing. Did you use the wing made out of 1# foam, or 2# foam?