
Every issue we share reader advice in our “Tips & Tricks” column. Here are a few of our favorites.
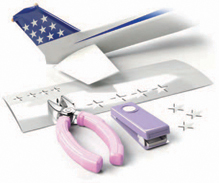
STAR STRUCK
Cutting out very small stars is nearly impossible with a hobby knife, and no small pre-made stars are available, either. Here’s the perfect solution: star-shaped punches for scrapbooking available at craft stores. Sizes range from as small as ⅜ inch up to about 1 inch across. Simply take a piece of your covering, peel the backing sheet off and punch out as many as you need. Use a Sharpie marker to make lines on the shiny side. The other is the glue side, so ironing them in place is easy as the marks on top can be cleaned off with acetone.
NO-STICK MIX
This is a great tip from way back. Coffee-can lids are made of smooth formed plastic that two-part epoxy glue won’t stick to. Just apply equal amounts of part A and B epoxy and mix together. After you’ve glued your parts together, set the lid aside. Once the adhesive has cured and hardened, it can easily be peeled away, leaving a clean surface to use again. This is much better than using disposable mixing cups that can tip over.
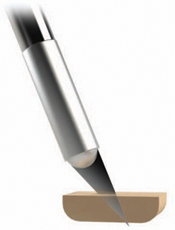
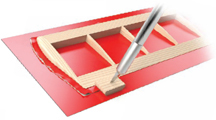
NEAT SEAMS
When you cover a model airplane part like a wing or tail surface, keeping the edges and seams straight adds a lot to the overall clean appearance. A great covering job with sloppy seams will not look as good as an average job with straight, neat seams. A surefire way to do this on the cheap is to simply stick your blade through a scrap block of hard-grain balsa wood. Position the blade about a 1/4 inch from the block’s edge with the tip protruding about 3/16 inch below the block. Hold the excess covering taught and run the block/blade around the part to produce a neat, consistent cut. Works every time.
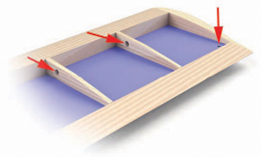
EASY BREATHING
Iron-on film coverings like MonoKote and UltraCote really seal up model structures like wings and control surfaces, and sometimes the heated air inside the structure will expand and the covering will “balloon” because the air has nowhere to escape. When the air cools, the covering becomes slack. Making a small slit in an outer edge with a hobby knife will allow the air to escape easily without marring the model’s looks.
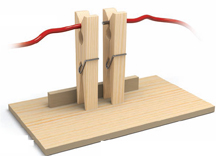
HELPING HANDS
It is darn near impossible to solder connectors to lengths of wire without some sort of holding fixture. You can purchase a jig, but why not use what’s at hand on your workbench? Simply glue a couple of clamping clothespins to a wooden base as shown. This arrangement holds the parts together while allowing you to hold the soldering iron and solder to do the job. Best of all, it costs nothing to make.
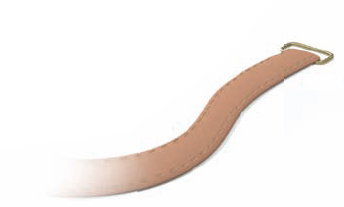
COAMING BY PRADA
For an easy way to make a good-looking leather cockpit coaming for your next open-cockpit airplane, check yard sales for old, worn-out leather handbags. The shoulder straps have nicely stitched and rounded edges and, with a good pair of scissors, you can cut sections of the strap edging free. Cut the section to the size coaming you need and remove the inner core. Cut to length, peel the two edges open and attach to the open edge around the cockpit. Glue in place with a touch of CA adhesive or white canopy glue. Voila!—an inexpensive, easy to fabricate scale detail. You can now proudly say, “My cockpit coaming is a “Louis Vuitton” or a “Prada.”
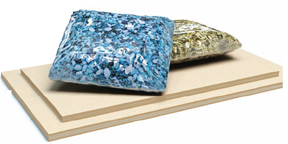
WEIGHT BAGS
When you have to laminate two large sheets of plywood together, it is often difficult to get a consistent glue bond if you just use edge clamps. Fill up sealable plastic bags with aquarium gravel to make handy weight bags. You can also use sand.

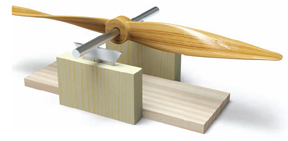
PROPER BALANCE
There are all sorts of propeller balancers out there for sale, but none of them work any better than the old, tried and true technique using single-edge razor blades. Simply get two blocks of wood (balsa or pine will do) and glue them to a sturdy base. On top of the blocks, glue the razor blades vertically (sharp edge up) at the same height and level with each other. Insert a drill rod (or a snug-fitting hobby knife handle) into the propeller hub and place on top of the razor blades. Now balance your propeller.
Have a tip to share? Send it to MAN@airage.com (no illustration needed, but it may help to take a photo) for “Tips & Tricks.”


Easy breathing – rather than a slit I use a pin to make hole through the film over the wood of the underside trailing edge. The wood prevents the hole from enlarging or tearing in the slipstream.
A pin hole works well in all ribs and at the root rib to allow the air to escape.
Proper balance – True, the blade balance method works and I have used it way in the past but why, with so many excellent inexpensive commercial balancers on the market that have a shaft and cone spindles that fit a multitude of prop sizes, go to the trouble of making this old fashion dangerous (sharp exposed blades) balancer that needs to be stored in a safe place. Always, SAFETY first!
P.S. – keep the tips coming. There’s more than one way to do something.
Also, as much as we like to believe our table/house is level, they most likely are not and with the straight razor method the prop is likely to just roll off in the direction of the blade slope unless you painstakingly level your balancer every time.
You are right about the commercial balancers, but keep in mind that many of us are involved in this hobby to be creative builders. It is easy enough to make the razor blade style relatively safe—you just grind the sharp points off at a sloping angle and inset the blade so the edges only protrude about 1/2mm, not the ridiculous height shown in the illustration.
When I finish an open cockpit I use round foam insulation ( this usually comes in a bag ) .Look for the type that has been slit and has the peal – and stick . Cut to the length you need , open the slit, peal off the tape and apply. Be careful ! ! , The sticky stuff is hard to reposition . I’ve been using this method for years and the foam has yet to fall off .
I made six little sand bags and all it cost me was a dollar plus tax. Found a small piece of material at Walmart in the sewing aisle. Sewed up the material into six bags, and filled them with sand from the local river. There was a nice sand bar, no rocks, after one of the floods this year.