
The concept of a flying wing or tailless fixed-wing aircraft is not new, the idea has been around since as early as World War I. This design has been adopted into the RC world with great success, most notably with the Zagi craze. The next generation of flying wings are bigger, stronger and faster. The RiteWingRC Zephyr is only one in a line of fast and durable wings that the owner Chris Klick has dreamed up. His newest creation is the Zephyr II (ZII), a strong lightweight wing made from EPOR foam with precut spar tracks, servo recesses and electronics bays. The kit contains two molded wing panels, two custom balsa trailing edge pieces, all of the required wing spars, winglets, electronics bay covers and a CNC aluminum motor mount. The rest of the hardware will need to be provided by the builder. The 10-page build manual is available online for download as well as many RiteWingRC instructional videos, which were a tremendous help in the build process. Chris is also available for any further assistance you may need, I have to say the customer service was outstanding.


UNIQUE FEATURES
The ZII has a new streamlined center section to house even more gear, and as an option Chris offers a CNC laser cut GoPro camera box and rail skids ($35.00) that can be easily integrated into the blunt nose section. These two features make it a great platform for First Person View (FPV) flights (see side bar). The wings are molded to fit standard size servos and the battery bay was designed to house up to two 4s 4000mAh. One of the benefits of the ZII’s foam material is that new bays or compartments for additional equipment can be cut with ease. Although having everything you need already pre-cut saves an incredible amount of time.
The control surfaces are a simple elevon arrangement, so make sure your transmitter has that mixing capability. Both servos and bays are located on top of the ZII; this provides easy access and also protects the servo arms and pushrods during landing. The manual suggests using several different types of glue. I followed these recommendations and they worked well. Following the steps to laminate the ZII made it ultra-strong and durable, giving it that bullet proof feel.
Building the ZII was a breeze, mostly because everything is precut and the recommended gear all fit perfectly. The most difficult part was making the elevons and hinging them with 3M packing tape. Chris has an online instructional video that addresses this process. After watching him do it once or twice it’s very easy to accomplish. Finishing touches can be made with paint or covering. I chose to use Monokote and vinyl carbon fiber tape. Using bright colors will help visually keep track of the ZII during flight and also makes it stand out on the flight line. I hinged the bay covers, gluing one end and keeping the other end closed with rare earth magnets. This allows for easy access to the batteries and electronics.

The recommended power package is a RiteWingRC 1200kv outrunner motor coupled with a 65amp ESC ($140.00). I ran this combo with an Aeronaut CAM 9.5×6 folding prop and two 4s 3300mAh batteries connected in parallel to make a 4s 6600mAh pack. When using a folding prop it is necessary to install a prop-stop which is flexible enough to not prevent the props from folding, yet strong enough to provide resistance against the props folding too far in (or out). The laser cut folding prop-stop, made of black Delrin, from fpvmanuals.com fit the bill perfectly. If you plan on using a 4s battery you must also use a separate Battery Eliminator Circuit (BEC). The built-in BEC of the ESC cannot handle a 4s battery pack without overheating which could result in a meltdown and loss of aircraft. I used a Turnigy 5amp 26V switching BEC. This power package makes the ZII scream across the sky. High speed passes and jaw dropping maneuvers are the norm for Zephyrs, and the ZII is no exception, but this wildcat also has a tamer side. The blunt nose and thicker camber make for great slow speed performance and stability. Using a 3s lipo will reduce the power output and lessen the weight for a more relaxing flight experience.

CONCLUSION
Chris has listened to his loyal customers over the last few years and came up with a design which addresses the troubled low speed launch and landing issues which plagued the Zephyr without compromising its incredible flight performance. It’s easy to build and just pure fun to fly. I was able to have the ZII built and ready to fly in two evenings. The manual is easy to follow and the online instructional videos were a big help. The ZII is more than just another flying wing; it’s an experience, which makes it one of those “gotta have it” planes.
IN THE AIR
For the initial setup match the control surface to the wing top with a straight edge. Do this out near the winglets. After this is done, dial in 3 to 5 clicks of up elevator trim. This will get you close to the right trim for the initial maiden flight. To get the correct CG I added 4.6 oz of weight to the nose. CG is extremely critical for flying wings, so try to be as exact as possible.
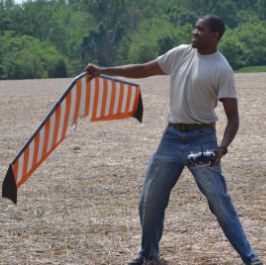
There are a few different ways to launch the ZII; each has its pro’s and con’s. The easiest way is to hold the ZII just in front of the motor mount, throttle up after an over hand toss. The danger of an accidental throttle bump with fingers near the prop is too high for me. Another method is to hold the ZII’s leading edge just to the side of the nose and give a side arm toss approximately 45 degrees up while applying ¾ to full throttle. This is the method I use for launching; it’s a bit more difficult but much safer. Some flyers have also made a small hand grip out of foam and taped it to the bottom, in the end you’ll have to choose which method works best for you.
Once in the air the elevons are quite sensitive so do not over control, small and smooth movements work best. A few clicks on right aileron and down elevator trims are all it took to keep the ZII flying strait and level. When it’s time to land simply line up and reduce power while keeping a slightly nose down attitude. Once near the ground, a small flair is all that is needed for a smooth belly landing.
GENERAL FLIGHT PERFORMANCE
Stability: The ZII is extremely stable with the proper CG. If it seems pitch sensitive or oscillates move the CG forward. It should fly smooth and slice through the air effortlessly.
Tracking: Flies like it is on rails, enough said.
Aerobatics: Rolls, loops, inverted flight and everything in between is easily accomplished. The RiteWingRC power system allows the ZII to power through any maneuver you can throw at it.
Glide and stall performance: I had no problems and saw no bad tendencies during stalls and power off glides. Keep the nose slightly down with shallow turns and you should have no issues getting the ZII on deck safely. The folding prop helps extend the glide by cutting down on parasite drag while the winglets improve stall characteristics by reducing induced drag.

PILOT DEBRIEFING
The ZII is fast, light and strong. It goes together quickly and easily which is good for a beginner but the flight characteristics require intermediate to advanced piloting skills. The ZII’s versatility makes it appealing to many different types of pilots. Whether hot dogging or just cruising around FPV style taking in the scenery, the ZII will do the job. It’s guaranteed to put a smile on your face every time.

Specifications
MODEL: Zephry II
MANUFACTURER: RiteWingRC (ritewingrc.com)
DISTRIBUTOR: RiteWingRC
TYPE: electric flying wing
SMALLEST FLYING AREA: football field
IDEAL FOR: intermediate or advanced
WINGSPAN: 56 in.
WING AREA: 770 sq. in.
READY-TO-FLY WEIGHT: 4lbs 7oz
WING LOADING: 16 oz sq.ft
PRICE: $130.00
CENTER-OF-GRAVITY: 9 3/8” back from nose
GEAR USED
Radio: Spektrum DX8, Orange rx, (2) RiteWingRC metal gear servos-elevons
Motor: RiteWingRC 1200kv, 65amp ESC (ritewingrc.com), Turnigy 5amp 26v BEC (hobbyking.com)
Battery: Turnigy (2) 4s 3300mAh (hobbyking.com)
Prop: Aeronaut CAM folding 9.5×6 (espirite.com), Prop-stop (fpvmanuals.com)
HIGHLIGHTS
+Awesome flight performance
+Quick build time
+Large electronics bays to fit lots of gear
+Made of durable foam
+Made in the USA
Winging it FPV style
The ZII was designed with FPV in mind. The extra wide electronics bay, blunt nose and stable flight characteristics all make the ZII an ideal choice for an FPV platform. There are a few extra steps you’ll have to make during the building process which will approximately double the time to finish. I recommend planning or even drawing out a diagram of what you want to install and more importantly where you want to install the gear. After coming up with a game plan I decided to install the 900 MHz transmitter on the right wing and the Vee video antenna on the right wingtip in an attempt to keep it far away from the other electronics. Also on the right wing is the MFD antenna tracker. The GPS is located on the opposite wing while the Eagle Tree eLogger V4, OSD Pro, altimeter and Guardian Stabilization Expander are situated in the main electronics bays. I was also able to fit the Long Range Receiver in the aft main bay with its two diversity antennas attached to both the top and bottom of the body/wings. The primary antenna is held vertical with a bamboo skewer and the secondary is horizontal in a shallow groove cut into the foam. To fit the two ReadyMadeRC 3s 2200mAh batteries I cut two compartments out of the inside walls of the main bay.

The optional CNC laser cut GoPro camera box was easy to put together and the skid rails help protect it during landings as well as providing extra strength to the main electronics bay. I covered the GoPro box with vinyl carbon fiber tape mostly for aesthetics but it does also add a layer of protection. You’ll need to cut out a section of nose to fit the box into, quick work with a razor saw. The box fits the camera without the hard plastic protective case; however if you feel like you want the extra protection you can glue Velcro to the ZII’s blunt nose, or in the cutout, and to the back of the GoPro case. Another option is the LayerLens from fpvmanuals.com. LayerLens is a precision laser cut frame that holds the protective glass lens found in the GoPro’s case, so you get the same lens protection with much less weight. Depending on which type of camera and batteries you choose to use, the motor can be mounted on the inside or the outside of the motor mount to help achieve the proper CG. The camera is pointed slightly down at a 3 to 4 degree angle for better viewing during flight.
The power package is the same as my previous ZII with the exception of the batteries, I’m using two 3s lipos to reduce weight and because I don’t need the extra performance delivered by 4s batteries. Using an external BEC is still recommended, even though I’m not using 4s batteries, to help with the extra load applied by the added FPV gear. If you plan on covering the video TX with laminate be sure to cut vent holes, it does get quite hot during operation. Also make sure the compartment housing the ESC is well ventilated or mount it on the outside of the bay. I made an air scoop out of a plastic spoon which works well, don’t forget to cut exit holes for the air to escape.
IN THE AIR
With the added weight of the FPV gear the ZII was slightly heavier than its non-FPV brother, coming in it at 4lbs 15oz. Even with the added weight and drag the ZII is still a high performer. The main difference is the increased landing speed and distance, so take that into consideration when setting up your approach. Also the launch throw will be more burdened, so give it a little extra oomph on the toss.
The Eagle Tree Systems Guardian Stabilization Expander kept the ZII’s wings level taking the stress out of launching and flying in FPV mode. Otherwise the flight characteristics are pretty much the same as the non-FPV ZII but from a different perspective. Still fun, still fast and definitely still a Zephyr II!
GEAR USED
Radio: Futaba 9c (TSLRS upgrade), Danish Aviation TSLRS 12ch rx (readymaderc.com), (2) Futaba 3004 servos-elevons,
Motor: RiteWingRC 1200kv, 65amp ESC (ritewingrc.com), Turnigy 5amp 21v BEC (hobbyking.com)
Battery: ReadymadeRC (2) 3s 2200mAh, 1100mAh – Video tx (readymaderc.com)
Prop: Aeronaut CAM folding 9.5×6 (espirite.com), Prop-stop (fpvmanuals.com)
Camera: GoPro Hero HD (gopro.com), LayerLens (fpvmanuals.com)
FPV Gear: Eagle Tree Systems eLogger V4, OSD Pro, GPS V4 Expander, Altimeter V4 Expander, Guardian Stabilization Expander (eagletreesystems.com)
BY KYLE MATTHEW; PHOTOGRAPHS BY ELIZABETH JENNY


Great review, Kyle! I’m a huge fan of the Z2, both for fun sport flying and for FPV. This really is a must-have bird. Chris at Ritewing and Tim at ReadyMadeRC really set the standard as far as customer support goes — yet another reason to get a Zeph!
Interesting video shows how little actual stabilization there was. Nice example of video stabilization though. I did like the overall article.
Nice Job Kyle! Great video too!
Gordon and Kyle, I’m new to all this. From the video clip it seemed that there was a lot of short amplitude porpoising, is that what you meant by stabilization? I’m attempting to build some mid-range camera platforms (14 foot wing spread) and I need a high degree of stability. I have Zero experience with RCs but it certainly is a fascinating field that I will eventually evolve into. Thus, I read extensively and all this helps.
Many thanks & Cheers—————–Edo
Ritewing is legend among FPV pilots. Chris is legend for his beyond incredible customer support. Just don’t forget that the Z II makes an awesome RC plane for regular flying. Beyond extreme. The most addictive plane you’ll ever fly.
So…. What’s the flight time?
Can you send me your Guardian Stabilization settings. I am using the same components.
Thanks,
David