

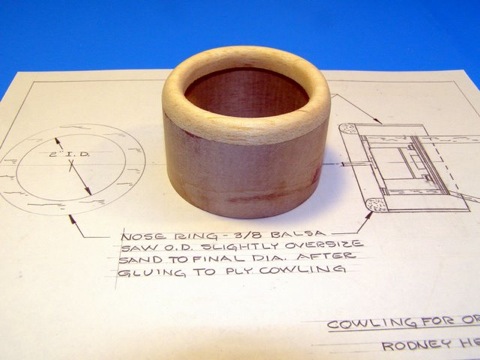
The method of making a round cowling involves laminating a cylinder from 1/64-inch plywood and capping it with a balsa ring for the leading edge. In the photos that are featured in this article, I show two cowlings that I made this way; one was for an original design and the other was for a stand-off scale model of a Vickers Wellesley single-engine bomber.
To make the cylinder part of the cowling, a length of plywood is soaked in water to make it flexible and then wrapped around a mandrel. When the plywood is dry and the mandrel has been removed, the edges are dressed and the balsa ring is glued to one edge. After final shaping, the cowling can be primed and painted to suit.
Step one of the building process is to determine the inside diameter of the plywood cylinder for the desired cowling. I like to laminate four layers of plywood which gives a wall thickness of 1/16 of an inch. Therefore, the I.D. of the cylinder is simply the O.D. of the cowling minus 1/8 of an inch. This dimension will be the O. D. of the mandrel.
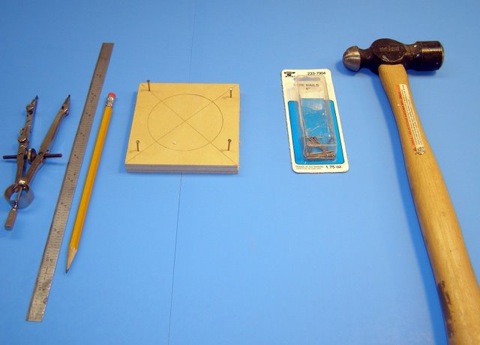
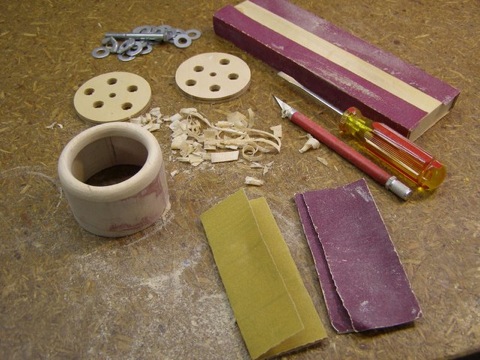
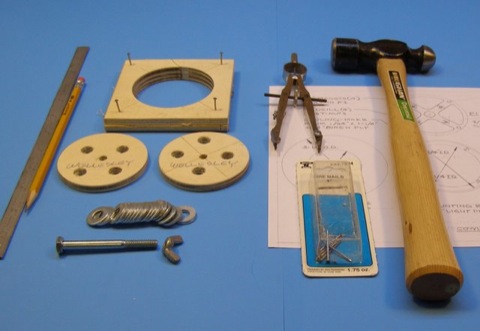
Before the mandrel discs are sawn out, a 1/4-inch diameter center hole and five randomly spaced 3/8-inch diameter holes are drilled through the plywood.
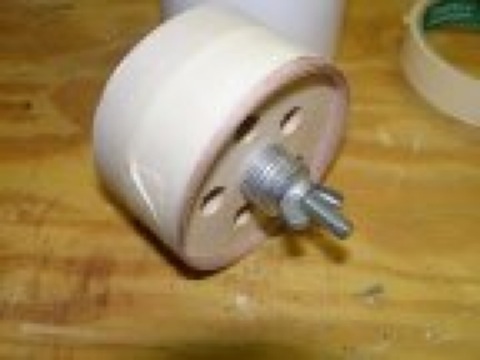
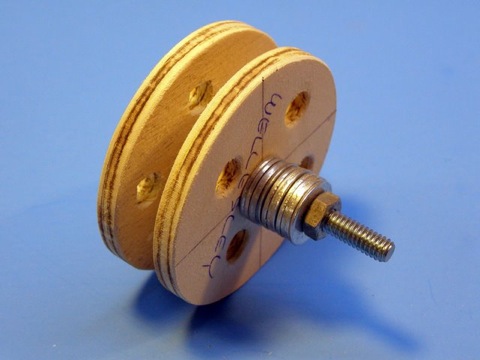
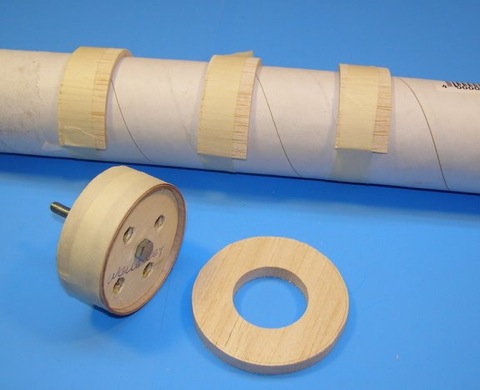
The mandrel consists of two discs, made from 1/4-inch plywood, spaced on a 1/4-inch bolt. Cut out two plywood squares, about an inch or so oversize, and nail them together in the scrap. Use a compass to draw a circle of the proper diameter on the top piece of plywood. Drill a 1/4-inch hole in the center for the bolt and several 3/8-inch holes randomly spaced in the circle.These holes will be used to knock out the discs after the cylinder has dried. The plywood will shrink as it dries and then tightly grip the discs. This is the reason for using 1/4-inch plywood for the discs. The small surface area of the disc being in contact with the inside of the cylinder allows it to be knocked out fairly easily. After the bolt is removed, a dowel or screwdriver threaded through the holes in one disc can be used to tap out the other disc. A band saw works well to cut out the discs.
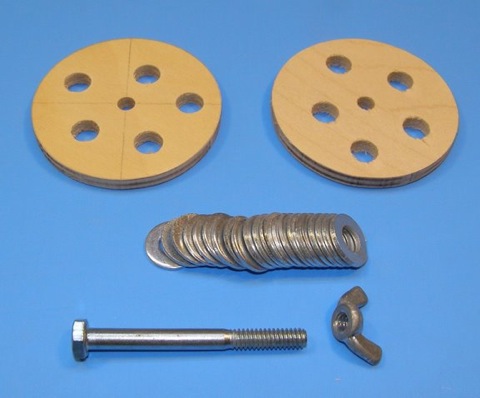
The two mandrel discs along with the 1/4-inch center bolt and spacer washers.

The assembled mandrel. The mandrel discs are spaced so that about 1/8 inch to 1/4 inch of the cowling cylinder projects out beyond the discs on each end.
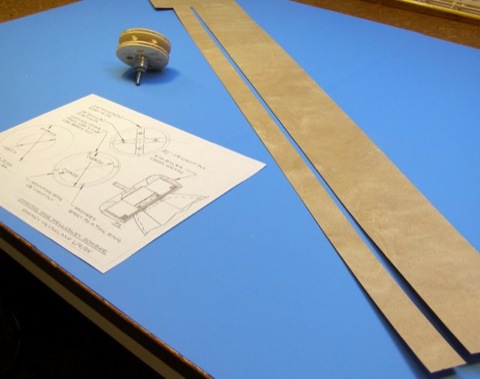
If you remember your high school geometry, the circumference of a circle is π times the diameter of the circle, so the length of the 1/64 plywood strip is π times the diameter times four (the number of plies). For example, the I.D. of the cowling for the original airplane design is 2-5/8 inches, so the length of the plywood strip is 3.14 x 2.625 x 4. This works out to approximately 33 inches. However, this could result in the ends coming out one on top of the other, which might create a bump, so I reduced the length to 31-1/2 inches. The inside length dimension of the cowling is 1-1/2 inches, so the final size of the plywood strip is 1-1/2 inches by 31-1/2 inches.
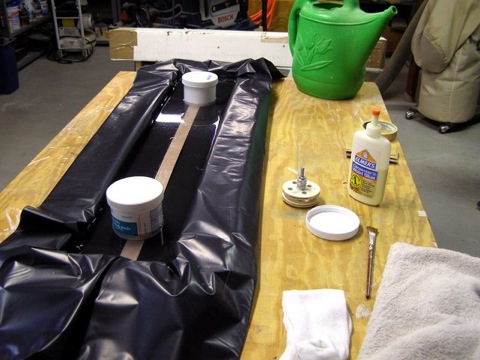
A soaking basin can be made from four lengths of 2 x 4 and a garbage bag. Arrange the 2 x 4s in a rectangle and press the garbage bag down inside the 2 x 4s to form the basin. Fill with warm water. Place the plywood strip in the water and weight it down with something non-metallic. Let soak about 10 minutes and then turn over. Soak about another 10 minutes.

The 1/64-inch ply strip that will be rolled up to form the cowling. A pair of scissors works well to cut the 1/64-inch plywood.
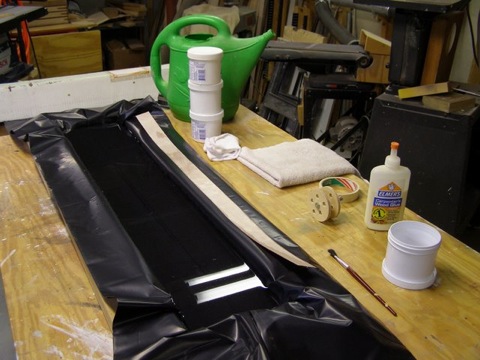
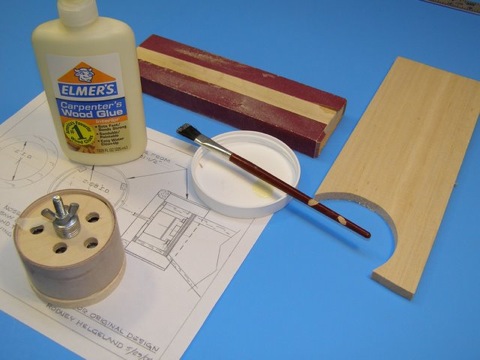
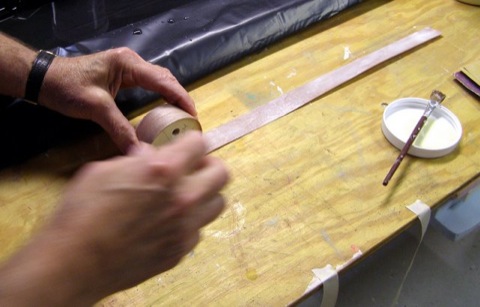
Prepare the mandrel and glue while the plywood is soaking. Space the discs on the 1/4-inch bolt so that about 1/8 inch to 1/4 inch of the cylinder projects out beyond the plywood discs on each end. Flat washers work well as spacers because you can add or subtract washers to achieve the desired spacing. Pour a little Elmer’s Carpenter’s Wood Glue into a container and select a medium soft brush for applying the glue to the plywood. While the plywood is soaking, periodically check its flexibility by bending with your fingers. When you feel it is flexible enough to form around the mandrel, remove and pat dry on both sides. Calculate the length [π x d] of plywood that will be in contact with the mandrel discs, and mark on the plywood strip. Brush the glue on the inside of the rest. Start rolling from the non-glue end. Try to roll the cylinder as tightly and as straight as possible. Tightly bind the rolled cylinder with a couple of bands of masking tape. You may wish to recruit an extra pair of hands to help with this.
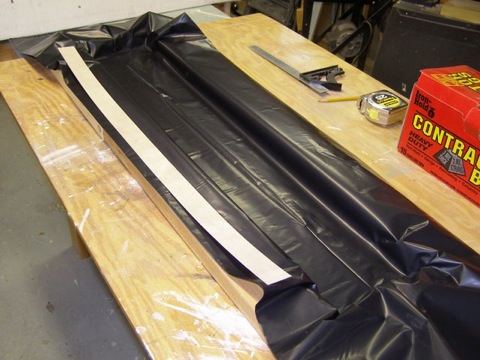
A large garbage bag is pressed down inside the 2 x 4s to form the soaking basin.
The soaking basin is filled with warm water.
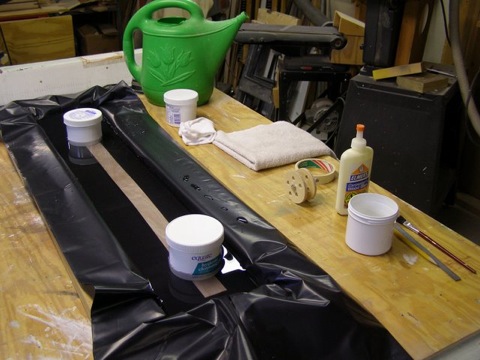
The plywood strip is placed in the basin and held down with something non-metallic. Soaking time is about 15 to 20 minutes. Mandrel, glue, tape and drying towel are ready to go.
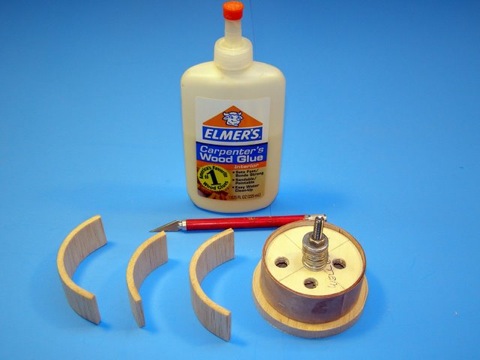
Use a damp rag to wipe off any excess glue that squeezes out between the plies. The masking tape won’t stick to the damp plywood, so make a couple of loops around the cylinder and stick the masking tape to itself. Allow to dry thoroughly, preferably overnight. After drying, remove the tape and bolt and tap out the plywood discs. Use a sanding block to dress the edges and to smooth out the exterior joint. Saw out the balsa nose ring and glue it to one edge width full strength Elmer’s. Rough carve to shape with a sharp #11 blade, and finish with a sanding block and sandpaper.

Remove the ply strip from the water and pat dry. Brush the glue on the inside of the plywood. Carefully calculate the starting point for the glue so as not to glue the mandrel to the cylinder.
Roll the cylinder as straight and tight as possible. Wrap with masking tape and set aside to dry.
The Wellesley cowling is a little different in that the exterior is shaped, r ather than flat like the cowling for the original design plane. I glued a layer of 3/16-inch balsa to the outside of the plywood cylinder with the wood grain running across the cylinder. The balsa pieces were formed by soaking in water and taping to a cardboard tube of about the right diameter. After drying, the pieces were trimmed to fit and glued to the cowling with Elmer’s. The final shape was turned on a lathe.
This method of construction would also work for a Townend ring, without the balsa nosepiece, such as on the Boeing P-26. It could also be used for bell-shaped cowlings, like the beautifully tapered cowling on the Hughes H-1.
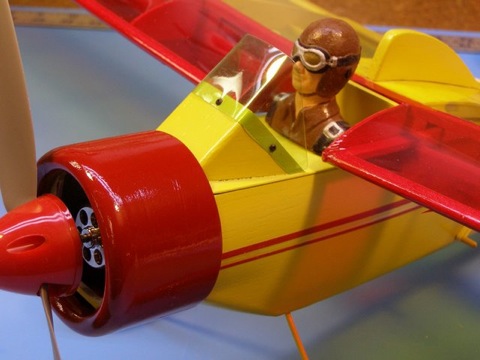
Part of designing a cowling is working out how the cowling will be mounted to the fuselage. On the original design plane, the fuselage extends forward to the backside of the balsa nose ring. The fuselage and cowling were sized so that the cowling is a nice slip-fit over the front portion of the fuselage. One small wood screw near the bottom rear of the cowling anchors it to the fuselage.
Because of the marked taper on the front of the Wellesley fuselage, a different mounting method had to be designed. A wheel-shaped former, made from 1/8 inch lite-ply with the O.D. the same as the I.D. of the plywood cylinder, is glued to the front of the fuselage. Four small magnets are epoxied to the front of the former. A plywood ring is glued to the inside of the cowling, and the four washers corresponding to the four magnets are epoxied to this ring. The ring is positioned so that the rear edge of the cowling projects 1/16-inch beyond the back of the former. The former also provides the mounting points for the electric motor.
Cowlings made using this method are low in weight and amazingly strong. If you are into building light, a cylinder rolled from two or fewer plies would still have adequate strength with less weight.
I used a sanding block to dress one end of the cylinder flat. To be certain the cylinder stayed round, I glued on the balsa nose ring before removing the mandrel.
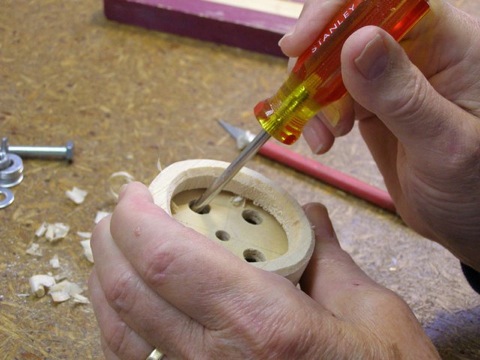
Poking out the mandrel discs with a screw driver.
A sharp #11 blade, a sanding block and sandpaper were used to shape the cowling.
The cowling ready for paint.
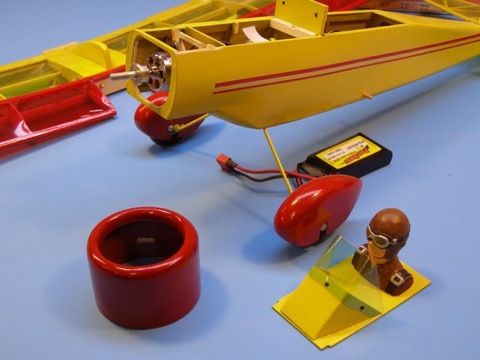
The finished cowling is a slip fit over the front of the fuselage.
The cowling in place on the front of the fuselage. The battery hatch slips under the rear of the cowling and is held in place with a magnet at the rear of the hatch.

The finished plane ready for its first flight.
The mandrel pieces for the Wellesley cowling.
The assembled mandrel for the Wellesley cowling.
The plywood strip and mandrel for the Wellesley cowling.
Soaking the ply strip for the Wellesley cowling.
Rolling the Wellesley cowling.
The balsa nose ring and the 3/16 inch-thick balsa pieces that will form the outside of the Wellesley cowling. The three balsa pieces were soaked in water and taped to a cardboard tube to form the curved shape.
To be certain the cowling held its round shape, the nose ring and 3/16 inch balsa pieces were glued on before the mandrel was removed.
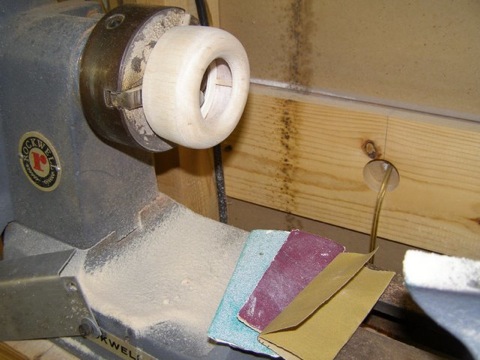
The cowling was shaped on a lathe using different grades of sandpaper.
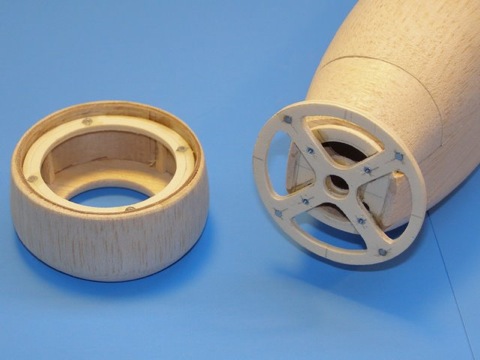
The nose of the Wellesley fuselage and the cowling showing the magnet mounting system.
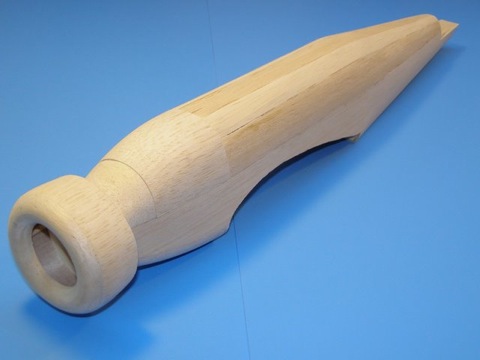
The unfinished Wellesley fuselage with the cowling in place.
Text & photos by Rodney Helgeland


