
Most aerobatic figures contain multiple combinations of various individual maneuvers. Becoming an expert aerobatic pilot requires that you practice these individual elements before trying to conquer a more complex stunt, and one great individual maneuver to become proficient at is the “inverted circle.”
Flying an aircraft upside down can be challenging at times. Typically, this is due to the fact that to maintain altitude, you need to push on the elevator stick and apply down-elevator, which may seem odd at first. Depending on the bank angle that is established at the start of the maneuver, rudder input is needed to maintain altitude, as higher bank angles require larger amounts of rudder. Like all things in life, though, these control inputs will become second nature with proper practice techniques.
INVERTED CIRCLE OVERVIEW
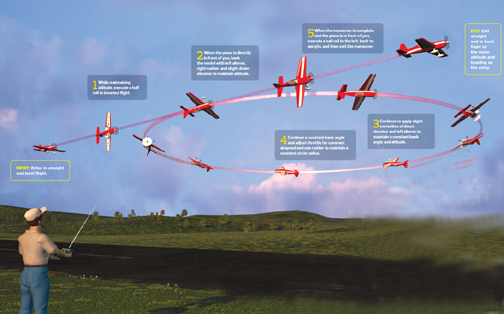
With the aircraft flying upright and parallel to the runway at a moderate speed, perform a half-roll before it passes you. Then input a little aileron to initiate the bank followed by down-elevator to start the circle. You’ll need to vary the amount of elevator and aileron input to maintain a constant bank angle and altitude. It is important to reach the cardinal points of the circle, and some rudder input may also be needed to keep the turn coordinated (i.e., keep the nose of the aircraft in the turn). Once the airplane is directly in front of you and has completed the 360-degree turn, it can be rolled to upright level flight. Now, let’s divide this stunt into four separate steps:
STEP 1. Orient the aircraft so that it is parallel to the runway and approaching you (a.k.a. the “center” position). At about 100 feet before the airplane reaches center, apply 60% power and begin the half-roll to inverted flight. In this example, a left half-roll will be executed, so a touch of left aileron will be applied to roll the airplane inverted.
STEP 2. When ready, bank the airplane by applying a touch of aileron input. Since the airplane is travelling from left to right and rolling left, bank it 15 degrees and then input elevator to start the circle. After the first cardinal point is met, the nose of the aircraft should be pointed out 90 degrees from where it began. Apply elevator and aileron input to maintain a constant bank angle and to maintain altitude until the second cardinal point is met.
STEP 3. Now the maneuver is 50% complete! Continue a constant bank angle and apply throttle as needed to maintain airspeed. For the best aerobatic presentation, constant speed is mandatory! Also, depending on the bank angle of the aircraft, rudder input may be needed to maintain altitude.
STEP 4. As the airplane approaches the last cardinal point, it should be directly in front of you. At that point, roll the airplane to inverted flight by applying a touch of aileron input in the opposite direction of the bank. This will get the airplane back to inverted flight and parallel to the runway. Then you can either stay inverted or perform a half roll to upright level flight.
Like all maneuvers, proper practice is mandatory. A maneuver like the inverted circle can become somewhat tedious as the orientation of the airplane may become difficult at times for the aerobatic newbie. Most will experience some orientation issues when the aircraft nears the 75% completion point as the airplane will be headed toward you. At this point, it is important to know proper roll directions and what elevator input is needed to maintain altitude. Keeping the airspeed somewhat low and having a generous amount of altitude is beneficial and will give you time to respond to various corrections that may be needed.


