
You know all those models you wanted to build, but did not attempt because they required a vacuum formed canopy? You remember reading about all manner of complicated vacuum formers that took a month to build and cost as much as a seven channel transmitter? Got $20.00 for materials, a few hand tools and an afternoon? Then it is about time you started vacuum forming!
What you will need and where to get it
> Get the vacuum cleaner with a hose from your home closet. If you can turn the vacuum cleaner on, put your hand over the end of the hose and it sticks to your hand, you are in business. If not, you either need a new vacuum cleaner or to change the bag. No, your shop vac will not do. It does not have the needed suction.
>An electric hand drill or a unpowered drill and a little ambition.
>A 1/8” drill bit.
>A coping saw. I used a scroll saw, myself, but a coping saw used correctly, will get the job done almost as fast.
>A hack saw. If you do have one, if not, buy some extra blades for your coping saw and have at it on the aluminum channel. You’ll get there. Only 3 or 4 cuts.
>Sand paper and/or a file would be nice.
>A ruler, a small carpenter’s square would be better, and a pencil.
>A kitchen electric range (not the oven) or a single burner electric eye. I bought the electric eye. It was an additional $20.00 but the convenience was well worth it. The gasses coming off a gas burner are way too hot and will burn the plastic, not to mention fingers. A charcoal grill will not work either. Don’t ask how I know.
>Two 4 inch “C” clamps
>A full size pair of scissors to cut the plastic plates.
>A hole saw the size of your vacuum cleaner hose end really saves time, but you can easily do without it.
The $20.00 worth of materials
A 2 X 2 foot piece of 3/16” and a 2 X 2 foot piece of 3/8” birch ply wood from a home improvement store these stores have pieces of birch plywood pre cut to this size. If you do not have a hand saw, the store will cut the pieces to size for you. Usually, 2 cuts for free.
>A 2 foot piece of ½” X 5/8” wide aluminum channel. You may have to buy a longer piece.
>A roll of ½” X 3/8” self adhesive weather strip.
>Basswood or balsa for the plug.
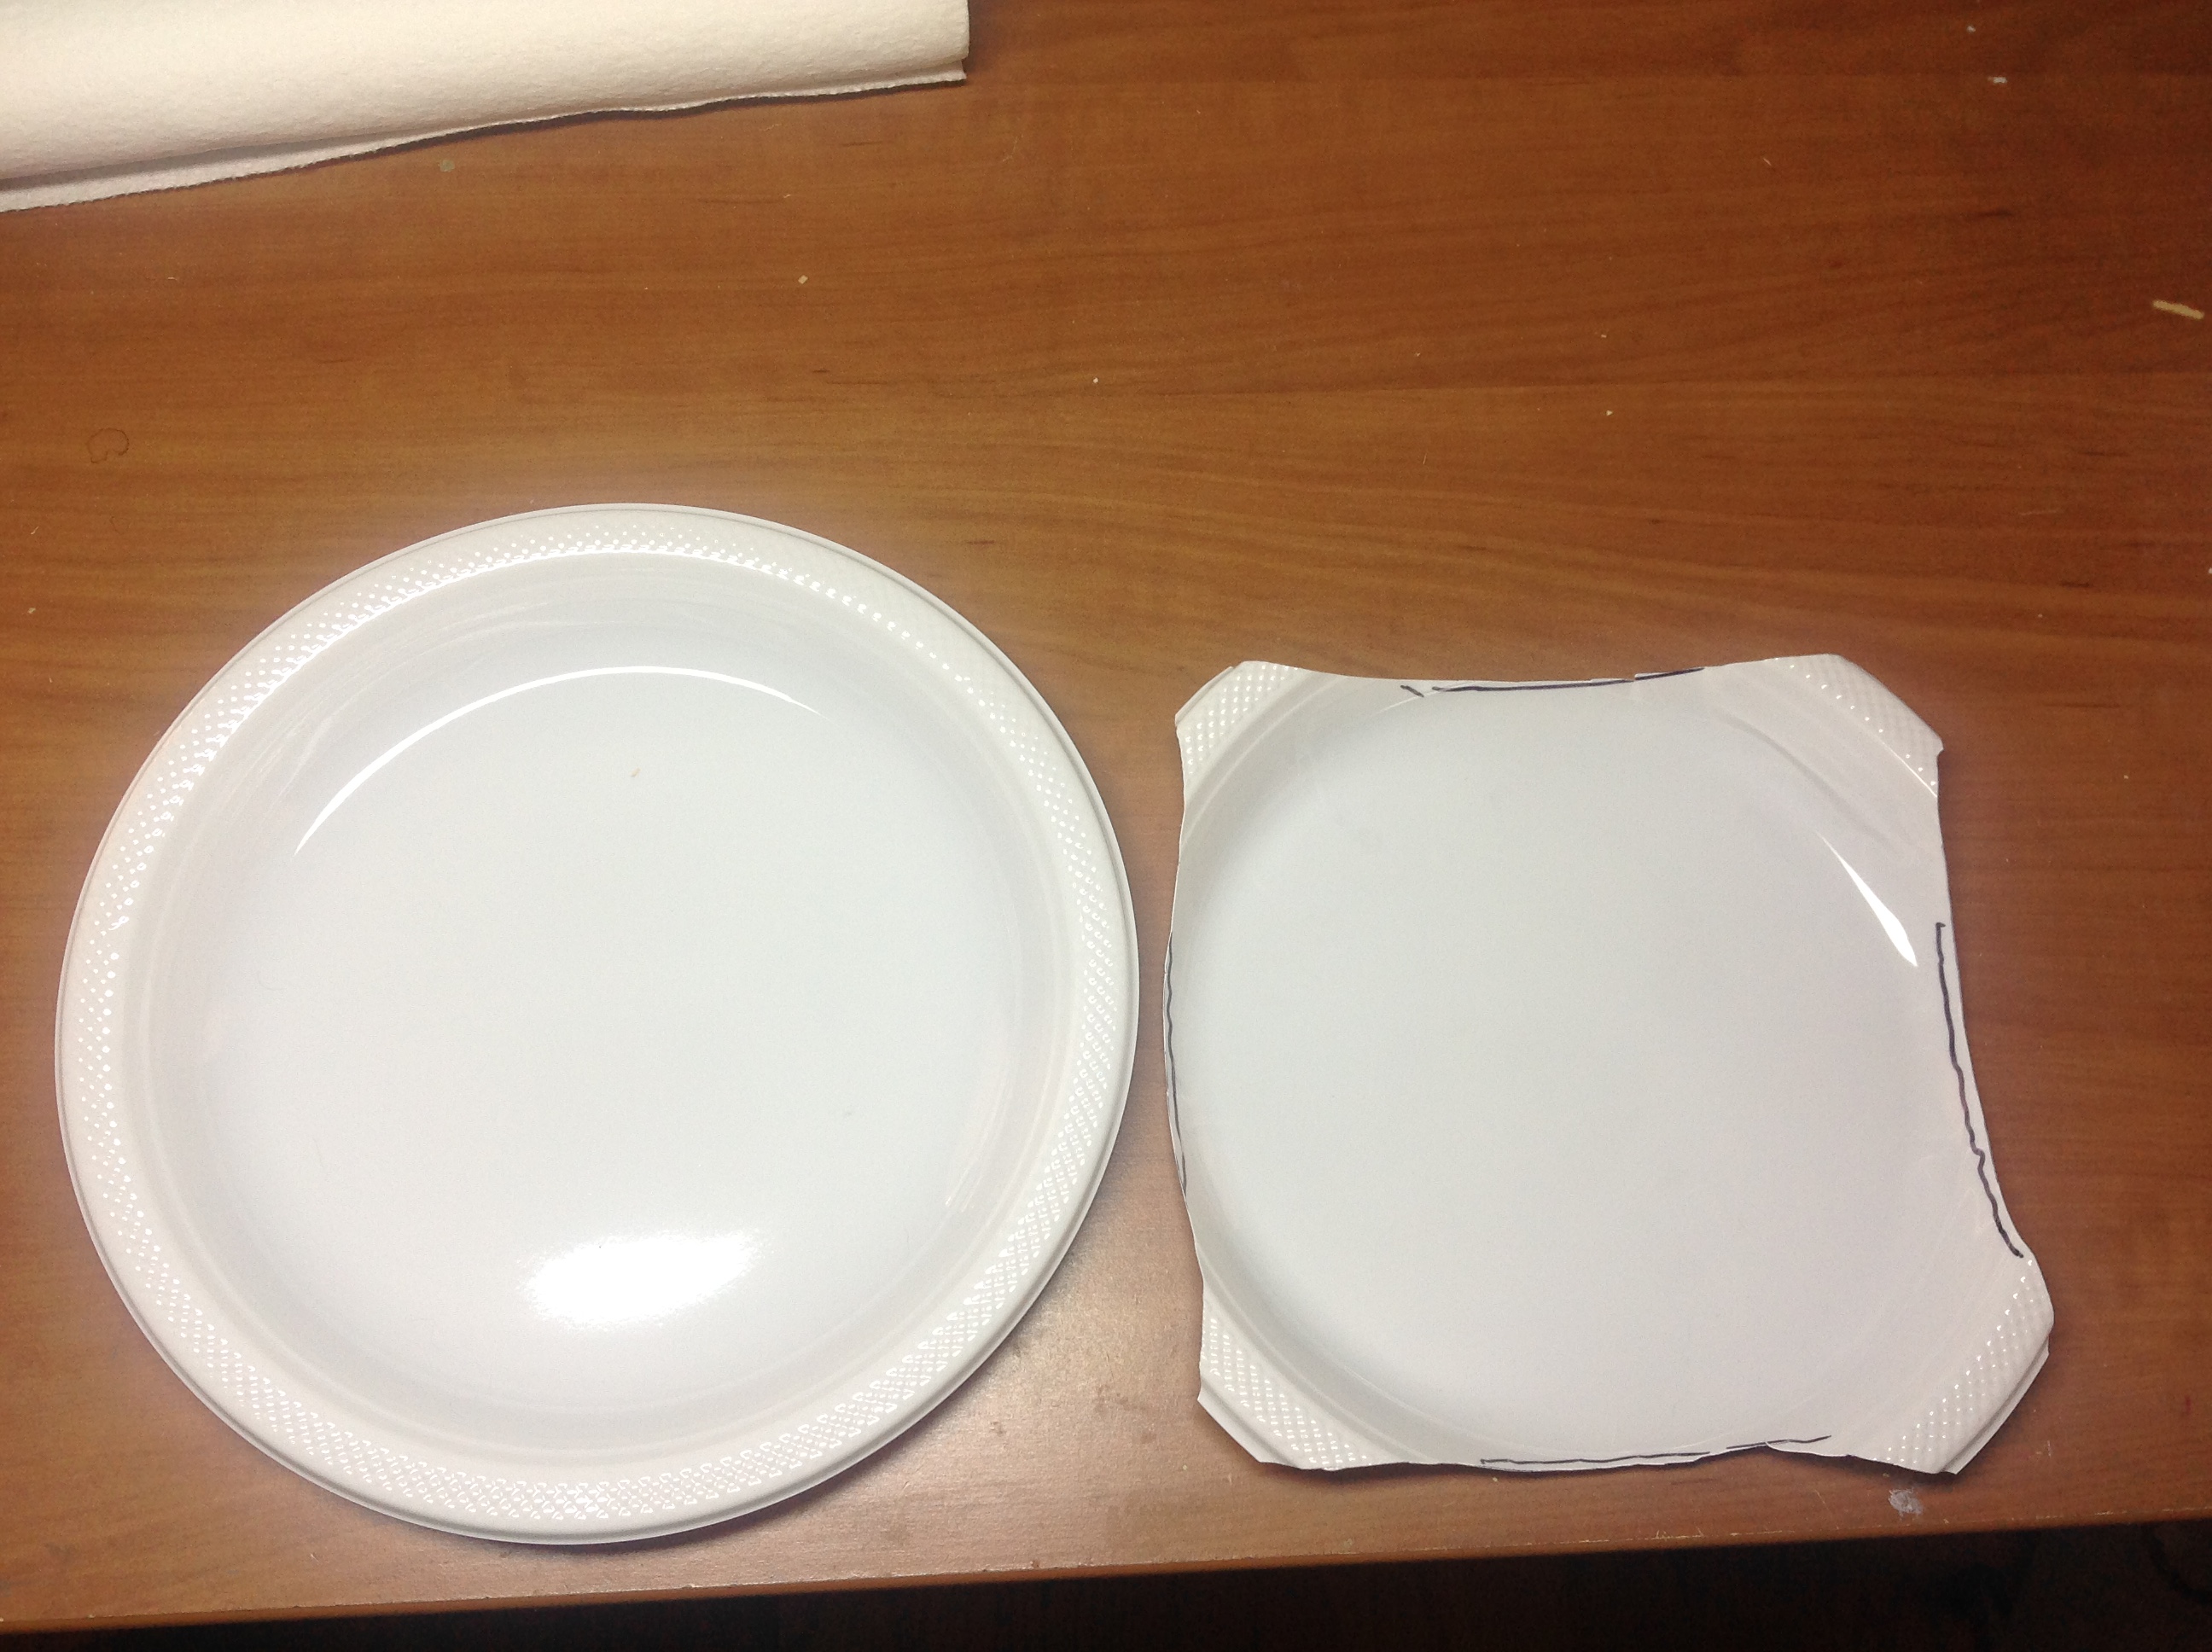
>A package of disposable Solo of similar brand 12” vacuum formed, plastic picnic plates (the weak flimsy ones). Start with white plates if you can find them. It makes it easier to see what is happening. With darker color plates, heat is absorbed faster and can get away from you, at first. You can find clear plastic disposable plates for canopies at party supply stores, but the resulting canopy may be cloudy looking. I get two dozen cookies and use the package they came in, from the grocery store. If anything has been vacuum formed once and is free of holes, it can be softened and vacuum formed again.
Decisions
From this point, dimensions are suggestions that have worked for me. There is nothing magic about them. You can make changes to suit your needs.
You need to decide how big an item you are likely to want to vacuum form. I build peanut scale and up to about 30” wing span models. If you build much larger models, you can easily make some changes to this design or consider making your canopy in two pieces.
I made my plenum to use the 12” picnic plates as a cheap, readily available source of plastic. You can easily make your plenum larger. There are plenty of large sheets of .02”-.03” thick PET G plastic, that is great for vacuum forming clear canopies, available from Amazon.
If you want larger canopies, or other vacuum formed parts, build a larger plenum and plastic holder. It will still work, but you just left the $20.00 materiel territory and are on your own!
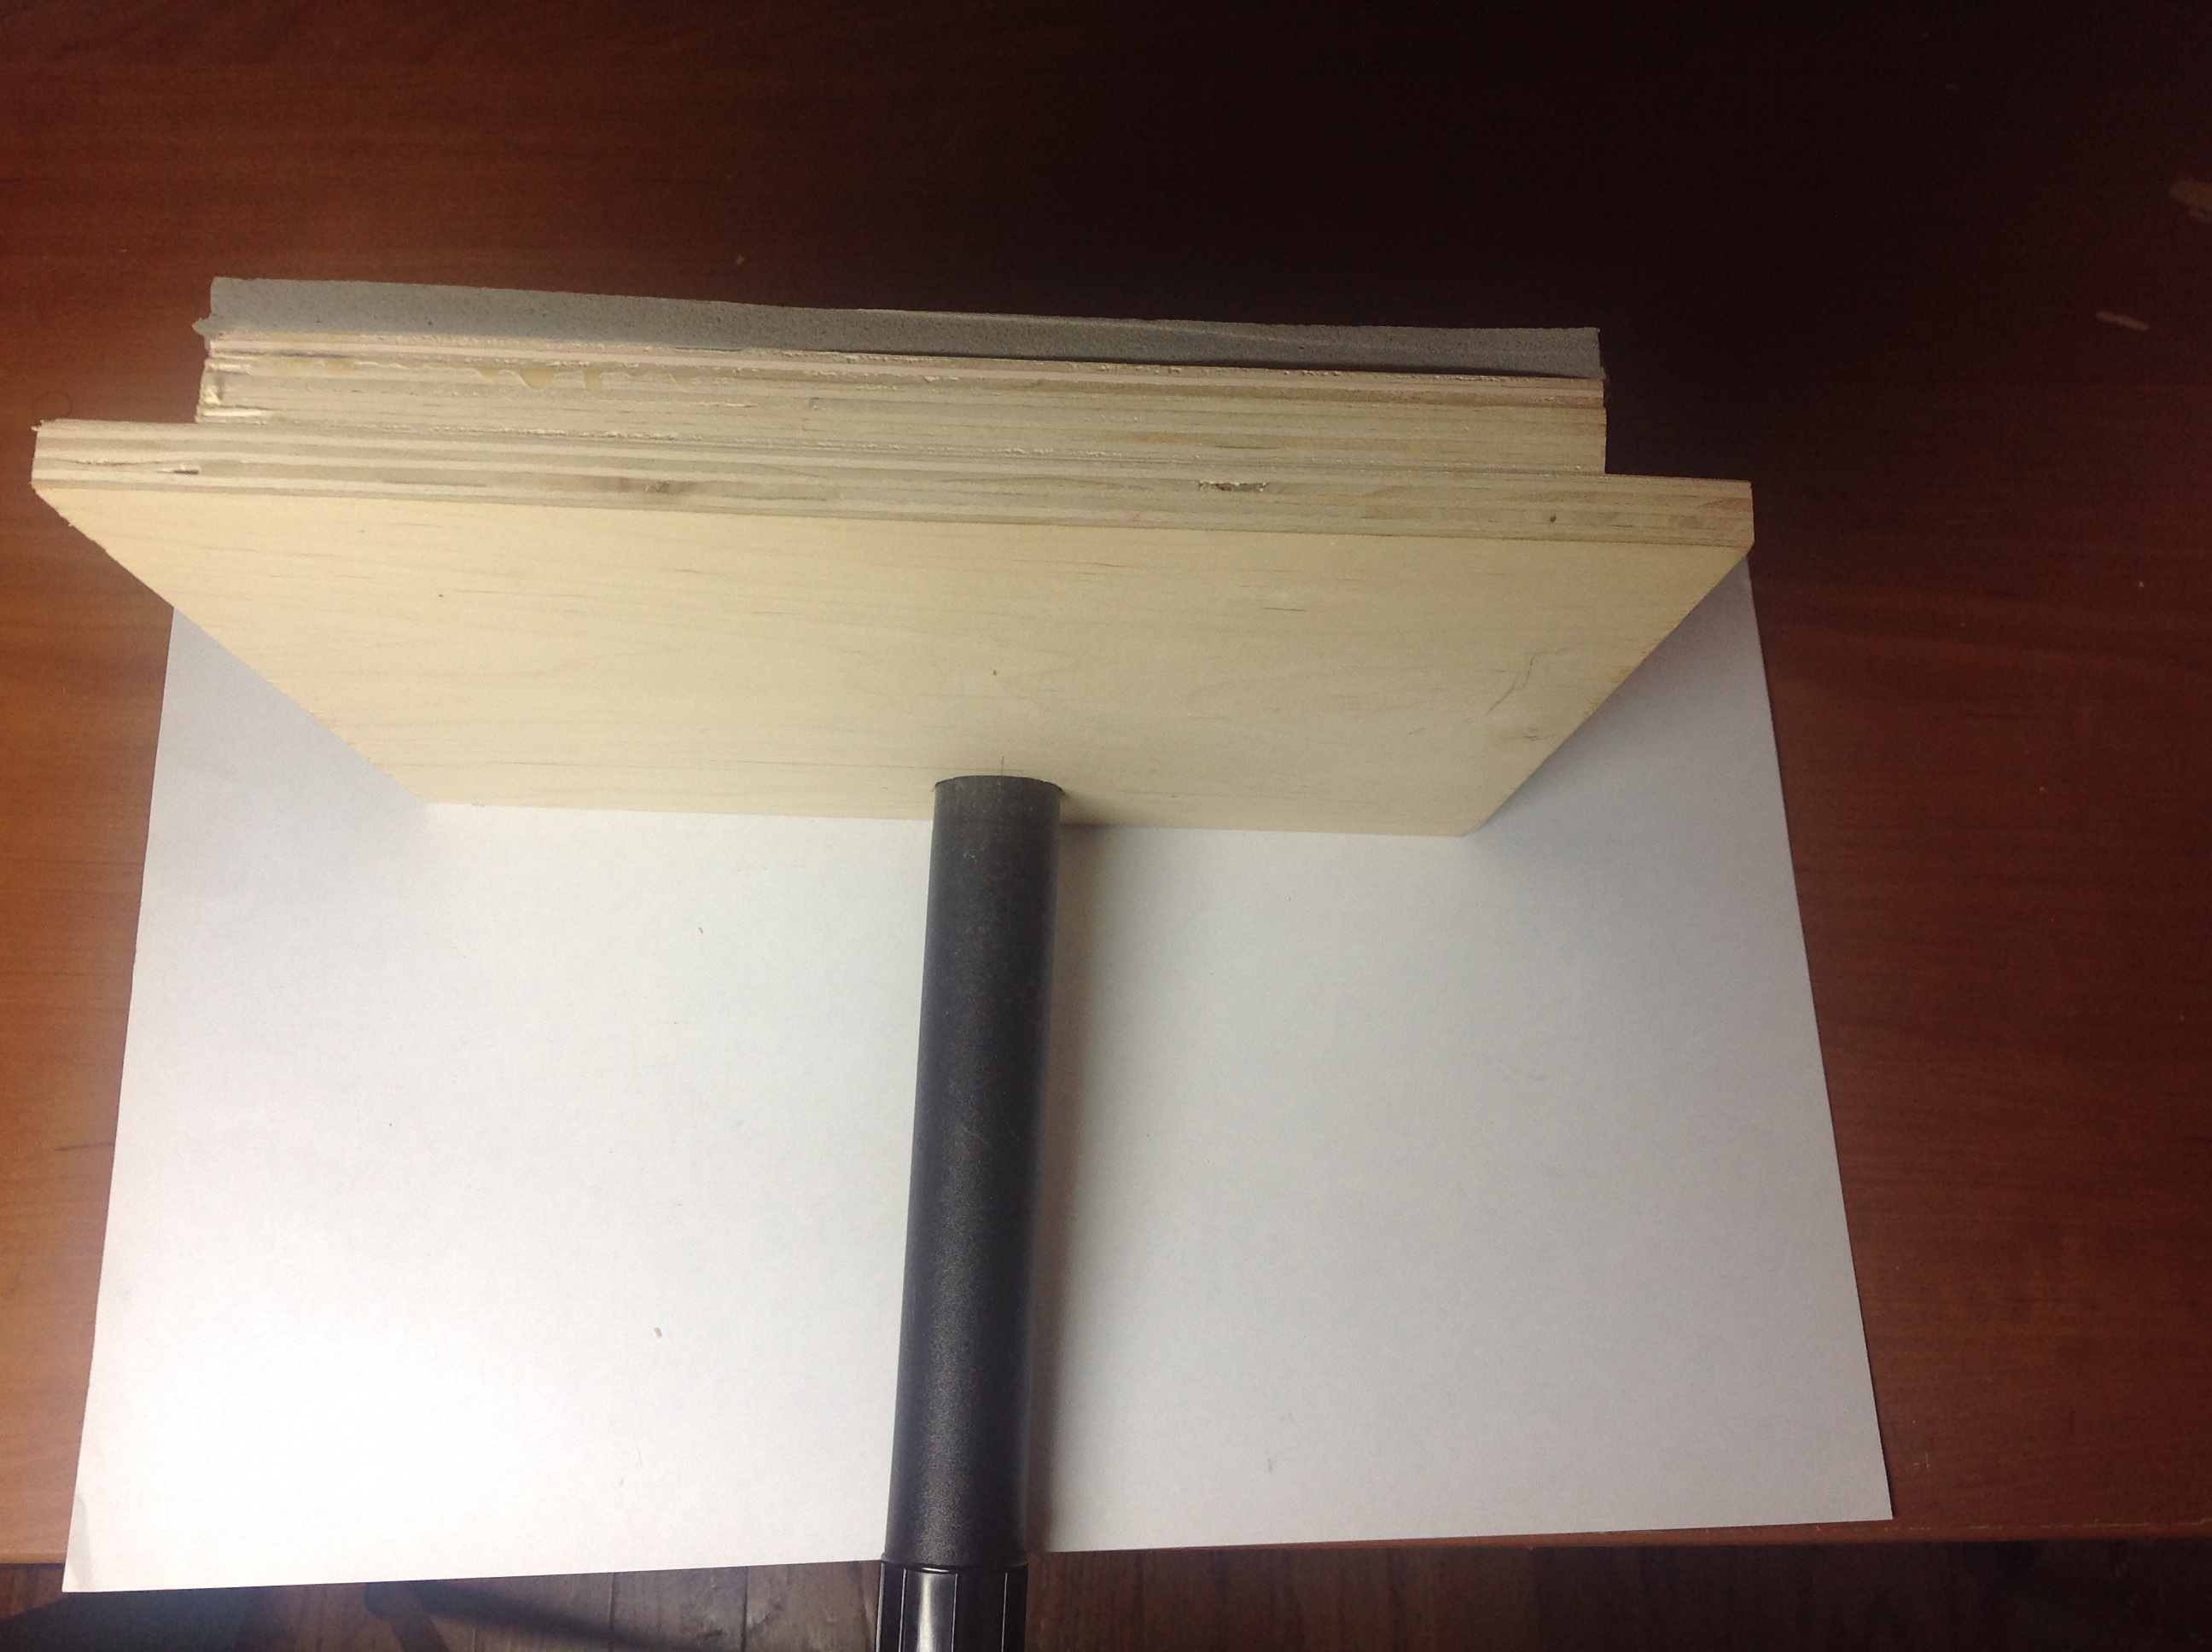
Except for a place to plug in the vacuum cleaner hose, there is no point in building a box to just have to suck all the air out of, before the forming starts. You will be plugging the hose into the part of the bottom of the plenum that hangs over the edge of the table. It does not appear to make any difference whether you plug the hose into the center or the corner of the plenum. What air there is, is evacuated very quickly and the forming is done in a split second. The two 4” “C” clamps hold the plenum in position on the table or counter edge.
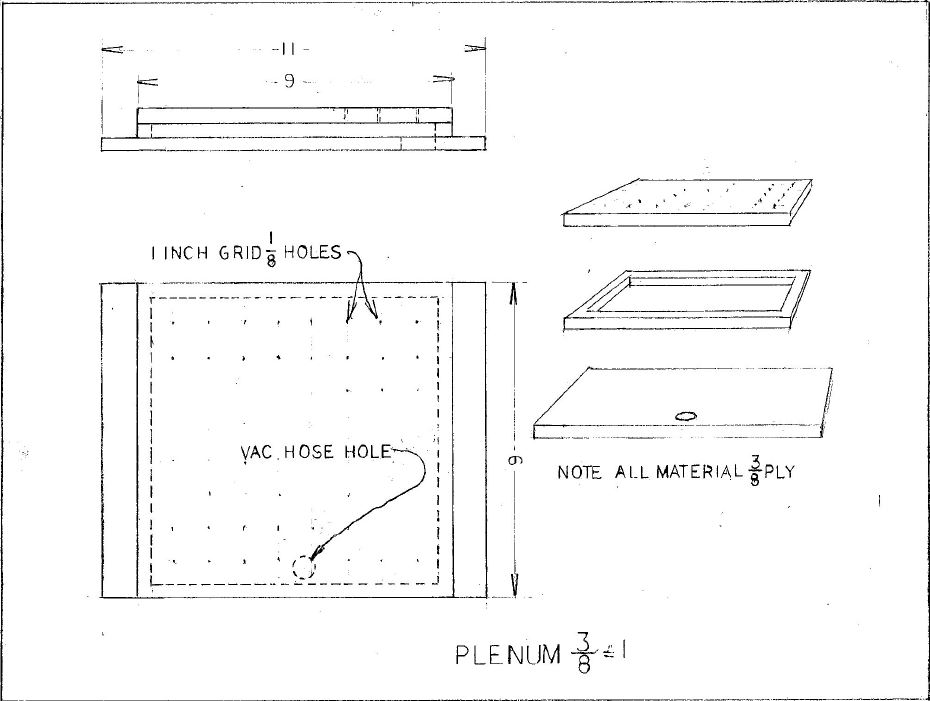
Making the plenum
Mark a grid on the top of the better looking of the two same size 3/8 plywood pieces. A 1” grid will do, but use a ½” or ¾” grid if you feel more ambitious. Leave at least ½” all the way around the outside. Clamp the two same size pieces of plywood tightly together and drill 1/8” holes through the top piece and into the second piece at the grid intersections. A piece of tape around the drill bit can help you with the depth of the holes. If you slip a little, it won’t matter. Separate the two pieces.
Using your scroll or coping saw cut all the way around the second piece just outside the partially, okay mostly partially, drilled holes. Leave at least 3/8” width of plywood all around the edge. DO NOT cut through this edge from the outside. You need it in one piece. This will be the edge of your plenum. Try to avoid splintering on the bottom of the cut. Taping the bottom of the board before you cut will help. Discard the piece with all the holes. Keep the piece that went around the edge.
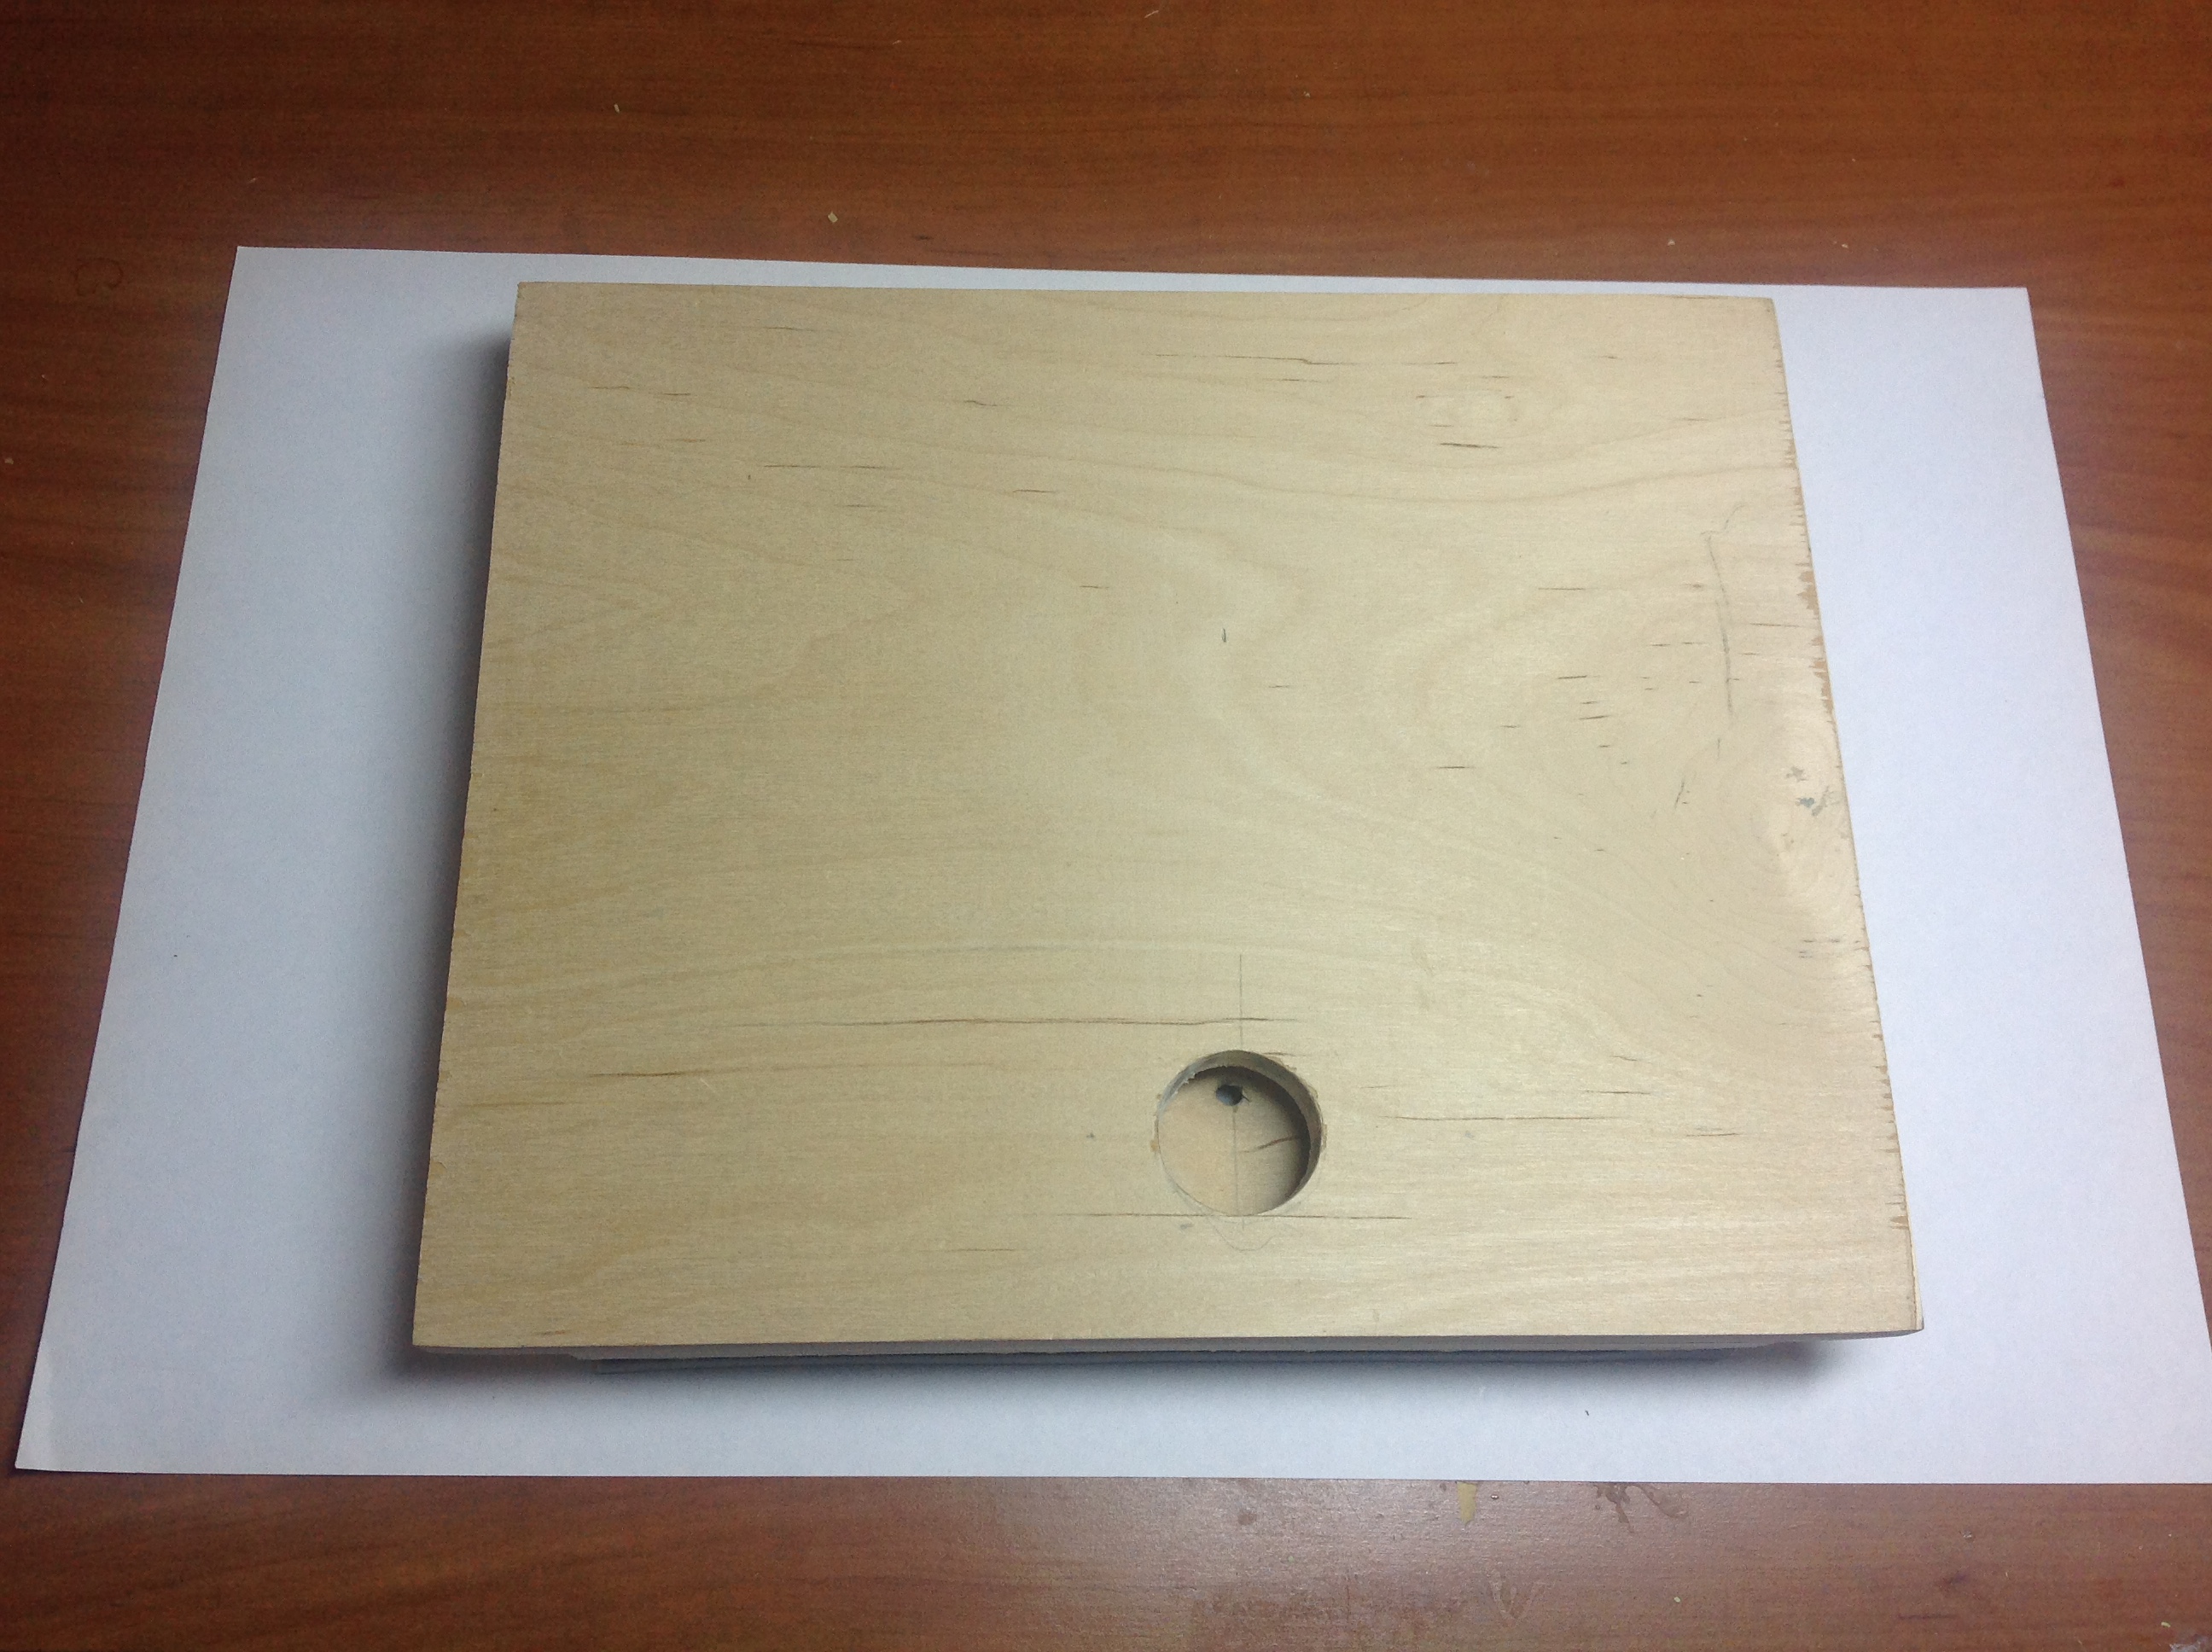
Now that you have practiced, mark and cut the hole for the vacuum cleaner hose in the larger of the 3/8” pieces. A hole saw works great, here, but not everyone has one. Cut just inside your mark with the scroll or coping saw. Sand to final size, checking often with the end of the vacuum cleaner hose. You want an air tight fit. If you do not quite get it air tight, wrap the vacuum cleaner hose end in clear kitchen (Saran) wrap, to keep it from sticking, and fill any gaps in the wood with epoxy.
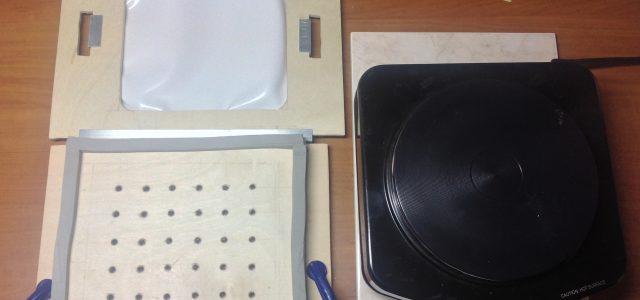
Stack the 3/8” plywood piece with the 1/8” holes on top. Put the 3/8” plywood piece with the big cut out in the middle. Put the big piece of 3/8” plywood with the hose hole on the bottom. Glue them all together. Be generous with the glue. This is where you seal the plenum edges air tight. Clamp the assembly and let it dry. Put the weather strip all the way around the top edge of the plenum. Air tight. No gaps. Congratulations the plenum is completed.
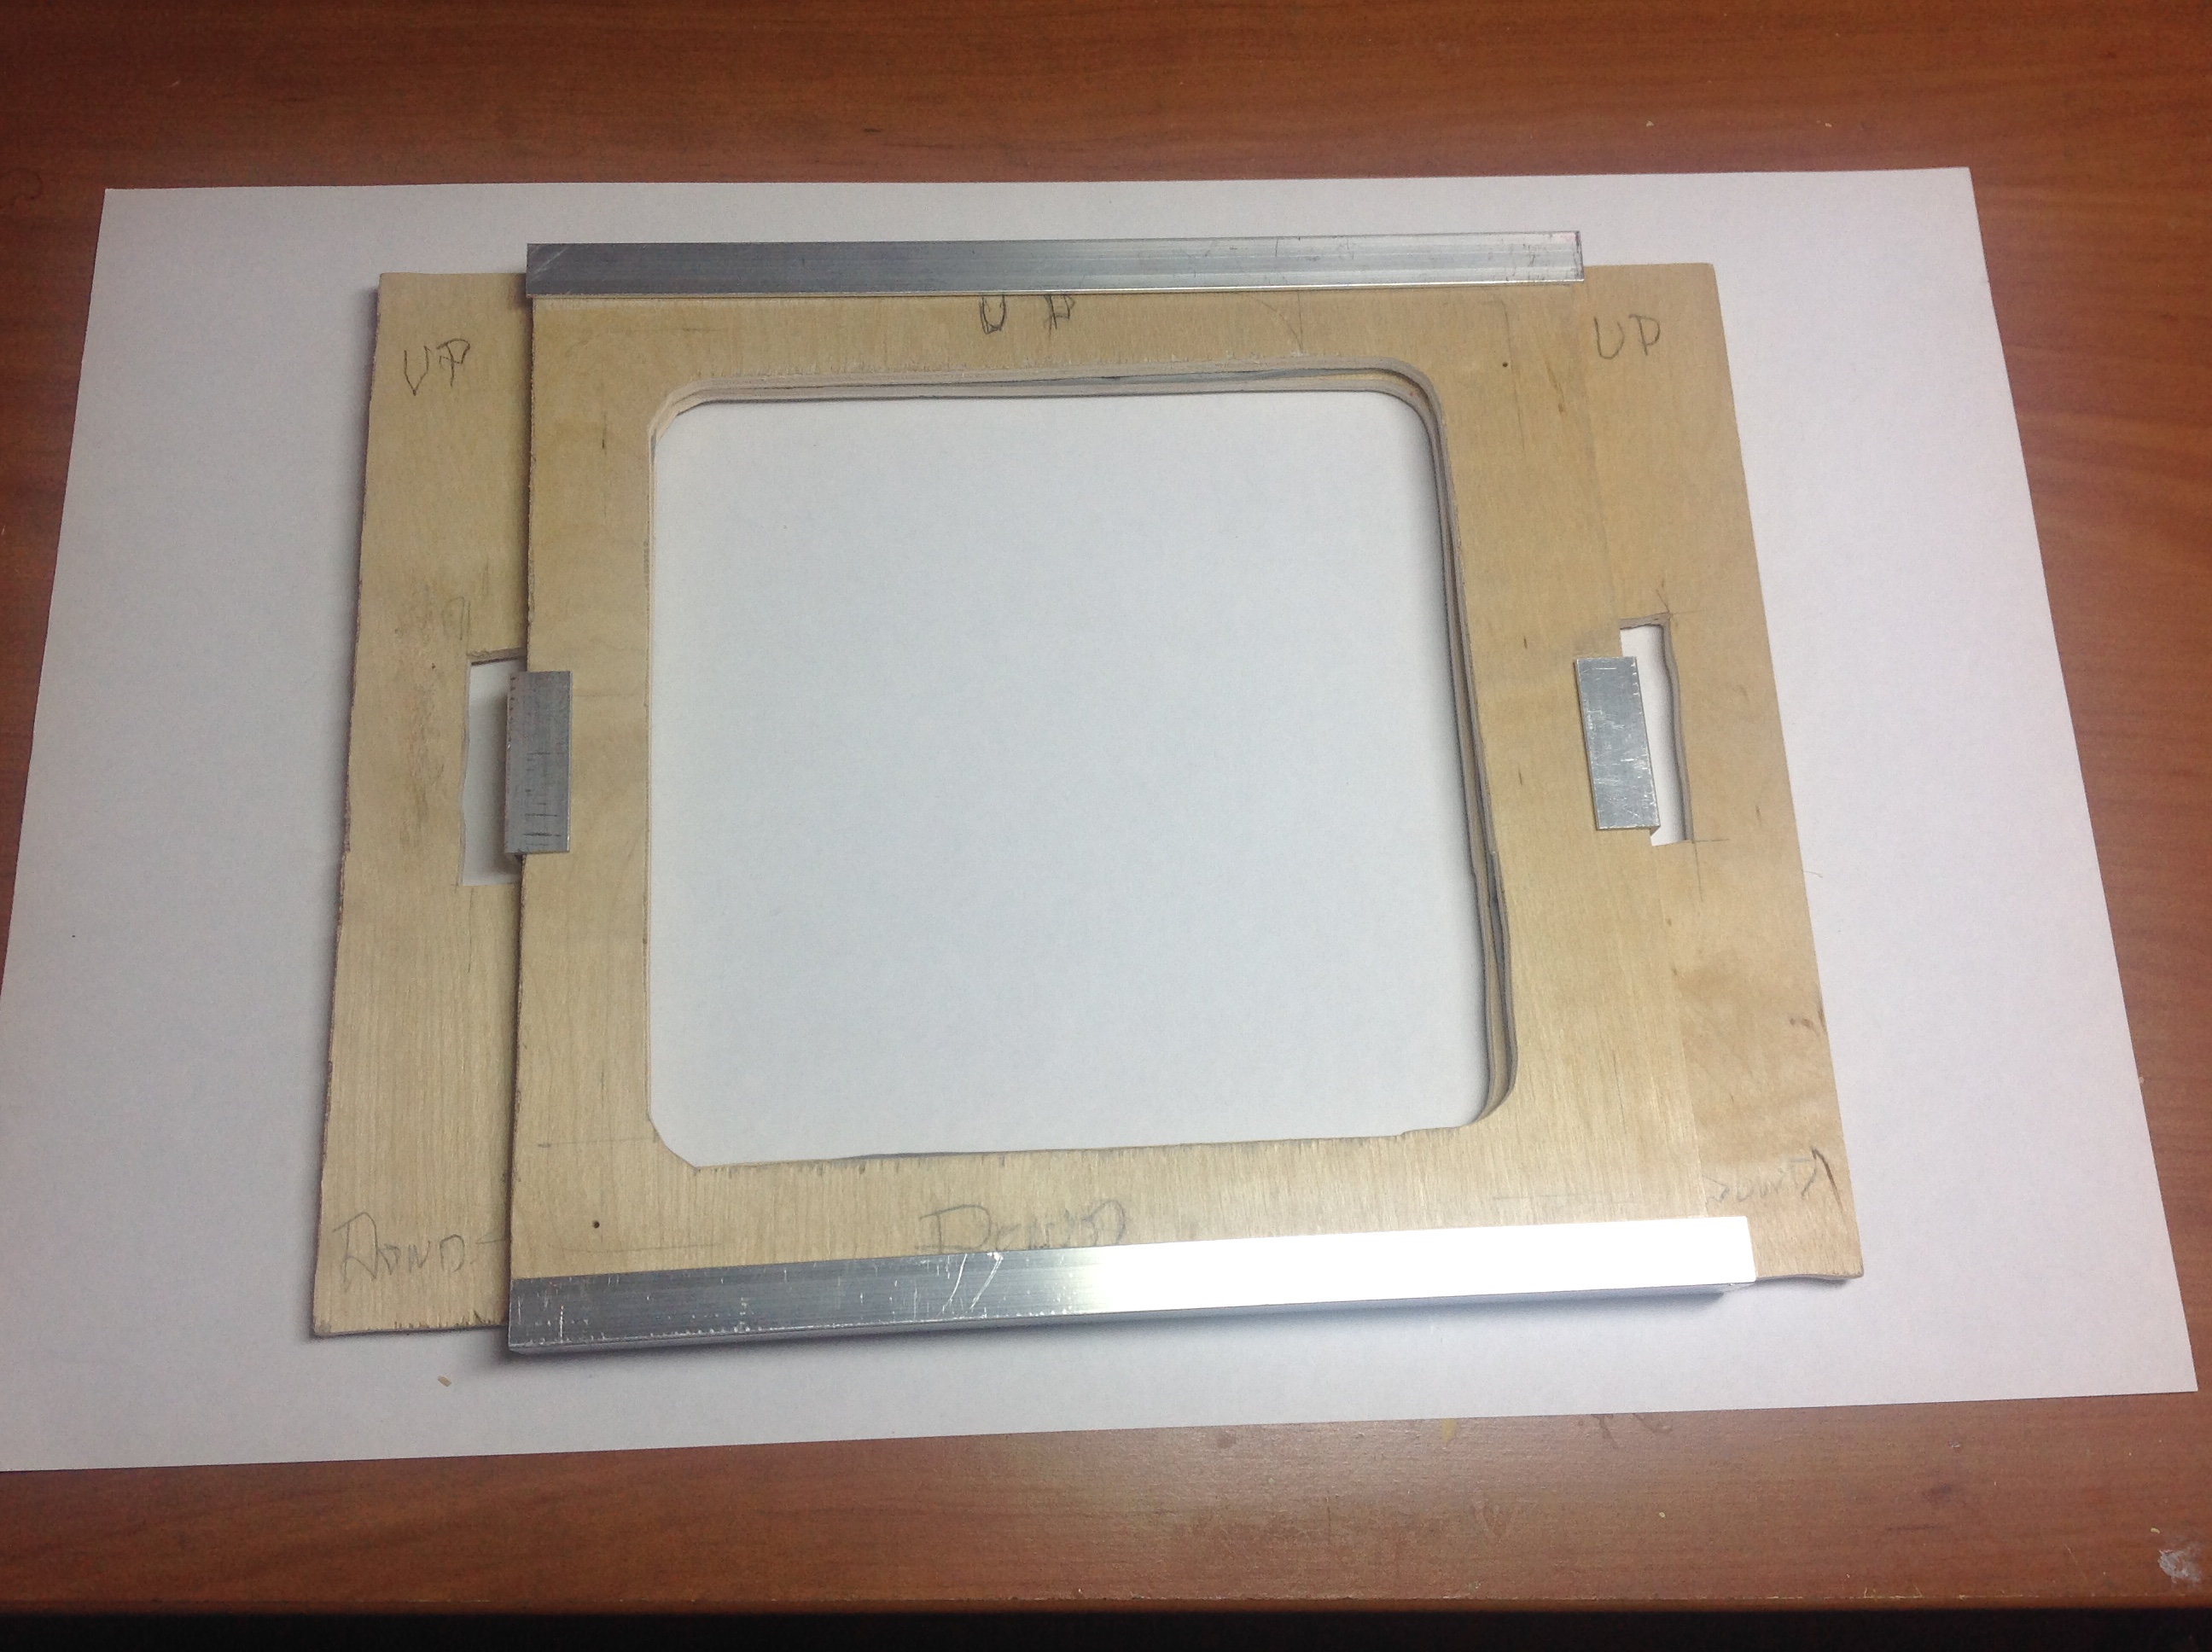
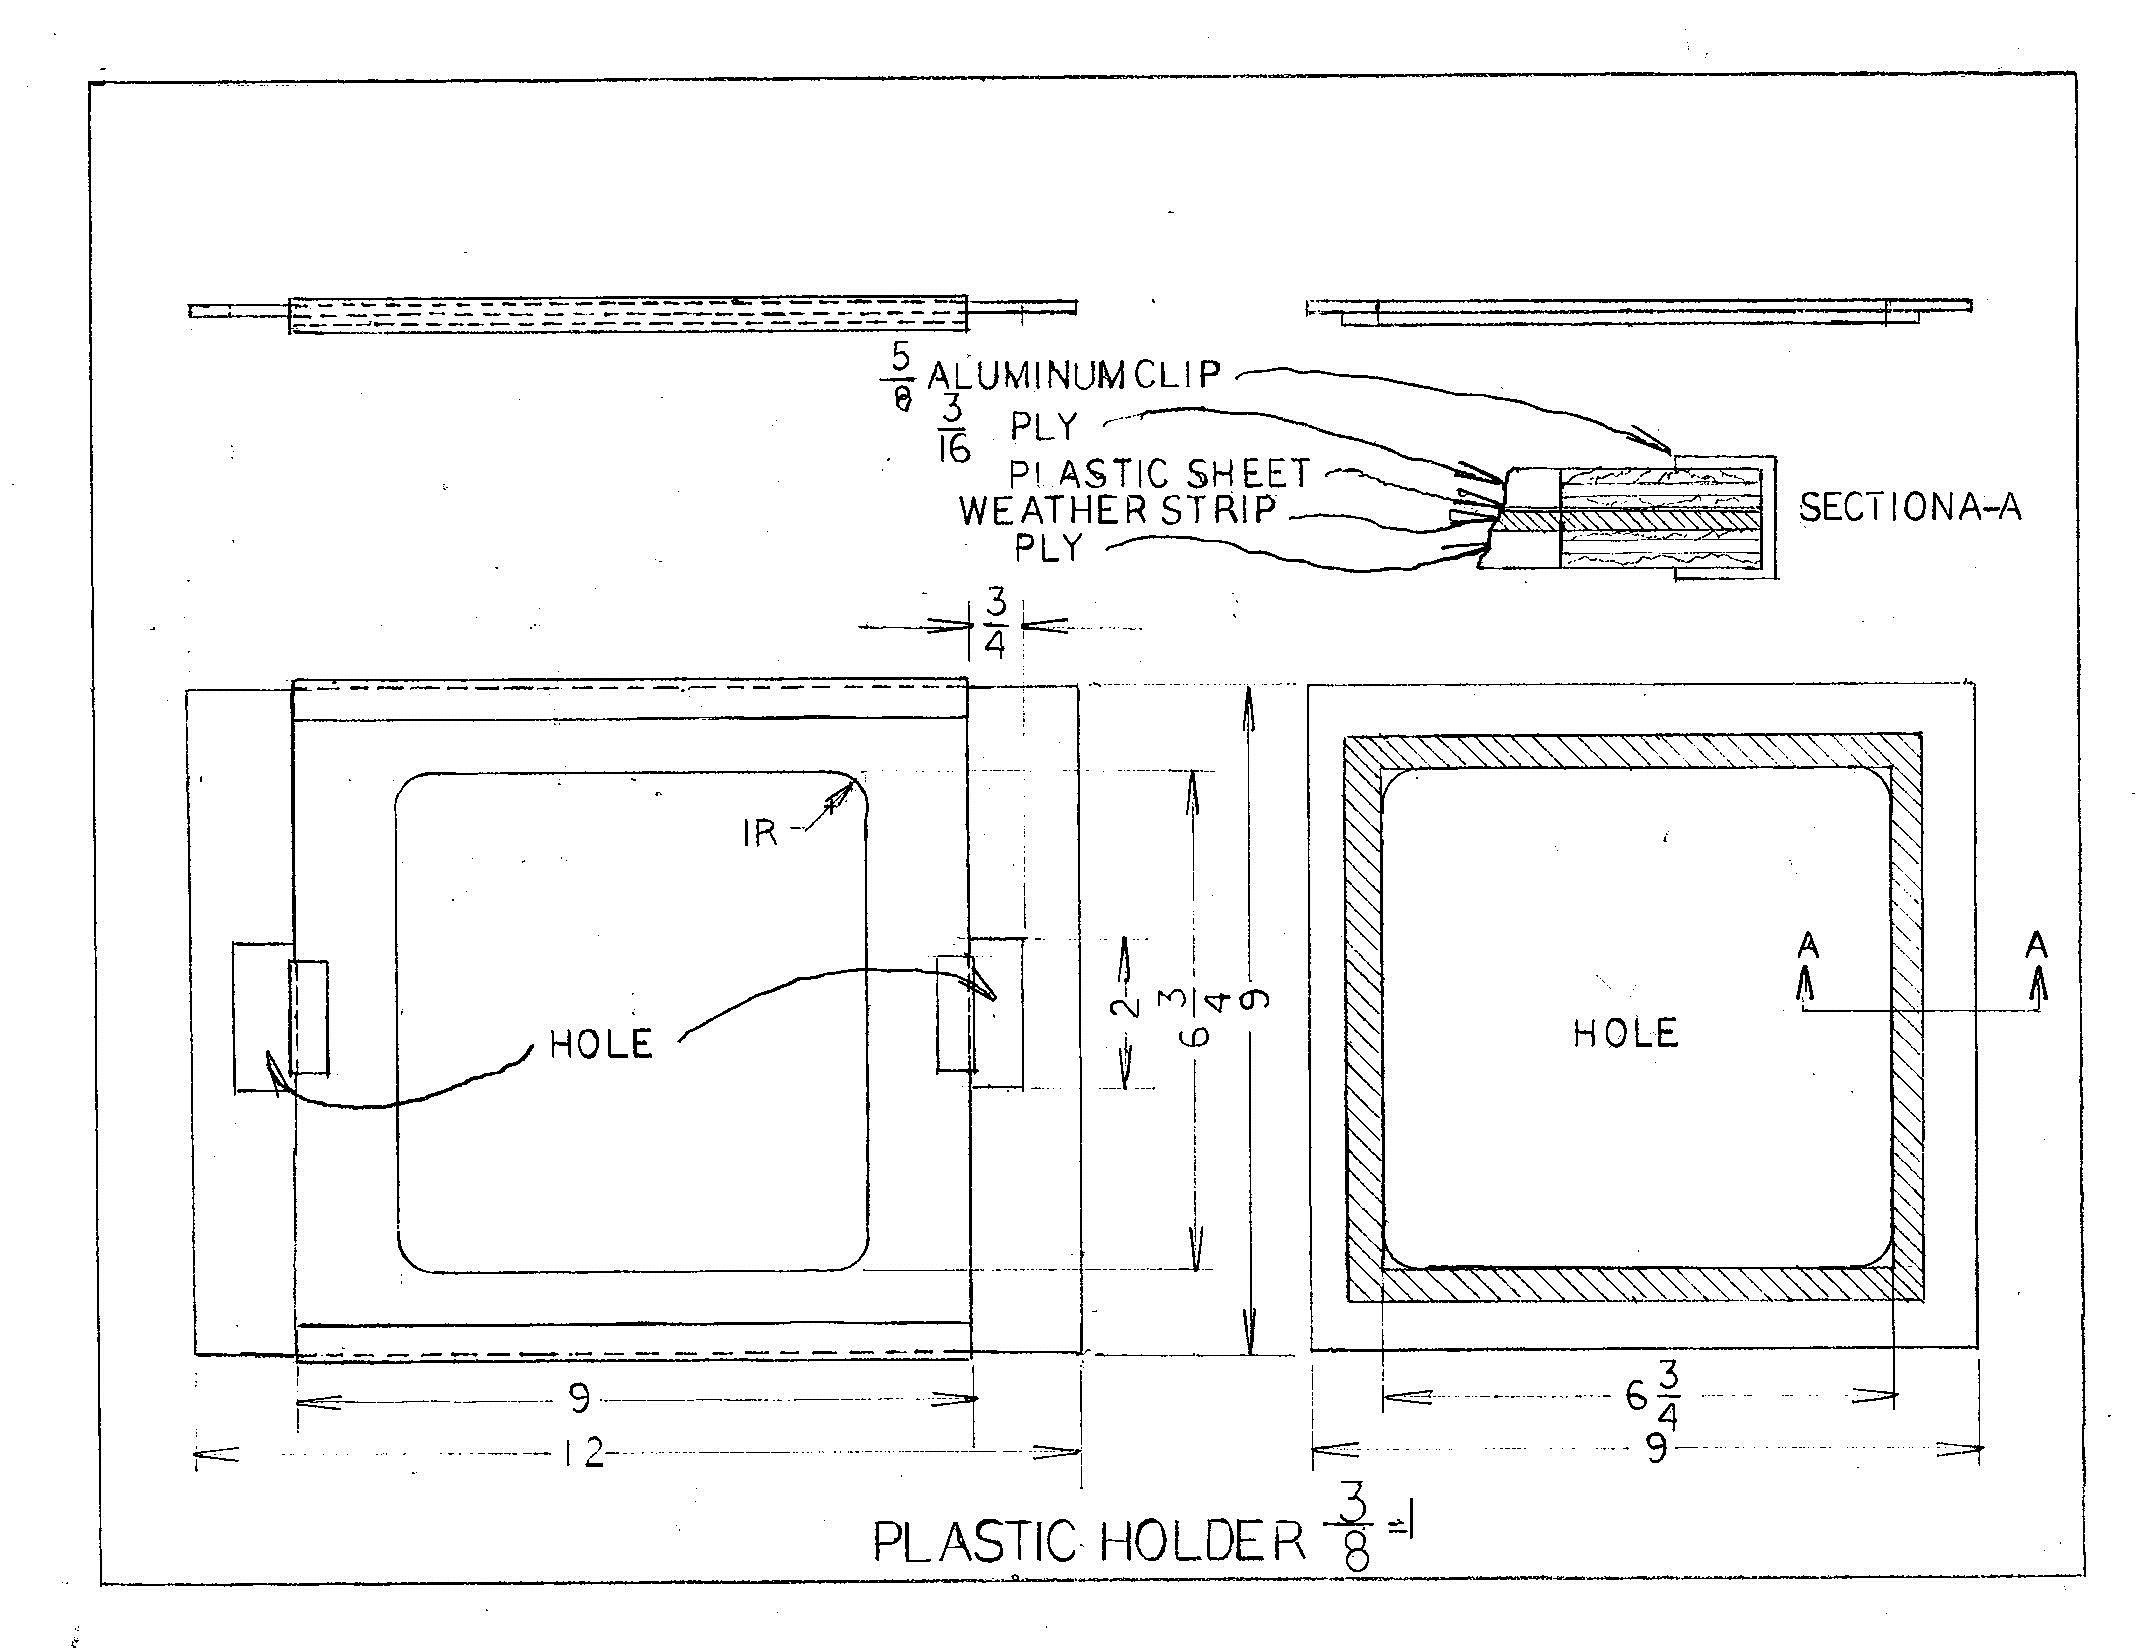
Making the plastic holder
The size of the hole in the center of the plastic holder determines the size of the plastic. The piece of plastic needs to be about an inch larger than the hole in both directions to be held and sealed by the weather strip.
These plastic holders are inexpensive and easy to make so I have some with different size holes. The rest of the plastic holder seals against the plenum, so one size plenum is all you need. The plastic holder will get warm but not too hot as you soften the plastic. I have used mine a lot and there is no sign of charing. I like to keep my fingers away from the heat, so I made the big piece of the plastic holder a foot long, to keep my fingers farther from the electric eye. Admittedly, the piece could be shorter; they’re your fingers.
The 6 3/8” square hole is about as big as I could make it to use the center out of 12” plates as a plastic source and still get the weather strip to seal the edges of the plastic piece. You could make the hole a little longer and narrower and it would still work using plates.
You can stack and clamp both plywood pieces, drill a hole to allow the saw blade through and saw both of the 1”X 2” and the 6 3/8 square holes in both pieces of 3/16 plywood at once I have another plastic holder that uses a 3” square center hole, which lets me make small parts using a ¼ of a 12” plate.
Clamp the channel to a table edge and cut two 9” and two 1 ½”long pieces of channel. These will hold the plastic holder parts together in use.
Put the weather strip all the way around the very edge of the hole in the small piece. No gaps. You want this air tight. The weather strip goes against the plastic to keep it from slipping and makes an air tight seal. You only need weather strip on one side of the plastic.
Making the plug
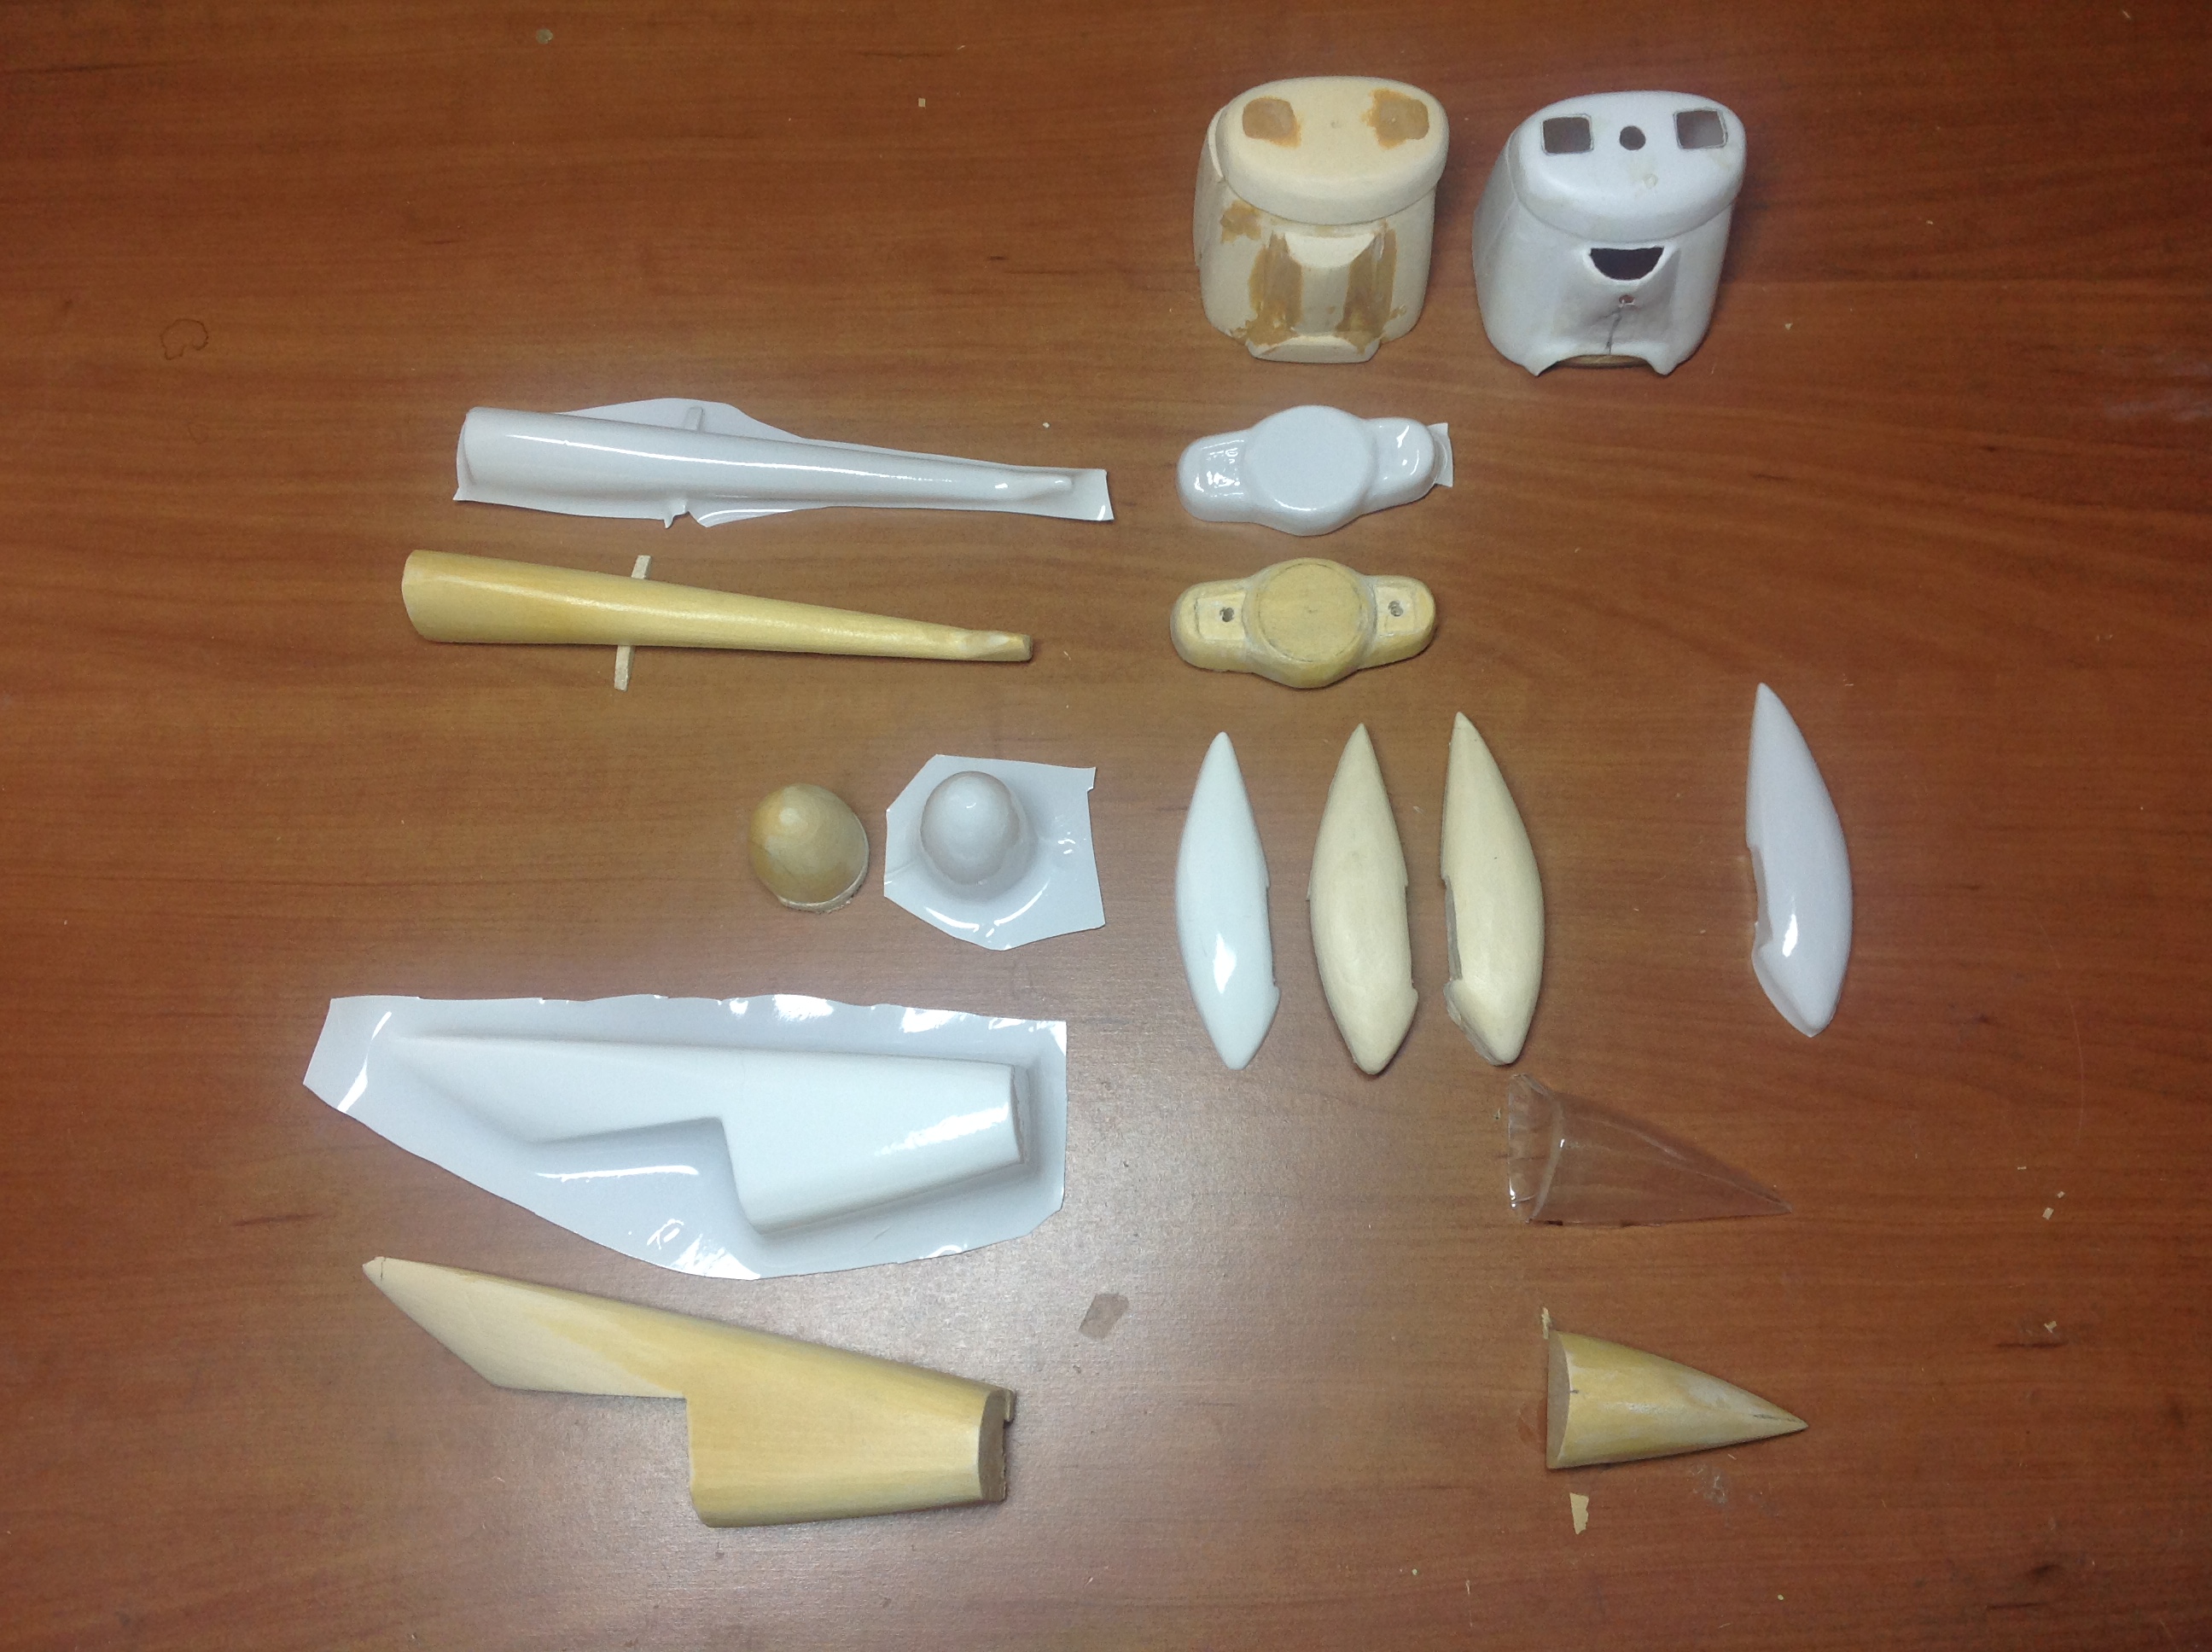
I like to carve my plugs out of soft Basswood, but Balsa will certainly do. Since it is hard to hold small parts while I carve, I usually glue the wood for the plug to a paint stirring stick ) free for a “thank-you” from Sherwin Williams) before carving. Sometimes, I carve the plug from the paint stirring stick. You need to make templates out of Manila folder or index card stock to make sure you end up with the right size and shape plug. Carve and, mostly, sand your plug to shape. Sanding takes longer and gives you much better control. The better and smoother the plug, the better the vacuum formed part. There is no need for elaborate finishing techniques, just get it smooth. No fuzz.
You will want to raise the plug about a ¼” above the plenum surface. You might want to use four small blocks to do this so the vacuum gets under the plug. This should eliminate any webbing. You can cut the part away from the plug, later. Rub talcum powder onto your plug to act as a mold release.
The forming process
I strongly recommend that you visit https://youtu.be/oJVFxK5pseA Chris Boehm has a less than 10 minute video that demonstrates this vacuum forming process beautifully.
Plug in and turn on the electric burner to high. It will take a while to warm up. Plug in the vacuum cleaner and plug the hose into the bottom of the plenum. Clamp the plenum in place on the table or counter edge. Place the plug on the center of the plenum. Cut the dinner plate to a square and place it in the holder. Put the channel pieces on the edges of the holder.
By now, the electric eye should be hot. Turn on the vacuum cleaner. Hold the plastic about 3”-4”, above the burner. Keep moving the plastic holder around to heat all the plastic evenly, even the edges. If your fingers are getting too warm, lift the plastic higher above the eye! As the plastic warms up you will see the surface of the plastic smooth out. Then it will appear to soften even in the corners. Finally, the plastic will begin to sag in the middle. The speed of this process is controlled by how high the plastic is held above the burner. Higher equals slower. When you think the plastic has sagged enough, lift the plastic holder away from the burner and quickly place it over the plenum. In about a split second, the plastic will suck down around the plug. Turn everything off and admire your part!
Where to get plastic
What ever you do, DO NOT use the plastic from 2 liter bottles for vacuum forming. This plastic shrinks very hard when heated and will turn your plastic holder into a pretzel! That is the voice of experience talking!
I already mentioned plates. For canopies, I really like PET G clear plastic sheet in the .02” to .03” thickness range from Amazon. This plastic makes excellent clear canopies. It is actually measured in metric. One sheet will yield enough materiel for several canopies. The materiel can be easily scored and snapped to size. Amazon also has plastic sheeting in colors.
One can use cookie boxes, however, they should be gently warmed for a minute or two before trying to soften them. The pre heating is needed to drive out any moisture in the plastic, otherwise clouding may occur. I made a couple of nice cowlings from the black , bottom of a tray of chicken minis from Chic-Fil-A.
I don’t buy a lot of plastic, but I don’t throw away plastic packaging without considering it for vacuum forming. Model builders have always been great at reusing and re purposing materials.
What could go wrong?
>If the plastic has sagged and does not, at least mostly form on the plenum, you have air leaks. Find them and fix them. Start by looking at the weather strip. Consider painting the edge of the plenum. Check where the vacuum hose plugs in.
>If the plastic sags too much, your part might be too thin to use. Either do not let the next piece of plastic sag that much, or start with thicker plastic.
>If there is not enough room between the edge of your plug and the edge of the plastic folder, the plastic may not be able to stretch enough. Can the part be made in pieces?
>If the plastic part did not come out right, if there are no holes and it did not over stretch, re heat the piece of plastic and try it again.
There is a lot of “art” to vacuum forming. Be patient with yourself. Give yourself some time, experience and practice. You may use up the whole first package of plates before you get it right. That is okay. You may still have enough change from the $20.00 to buy more plates. The number of parts that can be vacuum formed are endless canopies, of course, but also, cowlings, wheel pants, prop spinners, exhaust stacks, wheel wells, wheels, air scoops and more, much more!
TEXT, PHOTOS, & ILLUSTRATION BY JOHN A. JENNINGS


EXCELENTE
Very Nice DIY tutorial for vacuum forming. Check out my work here http://www.alplastics.ca/vacuum-forming/