
A wonderful article by our old friend, the late Frank Tiano. Enjoy and Happy New Year!
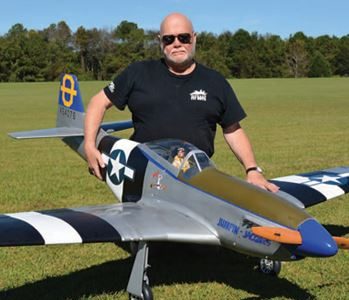
I promise that you will enjoy this article. After discussing article ideas with the MAN editors, we agreed that this should not be a review of an ARF as there are just too many of them already. Nor should it be a complete kit build (which I truly love) because they are few and far between, now that manufacturers don’t make kits anymore. This article is an entertaining, fun-to-read story of my upgrade of a popular ARF warbird: the gorgeous Hangar 9 P-51 Mustang.
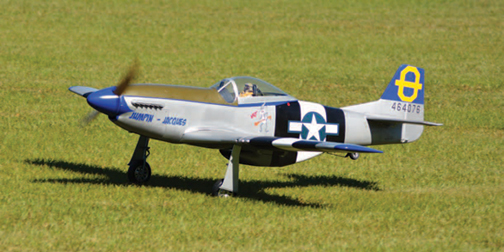
My idea was to take the popular Hangar 9 P-51D Mustang and give it a complete makeover, using nothing but the finest of upgrades in the process. Best of all, when completed, the project would produce a great airplane perfect for all the warbird events in which I participate. The Hangar 9 Mustang spans 89 inches, has 1,420 square inches of wing area, and calls for a finished weight of about 28 pounds. I have no idea what how much it might cost at your favorite hobby shop, but the suggested retail price is $939, with an average street price of about 800 bucks. Have I got your attention?
CLEARING THE BENCH
When the Mustang arrived, the first thing I did was clear a bench in the workshop and asked my friend John Banner to strip the iron-on ARF covering. He also reinforced areas that he thought needed it, then finished the entire airframe with 1.5 oz. fiberglass cloth and Z-Poxy Finishing Resin. While he was doing that, I looked for an engine. I wanted a super moose motor way out of the ordinary that would fit into the engine compartment. I have several friends in the industry who distribute various brands of engines, and during the search process, Michel, at AMR (Aircraft Modeler’s Research) in Canada, offered a new ZDZ 80cc inline twin-cylinder at a price that I simply could not refuse. Michel warned me that there were no mufflers available yet, so I would have to fabricate on my own something that would fit the P-51. Challenge accepted, I told him to ship it. (And speaking of AMR, you’ve just got to check out its inventory of engines and kits!)
LANDING GEAR
Anyway, sometime soon after that, I spoke with Dennis Crooks at Robart Manufacturing and asked if the company might have a set of air-operated retractable landing gear for the Hangar 9 Mustang. He said, “Not yet, we’re still working on them, but we do have the electric version.” I said I’d be happy to wait because I am not a fan of electric gear—yet. A few weeks later, the landing gear showed up, and it took less than an hour to fit them into the wing. The landing-gear doors were another story! There were some serious challenges in getting them to close—and stay closed—properly, but Jimmy Prive, my newest shop rat, worked it out with some small Robart air cylinders and bellcranks (see sidebar on p. 37).
ENGINE INSTALLATION
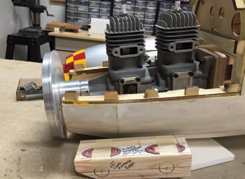
The most difficult procedure turned out to be the installation of the ZDZ 80 twin into an area originally designed for something else, primarily the Evolution 60cc. But I was determined to use that ZDZ 80 twin! Before explaining how I did that, here are some details about the engine. It is a compact 80cc inline engine with two carburetors sharing throttle and choke linkages. The carbs sit on the side of the engine, making it a little tricky to mount it in models with narrow front ends. It is attractive in so many ways—appearance, workmanship, and the fact that it has a very long snout and a low profile. It has a backplate mount, and the carbs sit farther to the rear than the mount. When it came time to install the ZDZ, we found that there were bulkheads and pieces of motor mount from the airframe in the way. Remember, this airplane was never intended to be powered by a piece of machinery like this 80cc twin. The engine compartment was more apt to hold comfortably a single-cylinder 55 to 70cc engine. Anyway, as I was pulling out what little hair I have left, Denny DeWeese, who was working on another project in my shop, told me to stop whining, get lost, and leave him alone with it for a bit. A day or so later, he had the twin nestled in place, with proper reinforcements added, and told me the installation was ready for the carburetor linkage and muffler fabrication.
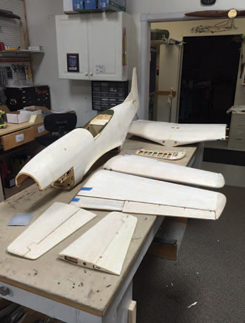
This shows the stock covering stripped from the airframe.
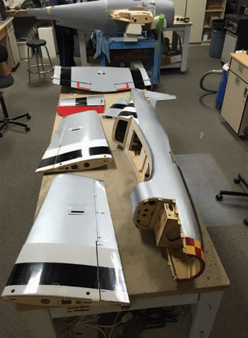
Here, we see the model as it exits the shipping box.

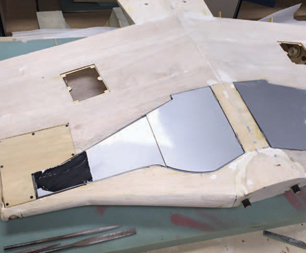
Here are all the airframe parts glassed and primed, ready to paint.
CUSTOM EXHAUST
With such a confined area, the muffler had to be custom made. I made a dummy muffler from balsa, made with exact notations where the exhausts and mounting bolts were needed and sent my pattern off to the master, Al Young, at J-Tec, in Mooresville, North Carolina. In a matter of a few weeks he sent me a new muffler for my ZDZ 80. It fit the narrow confines of the Mustang’s cowl area perfectly! The throttle and choke linkages required some outside the box thinking, but eventually it all came together and operated smoothly. The radio installation was uneventful, straightforward as per the kit manual so all that was left to do was to remove all the gear and get the Mustang ready for primer and paint.
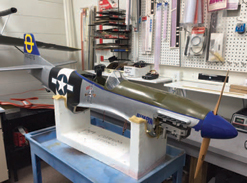
Here is the painted fuselage complete with Pro-Mark markings. We used Klass Kote epoxy paint throughout and have found it to be the very best for warbirds.
This shows the dummy muffler I made from wood to fit the engine and the space available in the engine compartment. I sent it to J-Tec, and the company sent me a functioning muffler that matched perfectly.
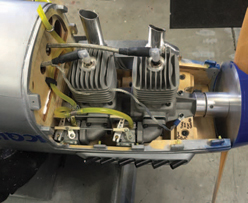
This shows the compact installation of the ZDZ engine, along with the tricky carb linkage. You will notice the cylinder heads have the fins positioned incorrectly (by 90 degrees). I didn’t realize the mistake until the first test flight!
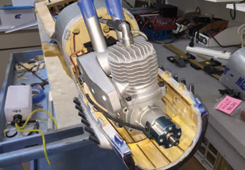
Here, we have the magnificent Evolution 60cc single-cylinder engine, which made the Mustang come alive. No overheating, plenty of power, and a very neat installation, as well. It is a perfect engine to take the place of the trusty old Zenoah 62cc we have been using for years!
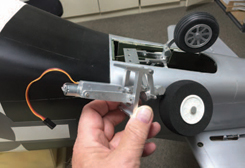
Here, we see the Shulman Aviation tailwheel unit, installed and out of the Mustang. These are just two of the gear choices or combos you can choose from. I have really come to love these tailwheel units. They will fit a variety of large warbirds and even though they’re electric, they work just the way I like. They don’t require any additional gizmos to make them go up and down! Just plug them in, and hit the retract switch. They bolt in the same bolt pattern as an air-operated Robart tailwheel unit.
PAINT AND FINISH
Just to fortify your memory, please remember that this is not a kit review. Although, if I had to make some comments, I’d say that this ARF P-51 is as good as anything that I have seen to date and has good outline accuracy. All components seem to be of above average quality, and the few “parts” you must deal with fit perfectly. So, getting on with my story, the entire airframe was given a coat of PPG K36 light gray primer, wet-sanded, then given a light coat of Klass Kote aluminum paint. (Klass Kote, in fact, makes more than six dozen scale Federal Standard colors for U.S. and foreign military aircraft.)
The landing-gear mount plates are pretty robust. Grinding them to accommodate the Robart gear does not weaken their integrity.
Notice that the strut lies exactly where it is supposed to when retracted—a good indication that everything will work as per the original.
Landing Gear Option
There are lots of guys out there who are reluctant to change over to an all-electric landing gear system—and I am one of them. For me, it’s an installation thing. With an air-operated system, I can move the gear strut from up to down at will, and can check wheel and tire clearance and landing-gear door clearances simply by activating a valve. With electric gear, in most cases, you have to hook up a battery—and sometimes a gizmo box—and operate the transmitter to activate the retract switch. Often when setting up a new model, it might take several retraction cycles to get things fitting perfectly. I admit it: I just don’t have the patience! So I opt for the air-operated systems and get on with the installation with much less stress.
There is no Hangar 9 pneumatic gear system offered with the Hangar 9 Mustang, so I contacted the gear guys over at Robart Manufacturing. After several minutes with CEO Dan Wenzel, it was determined that Robart was literally only days away from releasing a set of air-operated gear for this bird but that they would not simply drop into place. Some “modeling” work needed to be completed. In street terms, this means that only those who don’t build with a knife and fork should attempt this conversion.
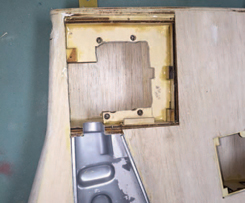
The primary difference in the retract pockets for the Hangar 9 electric gear is that they are just a bit too small. So in the wing, two areas must be enlarged for the Robart air units to slip in comfortably (meaning without the use of a hammer and chisel). In one of the photos, you can see where I marked the landing-gear plate to indicate where it had to be trimmed. What you cannot see is that I also had to substantially enlarge the hole through which the air cylinder would pass, but all of this was accomplished, rather easily, with a Dremel Moto-Tool. A right-angle attachment is a real help in this area.
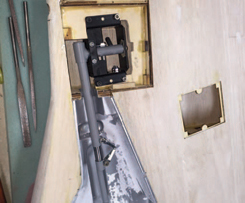
Once the gear plates were trimmed as shown, the gear dropped in casually with just a little final massaging of the corner areas so that the attachment holes would line up. Note here that the blind nuts that were already in place are 4mm. This requires the mounting holes in the Robart chassis to be drilled out respectively. I used four socket-head bolts to hold the Robart gear in place. The extra two center holes were not used. The nicest thing about this conversion is that the total time to complete it is less than 45 minutes. The second nicest thing about it is that all the landing-gear doors fit as they are supposed to, with no modifications. Only the links for the strut-door attach points need adjusting, meaning that the ball links need to be screwed in or out a bit.
I hope you find this account interesting, informative, and enlightening. If you were on the fence about purchasing one of these magnificent flying warbirds but found the electric gear intimidating, you now have no reason to resist!
Perfection! What a great sense of accomplishment we felt when we retracted the struts and closed the main wheel doors.
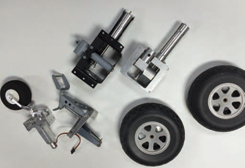
Here’s the Robart air-operated main gear (lower right), alongside a set available from Sierra Precision. The Shulman tailwheel is shown at top right, alongside a Robart unit.
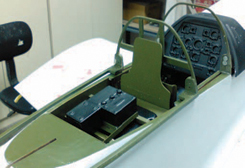
This shows what can be done with the stock Hangar 9 cockpit kit and a couple of cans of Tamiya spray paint.
We then used Chartpak drafting tape—the 1/64-inch stuff—to make all the panel lines. We first determined the location of the major panel lines using a ruler and then penciled them in place. We then laid down all the Chartpak tape and sprayed the entire airframe with a medium coat of Klass Kote aluminum paint, applying a little extra over the panel lines. Once cured, we applied the trim colors and invasion stripes using Klass Kote black, white, olive drab, and blue paints.
Once all the paint had cured, we peeled off the drafting tape to reveal perfect panel lines. By this time, the paint masks and vinyl markings from Pro-Mark had arrived, so we rubbed down the finish using steel wool and put the markings in place. Pro-Mark makes great-looking markings and was able to make them exactly the size we needed. (We use Pro-Mark for everything—whether it be dry transfer, Mylar, vinyl, or paint masks! If you ever tackle a paint scheme that requires special markings, check out its products at pro-mark.com.)
Denny insisted that the Mustang needed to be a little dirty, even though it was considered to be a very-well-looked-after airplane. So I reluctantly turned it over to him and his creative weathering talents. I must admit that I was wrong: The subtle weathering added a ton of realism to the model!
OFF WE GO!
The ZDZ 80 engine sounds incredible, and it has plenty of power for fast takeoffs from the grass runway.
For the first flight, we waited for a day with light wind, no rain, and some sunshine. We had already completed a preflight inspection in the shop, including running the engine. The ZDZ 80 has an incredible sound, almost like a race motor, and I couldn’t wait to hear it in the air. After our short ride to the local flying field, we had the Mustang fueled and ready for its first flight in less than 10 minutes. The engine started easily, and the airplane tracked smoothly. There was simply no reason not to turn it into the wind and advance the throttle. Takeoff was rather quick—I didn’t expect that kind of power! You’ve read other accounts of how this bird performs, so I won’t bore you. It really does everything well, including remarkably slow and soft landings when the flaps are fully deployed. My first flight was, unfortunately, cut a little short. The powerhouse ZDZ 80 started making funny noises, like when a glow motor goes too lean, and started breaking up. Without hesitation, I got into the landing pattern and completed a safe—and rather good—landing (if I do say so myself).
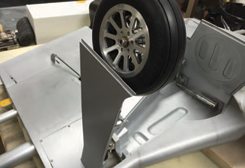
Here’s the main landing gear installation. It is interesting in that it shows how we got a more secure closure for those huge main landing-gear wheel doors. We ran a medium-size Robart air cylinder attached to a bellcrank to get clearance away from the scale Robart tires.
A SLIGHT HICCUP
It turns out that the engine had overheated! I knew that I had plenty of cooling area, so I was baffled—that is, until we took it back to the shop and one of our shop rats asked, “Why do the cylinder heads have the fins ‘going across’ instead of in line with the airflow?” Yup, can you imagine? Not one of us ever noticed that the fins were 90 degrees off from the position they should have been in! So we yanked out the ZDZ, and after a great deal of work replacing the front end structure to where it was before the surgery, we installed an Evolution 60 and wraparound muffler—much like the manual suggested in the first place!
BOTTOM LINE
We returned to the flying field two weeks later, and put in four uneventful flights. The engine performed flawlessly—not one hiccup! This “Mustang Makeover” took very little time. Remember, the airframe was already built, so all we had to do was fiberglass it and paint it. What are the two things I have now that I didn’t have before? A more durable airframe and a color scheme that nobody else has! So at the few warbird events I’ve brought it to, I’ve had fun explaining that this was a Hangar 9 Mustang, not some new secret airplane being tested for somebody else! I’m guessing that of the several dozen who have seen it fly by now, eight of them have bought one for themselves—and all of them are doing a makeover, as well. Who says that there are no builders left?
TEXT & PHOTOS BY FRANK TIANO


