
Is there a building step that always gives you trouble? Have you wondered whether there’s a better way to accomplish a particular modeling task? If so, perhaps one of these 10 helpful workshop hints will help you solve the problem or simply lead you in the right direction. You might have heard about a better way to accomplish a certain step, but it slipped your mind–until now! Cast your eyes over these 10 trusty tips to see whether one or two of them will help you cross a bothersome task off your to-do list.
1: MOTOR-BACKPLATE SLIPPAGE

Almost all motor prop adapters are smooth; they don’t have a knurled finish. This means that when you install a prop and try to tighten the nut, the adapter often slips. Small pieces of 220-grit sandpaper CA’d to the backplate surface will prevent this and secure the prop tightly. This easy fix is well worth the bit of time it takes to do.
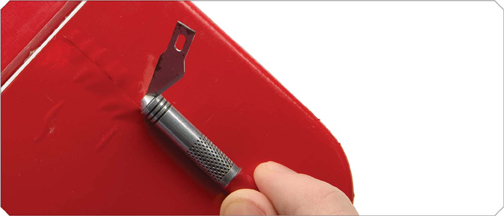
2: REMOVING COVERING FROM BALSA SHEETING

Removing covering over balsa sheeting can be tricky. If you cut too deeply, you can compromise the wood’s integrity. By placing the blade in the knife handle as shown in the photo, you can easily adjust and control the depth of the cut. To set the blade’s depth, use it on a scrap piece of sheeting and make test cuts before you make the actual cuts on the model.
3: FAST, EFFICIENT, GLOW-PLUG IGNITER CLEANER

Oil residue can prevent glow igniters from working properly. If you carry yours in your pocket, even the lint in there can cause your igniter to malfunction. A good way to clean igniters is with alcohol and an old electric toothbrush. A clean tip on the igniter will allow more current to reach the glow-plug element for more reliable starting.
4: CONTROL-HORN MOUNT

Mounting a control horn on a tapered surface makes it difficult to align the screw holes. To keep the control-horn base square to the hinge line, install a few tapered shims. CA the control horn into place, and match-drill the holes with a drill press so that the horn aligns perfectly with the nut plate on the far side.
5: CUSTOM TRIM TAPE

When it’s time to apply trim tape to your model’s canopy (or anywhere else), and you need a special color, paint the tape with Testors Model Master water-soluble paint. It comes in a rainbow of colors, and you don’t have to buy a lot of it. It comes in 1-ounce bottles.
6: PRESSURE-GAUGE HELPER

When you encounter a leak in an air line or air cylinder in your retract system, there is a handy way to discover where the problem originates. Hook up the retract cylinders and the air-supply tank individually, and then check each component separate from the rest of the retract system; it will be much easier to find the leak.
7: SAFE COMPONENT TIE-DOWN

Mounting a plane’s electronic components takes some planning. You want them to be secure but not so tight that they absorb engine vibrations. Here, everything has been safely tied down in a neat and orderly fashion. To do this, place the component on a piece of foam, and then tie it in place with a plastic strap. Add a piece of fuel line across the top to help absorb the vibes.
8: MAGNIFICENT TRAILER

A friend of mine built this unusual trailer to haul his airplanes to the field. He found the rear end of a pickup truck at a junkyard and modified it. The great thing about this trailer is that when he pulls out the bed, all of his airplanes are within easy reach! Somehow, though, the trailer doesn’t seem to go with that expensive Hummer pulling it.
9: EXTRA WEIGHT

Often, you have to add extra weight to the nose or to the tail of an airplane to achieve the proper center of gravity (CG), and lead seems to be the material of choice for this task. Shower-base liners are made out of lead, and you can cut them into small pieces easily with scissors and then bolt them on. The lead is approximately 1/16 inch thick, and you can cut it to fit almost anywhere. Used and new shower-base liners can be purchased from plumbing-supply houses.
10: MARKING HINGE LOCATIONS

When it’s time to mark the locations of hinges, you could do it with a ruler and a pen, but there’s an easier way, and you won’t have to put a single mark on the plane! Lay a strip of masking tape on the leading edge of the control surface and on the trailing edge of the wing. Mark the hinge locations on the tape. When you’ve finished, remove the tape and apply it to the other control surface. That’s it!
BY JERRY SMITH


I am confused about the last tip here regarding marking hinge locations. Can you please clarify?
It looks like there are two strips of tape. The marks are used to locate the centers of the hinge slots or holes. Neat idea.
Blue painters tape is better for hinge marking as it leaves no sticky residue when removed
Extra weight – thin lead sheet is terrific to use. I weigh the whole sheet then work out how much sheet area equals one ounce and cut the sheet to rectangles of this length by width measurement. So easy to work out how many rectangles (ounces) are needed to bolt together on the firewall. Fine tuning – just add or remove a rectangle.
It would be great if the builder of the 8. MAGNIFICENT TRAILER had some plans or at the least more pictures of the trailer !! So those of us that are interested in the contruction of one , would be very very helpful to say the least !!
I like the idea of using fine grit sandpaper on the prop hub, great when the can is inside the housing and you are unable to stop it from turning
Great idea on the control horn mount, I can never get those little bastards to line up
I really appreciate these tips, and the many others published previously. I just wish I could remember them! Is there an efficient way to retain them for future easy reference?
Many nice Tip’s, Everything in the way of aeromodeling seems to be growing in wing length everyday, 96″ wing span, I don’t know about you, but no matter how you build to fly, storage for limited Space people, are looking for the 28-36″ wing span is what my crowed enjoy’s. However most of the articles are about new ARF’s
almost 1/4th scale, how about some 28″-36″ W/S Articles.Almost considering going Micro, seems to have articles we can relate to, but don’t want to be limited to” Back Yard Flying. I use to be able to ride to Delta Park where you could do what ever you wanted, environmentalist’s, and Soccer Fields have take away our Park, now we are limited to 1 C/L field here in Portland Oregon, the Jim Walker Memorial field, Shoved off in a tiny corner of a 100 acre area?
Happy flying, Stand Your Ground.
I drag the tips to a folder on my computer. When several have been “harvested” I print the collection to paper which will still be in my workshop file folder. That will still be around when the computer eventually crashes.
Back in the day, I cut the pages out of the magazines. Found some the other day from a 1976 issue. Several computers have come and gone since those days.
For the control horn tapered shims, buy carpenter’s “Shimming Shingles” at any home improvement store. Perfect for the job, and a pack of them that costs only a couple of bucks will last you forever! (You will likely find other modeling uses for them as well.)