
Along with being an outstanding show maneuver, knife-edge flight will help take your flying to a new level of satisfaction and accomplishment. While opinions vary about the best techniques for learning how to perform a knife-edge maneuver, you’ll quickly discover, after trying out a few, that certain methods are more effective than others. The crawl-walk-run approach from 1st U.S. R/C Flight School has proven to be the most effective method for developing knife-edge proficiency in the shortest amount of time.
BASIC KNIFE-EDGE WARMUP
On your first attempts, it’s wise to enter your knife-edge maneuver from a slight climb to buy yourself some extra time to think through the steps so that you don’t finding yourself rushing to recover. You’ll also find it much easier to build your first sustained knife-edge if you initially roll the airplane in the same direction every time.
During a sustained knife-edge, altitude is maintained with top rudder, the force of the air deflecting off the side of the fuselage and the upward component of the engine thrust. This is why a great deal of airspeed, thrust, and rudder (yaw) are typically required to maintain altitude in knife-edge flight.
Before we go any further, we need to do away with the popular but ambiguous reference to “use the rudder like an elevator” during knife-edge flight. Instead, simply remember that the rudder is always applied the opposite direction that the airplane is rolled, regardless of whether the top or the bottom of the plane is facing the pilot. So if you roll 90 degrees to the right, input opposite left rudder to maintain altitude.
By definition, the most important aspect of knife-edge flight is establishing a perfect 90-degree bank. You can quickly get a handle on this by rolling to knife-edge without worrying about the rudder for the first few attempts. When you first introduce rudder, it’s crucial that you first establish a 90-degree bank before inputting rudder, and thus avoid the tendency to over- or undershoot the bank because you’re rushing to input rudder. At first, you may even want to briefly pause at neutral after rolling to knife-edge to make sure the wings are perfectly vertical before you apply rudder. If you become confused or you need to recover, neutralize all the controls and then roll back to upright.
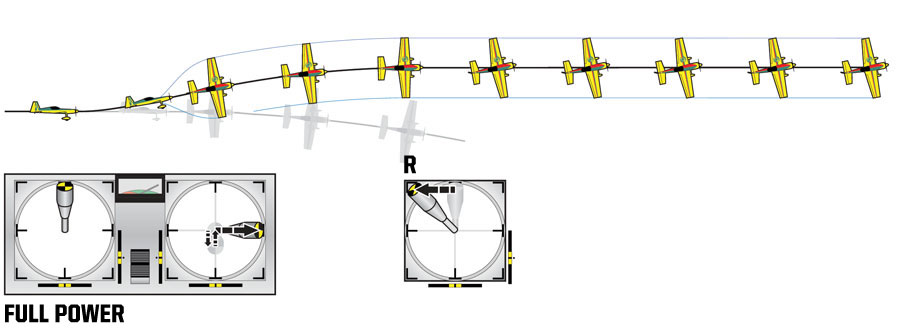
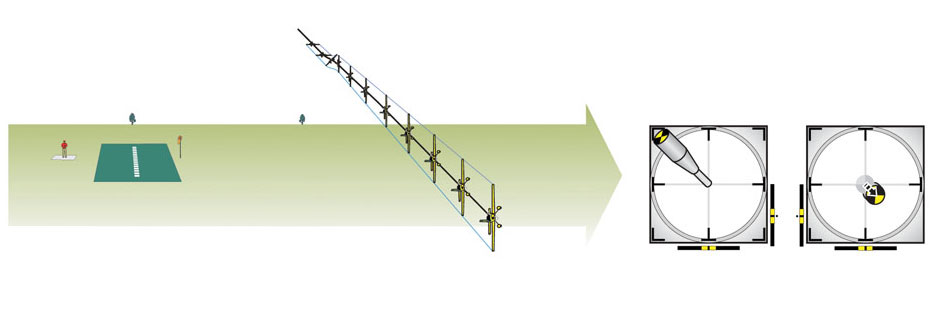
Basic Knife-Edge Flight
Pitch up into a slight climb, roll right 90 degrees, apply opposite left rudder, and hold. Maintain altitude during knife-edge by simply remembering to apply the rudder in the opposite direction in which you applied the aileron.
BUILDING A SUSTAINED KNIFE-EDGE
Factors such as propwash, gyroscopic precession, and P-factor won’t let most airplanes stay on their sides and/or track straight in knife-edge flight with just rudder input. But determining which corrections are needed to hold a straight line is easy as long as you don’t clutter your attempts with too many inputs; instead, build on what the airplane shows you it needs. In knife-edge flight, the best teacher is the airplane.
For example, enter a slight climb at full throttle. Roll right to knife-edge, neutralize the aileron with the wings perfectly vertical, then smoothly apply full opposite left rudder and hold it. Don’t attempt to correct any deviations at this time. You’ll most likely see the plane roll in the direction in which you’re holding the rudder (i.e., left). Rather than correcting it, record the event in your mind while forming a plan to correct it the next time using the right aileron.
Assuming that you successfully correct the roll tendency in your next attempt, it isn’t unusual to observe the airplane tucking toward the canopy or the landing gear. Just as you did with the roll tendency, take stock of the direction in which your airplane tucks and which way you’ll need to apply the elevator to correct this during the next attempt. Once you’ve identified the knife-edge requirements for your airplane and have developed some confidence, you can begin to gradually remove the climbing entry and start blending the inputs.
In its final form, a skilled pilot applies just enough up-elevator pressure at the start of the 90-degree roll to prevent the plane from dropping (but which is otherwise undetectable) while smoothly adding top rudder as the wings approach 90 degrees. Then, based on prior observations, the pilot blends in the aileron and elevator inputs required to hold a straight line.
Without question, the most common mistake pilots make is neglecting to apply a little up-elevator pressure while initiating the 90-degree roll and, thus, entering knife-edge with the airplane already descending. Consequently, many pilots will resort to inputting large amounts of rudder at the start of the roll in an attempt to keep the plane level. Introducing such a large amount of yaw so early in the roll forces the plane off its line and invites P-factor and gyroscopic precession to produce deviations that otherwise would not have been in play if the entry was flown correctly.
By remembering to smoothly blend in a little up-elevator pressure at the start of the roll, the plane will arrive at knife-edge in level flight and require less rudder to keep it there. It’s also less likely to deviate from the line. Of course, this technique is also applicable to the start of your hesitation and slow rolls.
Easy Corrections
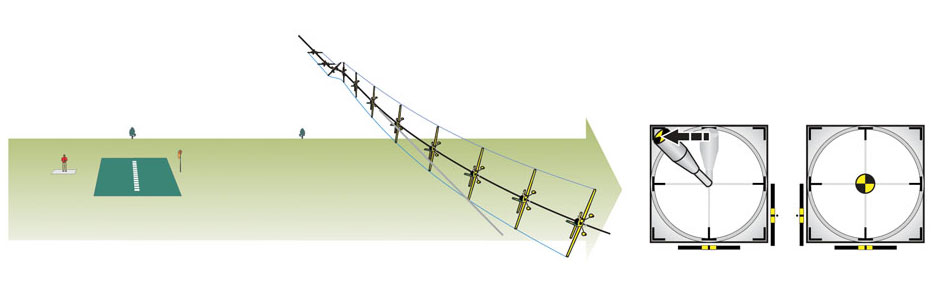
First attempt: Enter a slight climb, bank right 90 degrees, input full opposite left rudder, and hold. Let the deviations occur, but take note of where they are. The airplane is trying to roll out of the bank, which is typical. Plan to hold in a little right aileron the next time.
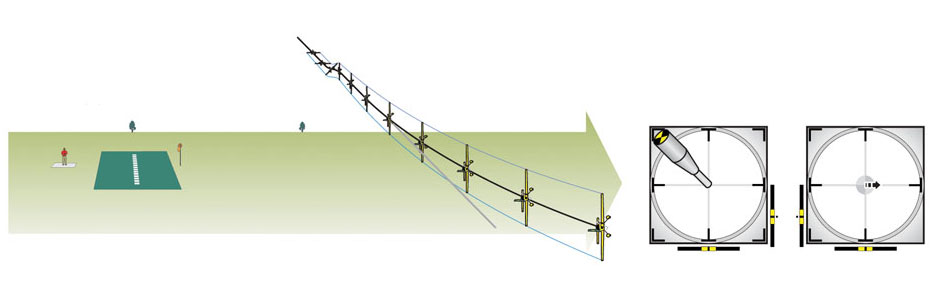
Second attempt: Enter a slight climb, bank right 90 degrees, input opposite left rudder, and add a little right aileron. The plane stays banked 90 degrees but tucks (turns) toward the landing gear. Plan to pull a little up-elevator the next time.
Third attempt: Enter a slight climb, bank right 90 degrees, input opposite left rudder, add a little right aileron, and pull a little elevator. For future attempts, make a shallower entry and smoothly blend the inputs together.
4-POINT HESITATION ROLL
The logical progression from knife-edge is to add the second, third, and fourth points of a 4-point roll. Remember that although the rudder is applied in the opposite direction that the airplane is rolled during the first point, the rudder is applied in the same direction the plane is rolled during the third point. Another way of looking at it is that the rudder is applied “the other way” at the third point compared to the first.
When you perform a 4-point roll, first emphasize rolling to precise 90-degree points, with opposite rudder at the first point, a push at the second, and the same rudder at the third. Also keep in mind that the amount of rudder required during the brief knife-edge points in a point roll is much less than what’s needed to maintain altitude during sustained knife-edge flight.
Here again, the most common mistake is to neglect the elevator inputs at the start of the maneuver and during the inverted portion, and instead using a lot of rudder to hold altitude. You’ll get a better result from blending in a little up-elevator pressure at the start of the first 90-degree roll and forward-elevator pressure when rolling from inverted to the third point. Consequently, less rudder is needed during the knife-edge points, resulting in a cleaner roll with less tail movement and one that is likely to remain on line.

Knife-Edge Warmup
Before introducing rudder, practice pitching the plane into a climb and rolling exactly 90 degrees. Don’t use rudder until you can first consistently roll to knife-edge with the wings perfectly vertical.
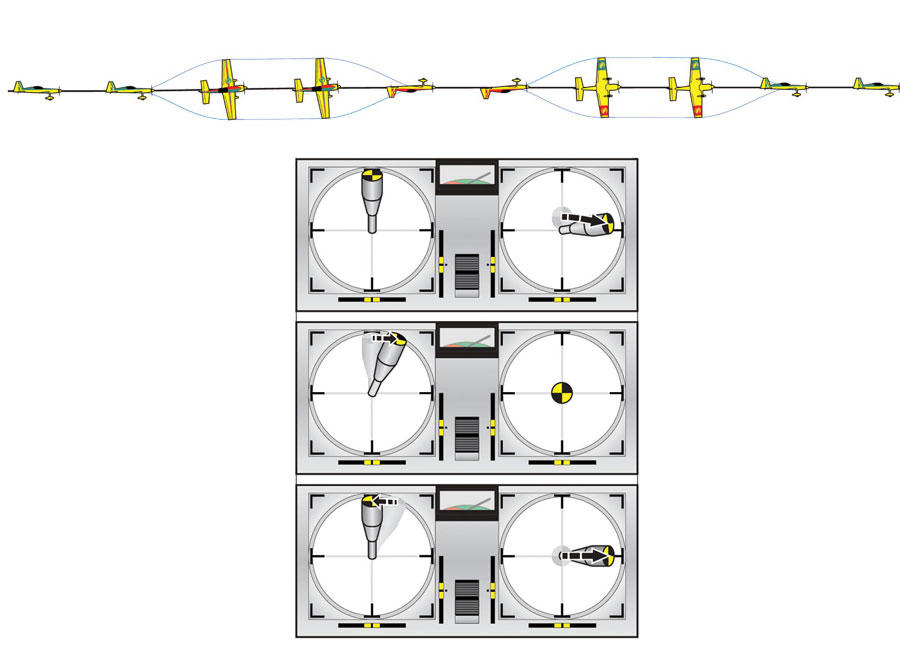
Right 4-Point Roll Inputs
Roll right 90 degrees, opposite left rudder, roll right to inverted (take out rudder), push forward-elevator, roll right 90 degrees, same rudder, and roll upright (take out rudder).
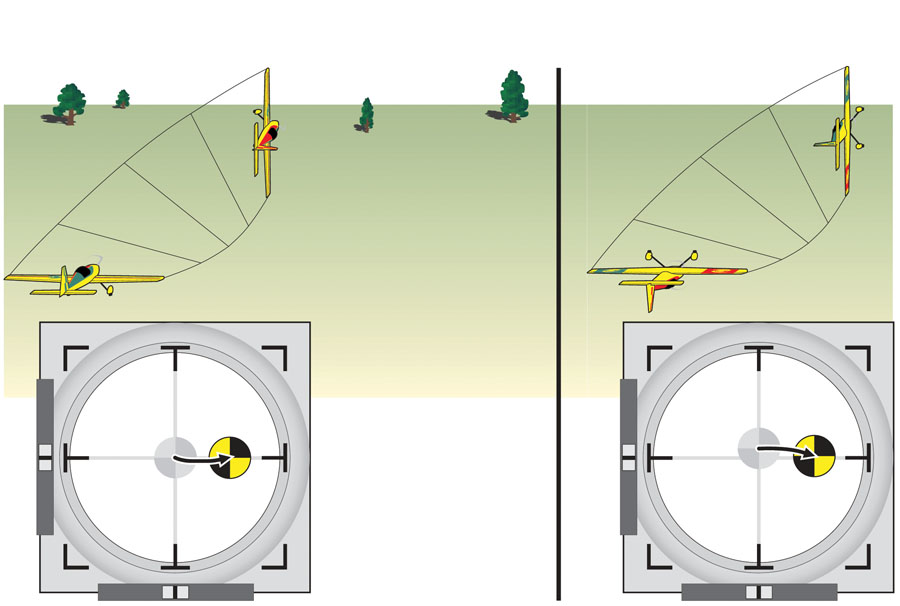
Advanced 4-Point Roll Entry
Apply a little up-elevator pressure at the start of the roll to prevent the plane from dropping. Applying top rudder will continue to keep it level.
Tip: If you tend to overcontrol the elevator while initiating the roll to knife-edge, think of the up-elevator as slight pressure applied to the control stick, rather than measurable stick movement.
When rolling from inverted to the third point, don’t forget to maintain forward-elevator pressure when you initiate the roll from inverted to the third point.
THE TAKEAWAY
A sensible amount of mixing can help make knife-edge flight a little easier, but your flying skills have the biggest impact on how well you perform. It’s true that developing better flying skills is challenging at times, causing some pilots to claim that they’re content where they are. But let’s face it—flying is much more fun when you’re doing it well and making progress.
Programmable Mixes: A Trade-off
Mixing out unwanted tendencies during knife-edge is widely practiced, but like most things in aviation, there are trade-offs to consider. Programmable mixes let you automatically mix another control with your primary input to reduce or eliminate some of the unwanted tendencies associated with certain inputs and maneuvers.
When you apply a lot of rudder to sustain knife-edge flight, for example, most planes tend to gently roll in the direction in which the rudder is being held. Therefore, pilots routinely mix opposite aileron with rudder to cancel out the rolling tendency during knife-edge; however, while a mix can help make the maneuver for which it is intended easier, it may prove contrary to what’s needed during another maneuver or end up causing a deviation somewhere else.
Many “tendencies” are held in check at higher speeds and only show up when the plane is flying more slowly. Some tendencies show up at high-throttle settings but not when the throttle is low. This means a lot of mixes are only appropriate at certain airspeeds and throttle settings. This partly explains why those who look to mixing as a substitute for developing better flying skills often find it difficult to advance beyond the initial success they had when the mix was first introduced. In fact, you can travel across the country and observe fliers involved in an endless cycle of trying to “dial” into their radios the corrections that they could easily be making only to have to repeat the process each time conditions change, a new maneuver grabs their interest, or they fly a different airplane. You might think that programming the radio has become their hobby! Unless the only maneuver you intend to fly is knife-edge, the most efficient and effective use of programmable mixes is to limit your mixes to no more than 5 to 10 percent (15 percent max). If the tendency that you want to correct is slight, try a 5 percent mix; if it is more noticeable, try a 10 percent mix. Limiting each mix to 5 to 10 percent will help make flying easier without having too much impact on other maneuvers or causing you to do a lot of backtracking as your repertoire expands.
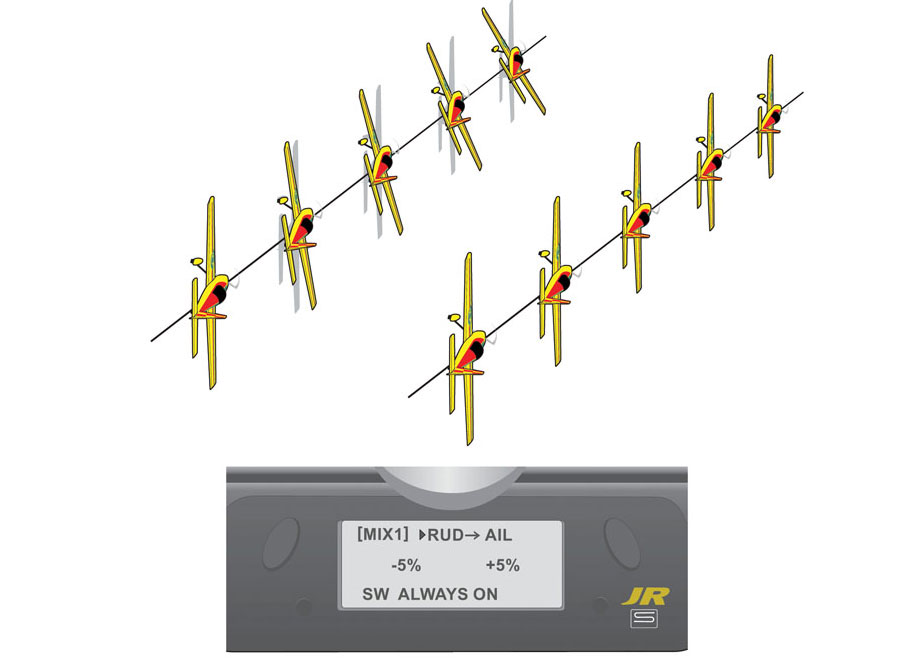
Classic Knife-Edge Mixing
Exhibit A: Holding in left rudder during knife-edge flight results in the airplane also gently
rolling left.
Bottom: Mix solution: A little right aileron mixed in with your left-rudder input cancels the roll tendency during knife-edge.
BY DAVID SCOTT, 1st US R/C Flight School


