
It happens all too often, unfortunately: Someone with a brand new airplane shows up at the field and has everything working perfectly. The radio checks out, and all the controls move in the correct directions; the engine runs reliably and provides plenty of power. The model taxis out and runs down the field and becomes airborne. Right away, it starts to rock its wings; the nose points up sharply; and after several frightening seconds, it hits the ground—hard! The pilot did everything right except that he forgot to check the model’s balance.
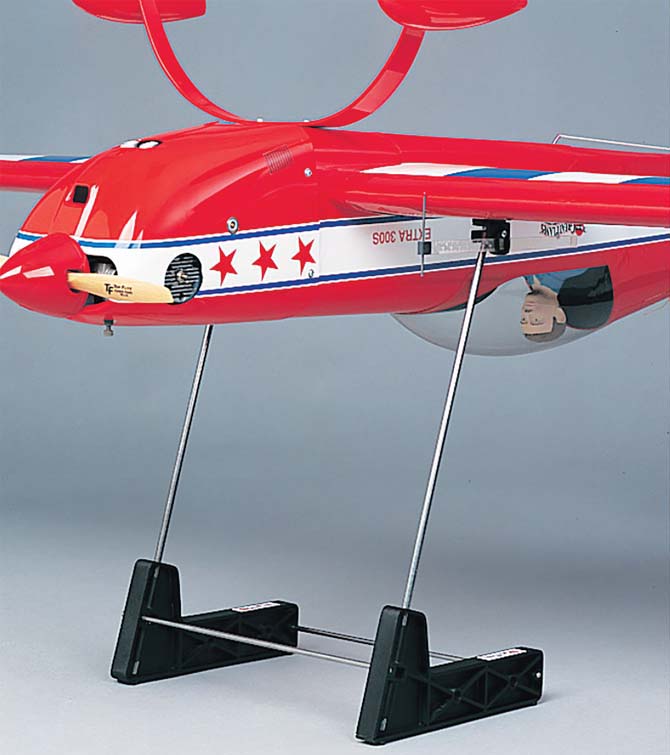
Better than using your fingers, a precise balancing device, such as the Great Planes CG Machine, will help you get the balance point correct.
To successfully test-fly a new model be absolutely certain that the model is balanced at the correct center of gravity (CG). Nothing can spoil your day more than trying to sort out a tail-heavy model after it has left the ground. It is a fair bet that improper CG location is responsible for more broken airplanes than engine and radio issues combined. Let’s look at some methods for determining the CG.
Balancing Act
While balancing a monoplane, use the location indicated in your model’s instructions or plans measured back from the leading edge. If you don’t have this information, it isn’t hard to figure it out yourself.
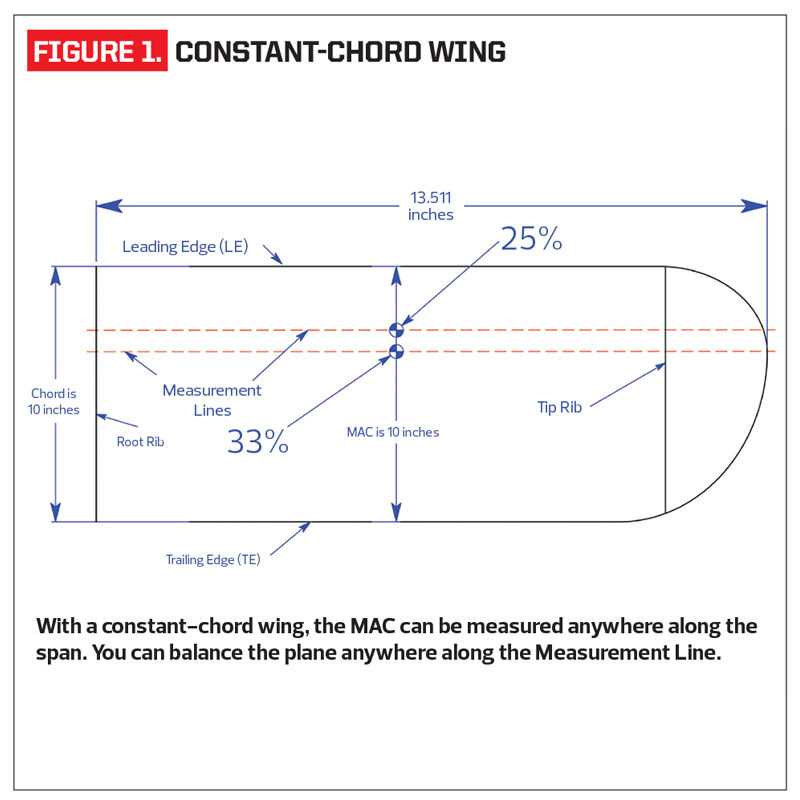
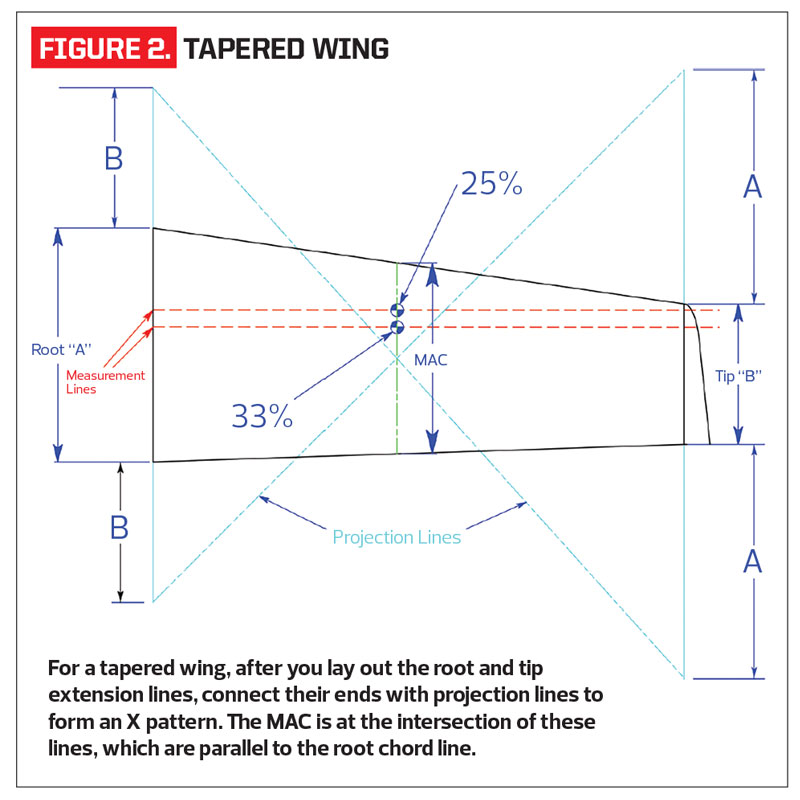
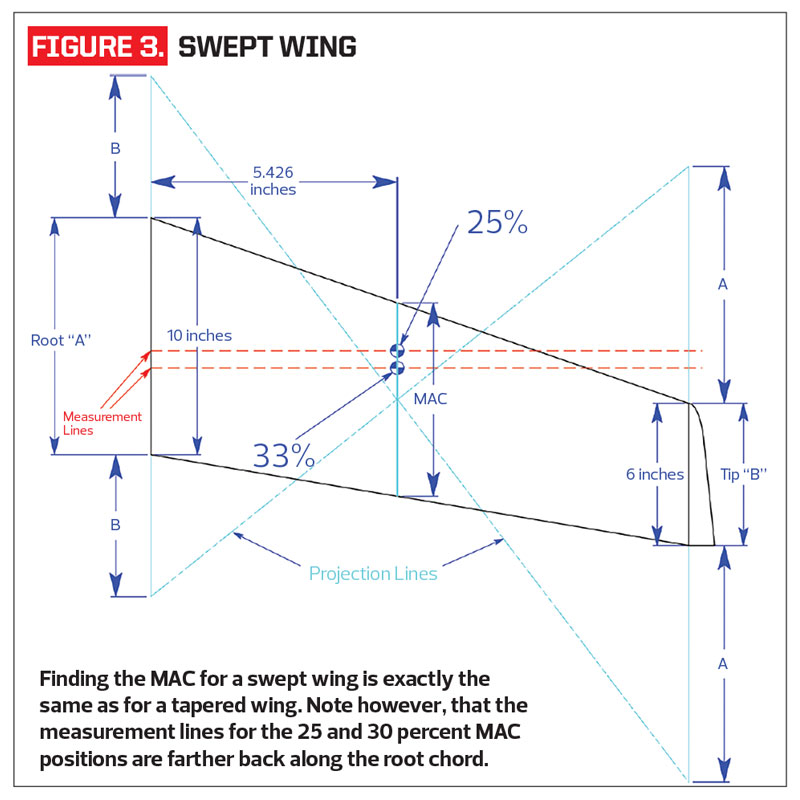
For most models, the balance point falls between 25 and 30 percent of the mean aerodynamic chord (MAC); 27 to 28 percent seems to be the average. With a constant chord wing, like on a Piper Cub, the MAC line is the wing’s chord line, or the distance from the leading edge to the trailing edge, and it can be measured anywhere along the wing’s span (Figure 1). With a tapered or swept wing, you have to determine the precise location of the MAC line (Figures 2 and 3). Using the wing’s top view, the chord length of the tip rib is added to either side of the root rib, and the root chord length is added to either side of the tip rib. The ends of these extension lines are then connected with projected lines forming an X. Where these two lines intersect is the location for the MAC line. The MAC line is parallel to the root chord. The MAC line is then divided by four to get the 25 percent MAC location and by three to find the 33 percent MAC location. These two points provide the wing’s CG range. You can then extend measure lines from the two MAC locations, which are 90 degrees to the root chord, and you can then balance your model anywhere along these lines.
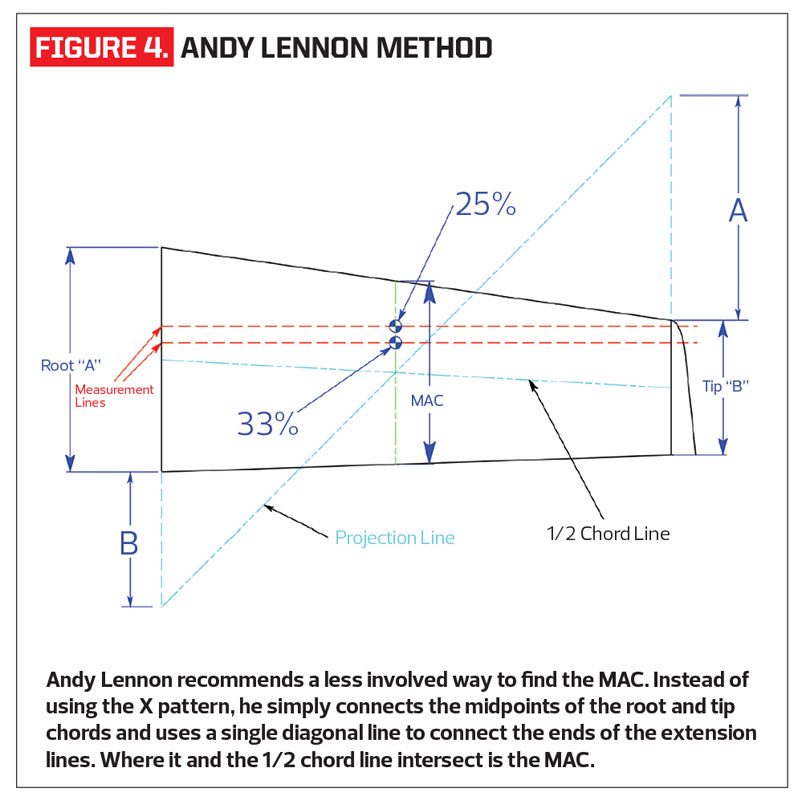
Figure 4 shows Andy Lennon’s variation for finding the MAC line of a tapered wing panel where the MAC location is at the intersection of a single diagonal projected line and a line connecting the midpoints of the root and tip rib chords. The outcome for the two techniques is extremely close and well within the overall CG range.
Biplanes
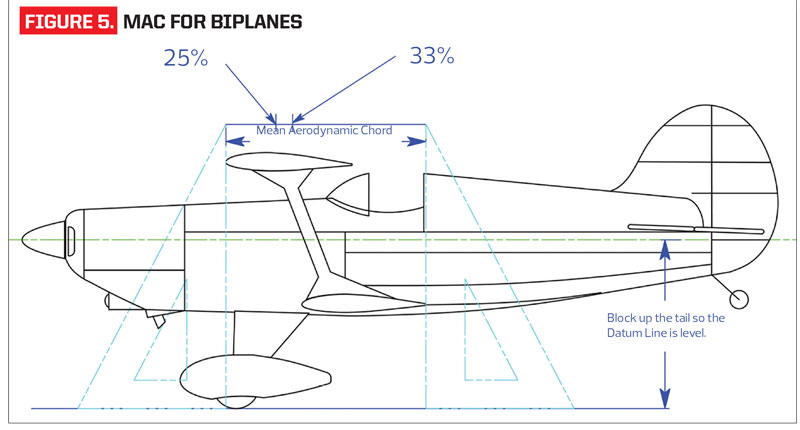
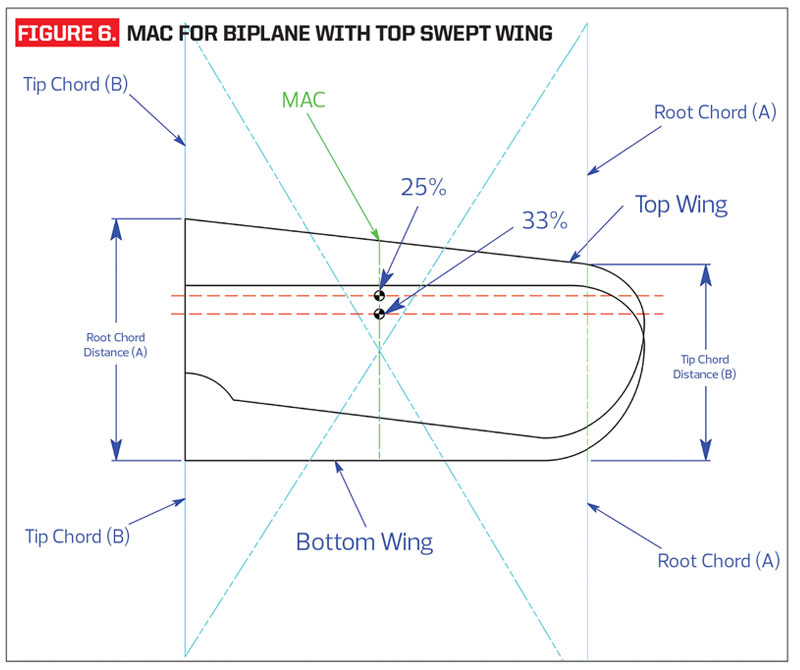
When it comes to biplanes, the technique is very similar. Figure 5 shows a side view of a biplane with two straight constant chord wings. The MAC is estimated as the horizontal distance from the top wing’s leading edge to the bottom wing’s trailing edge. You then divide the MAC line to find the CG balance range. There are other ways to find a biplane’s CG location, but this is the simplest. If, however, your biplane has a swept top wing and a straight bottom wing, like with a Pitts Special, you use the same technique as for a tapered wing shown in Figure 6. The distance from the top wing’s root leading edge to the bottom wing’s root trailing edge becomes the root chord line, and the distance from the top tip’s leading edge to the bottom tip’s trailing edge becomes the tip chord line.
After determining the position of the MAC and finding the 25 percent and 33 percent MAC locations, add nose weight or shift the onboard equipment around so that the model’s balance point falls somewhere within the CG range. Use a sturdy balancing stand that’s sized according to your model, then make sure that your ballast weight is properly secured so that it can’t move or fall out of the airplane. I like to start in the middle of the range because the only way to truly figure out whether the model is slightly nose- or tail-heavy is to test-fly it.
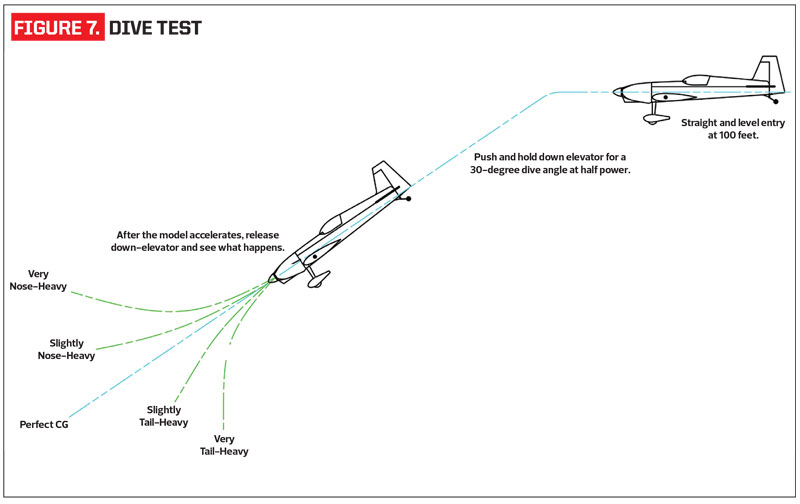
The Dive Test
An excellent way to check your model’s CG is to use the dive test method (Figure 7). We learned this technique from Keith Shaw, an expert electric-airplane designer and a MAN contributor, and although it might seem backward, the test works very well. According to Keith, “An incorrect center of gravity, usually too nose-heavy, also increases unwanted drag. A nose-heavy plane has to carry up-elevator trim to maintain longitudinal stability. This means that the stabilizer is ‘lifting’ downward, and that creates some induced trim drag. It also means that the wing must now develop even more lift to maintain level flight, producing even more drag!
“Fly your plane at half throttle, and adjust the elevator trim until it can maintain hands off level flight. Check this by making several passes without changing the throttle setting. You should be flying at an altitude of 100 to 150 feet. When the plane is nearing center stage, gently push it into a 30-degree dive, and hold it until the air speed has increased noticeably. At this point, take your hand off the stick and observe what happens. If the plane pulls up sharply, it’s very nose-heavy. If it continues in the dive or pulls up slightly, its CG is just right. If it tries to tuck under, it’s tail-heavy. This happens because the increase in speed amplifies the trim corrections. If the model was carrying some up-trim to correct a nose-heavy condition, the increased dive speed makes the model pull up and vice versa. “A bunch of extra advantages comes with having a correct CG location. The amount of elevator throw necessary for any maneuver will decrease, and that will mean less control drag. There will be virtually no need for down thrust, which is an inept attempt to ‘fix’ the tendency of an over stabilized aircraft to nose up as power is increased.”
Let’s Go Flying
With the model’s CG is in the safe balance range, you can take off and sort things out on the first flight. Fly the model at about 1/2 to 3/4 throttle, and set the trims for straight and level flight. After landing and checking the trim-lever locations, adjust the clevises so that the radio’s trim levers can be set back to neutral. Make another flight, retrim, and see how the model performs. If it flies normally—not climbing or diving with minor power changes—this is a good CG indicator and you are very close. If there is still a lot of up- or down-trim, then the CG still needs to be adjusted. A lot of up-trim tells you that the CG is too far forward (nose-heavy); a lot of down trim indicates an aft CG (tail-heavy).
Bottom Line
The best insurance policy for any model airplane is to have it balanced as close as possible to its correct CG before flying. Feeling what the model tells you when test-flown will help you fi ne-tune its balance. Tail heaviness increases maneuverability, while nose heaviness increases stability. A nose-heavy airplane, however, tends to land at a faster speed, while extremely tail-heavy airplanes can become uncontrollable. Some basic calculations before that first flight will help keep your model whole. Get the balance right.
Editor’s note: Please note that these techniques are good for close estimations and will get your model balanced in the ballpark well within the proper CG range so that it is safe to test-fly. We’re not taking into account unusual configurations or lifting tail surfaces.
Text & Illustrations by the Model Airplane News Crew


What works for me and some others is flying hands off straight and level, roll inverted, and see what happens. If you have to push fairly hard to maintain level, you are nose heavy. A light push or no push and you should be good. If you have to pull, you are tail heavy.
thanks, very good
what shoud we do for unusual configuration or lifting surfaces?
we should estimate NP first?
thanks a lot…very useful
what should we do for unusual configuration or lifting tail surfaces?