
With electric motors now being used more frequently in scale models, we have new possibilities for enhancing the model’s appearance. Because they’re virtually vibration free and run cleanly, they allow any dummy engine and motor mount to be constructed around them and all from readily available home workshop materials. I needed such a dummy engine for my converted 81-inch-span Hangar 9 P-47 Thunderbolt. Here, I show you how I achieved this.
ONE STEP AT A TIME
When I bought the model’s Hacker A60-L outrunner motor, I also purchased the motor mount designed for it. As clever and as lightweight as this mount is (it is fully adjustable and includes a support for the rear bearing of the motor), I could see that it would be very difficult to hide the bulky unit behind a dummy engine without having to resort to an extension shaft, which I always try to avoid. With such a gaping visible opening in the front of the cowl, I wanted to improve the model’s scale appearance, so I decided not to use it. Instead, I built a plywood cone-shaped dummy crankcase that the motor is secured to the front of and that also includes a backplate that can be radial-mounted to a bulkhead. The backplate also accepts the supplied flanged rear bearing used to support the quite considerable overhang of the A60-L motor.
With the motor and dummy crankcase mount secured to the model, it all felt strong and rigid enough, so I ran the motor to check for problems. From a 95-percent charge, I see ì2900Wî on the Wattmeter (almost 4hp) and a steady 6,300rpm on the 22◊10 APC E propeller without a hint of a problem. So far, so good!
To cool the motor, the supplied centrifugal fan pulls air in through four holes in the front of the dummy crankcase. This then passes through the windings and magnets and exits through four radial slots opposite the fan and also the rear of the backplate. The warmed air then spills into the cowl and out of the model through its semi-open cowl gills.
The crankcase is made out of formers built up using laminations of 1/16-inch-thick ply that are then wrapped with two layers of 1/32-inch-thick ply with thin CA used to bond everything together. A lite-ply nose ring is glued to the front and sanded to blend with the cone, and then the entire structure is strengthened with a layer of glass cloth applied to the outside. More 1/16-inch-thick ply laminations are used to build the backplate, taking care to ensure that the rear bearing is centrally placed and does not bind with the rear of the motor. An outlet is required on the front underside of the mount for the three motor cables, but this can be hidden from view with a dummy crankcase sump screwed over the exit. With the motor now successfully mounted and hidden in its dummy crankcase, it was time to think about how to add the remaining detail.
WILLIAMS BROS. WASP
The Williams Bros. accessories are very popular and can be found online. The 2-inch, scale, Wasp cylinders used in the dummy engine come individually packaged and include the pushrods and cylinder base used to mount them on the plywood flange. The photo also shows the nuts and short lengths of screw threads glued into the flange former and spark-plug wires formed out of plastic pushrod tubing. There are other more modern radial engine parts available from 3D printing sources.
A STROKE OF LUCK
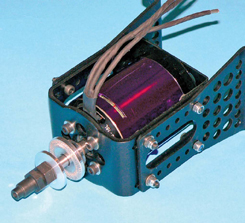
The well-engineered, but bulky, motor mount that the combined dummy engine and new mount replaces.
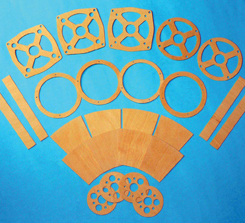
The major components for the dummy crankcase are all cut from laminations of 1/32-and 1/16-inch-thick birch plywood.
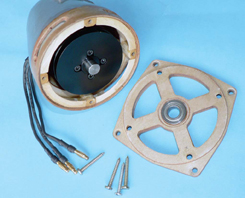
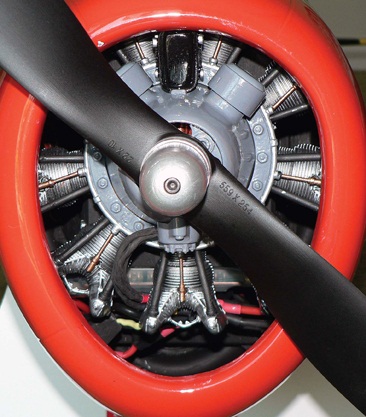
The crankcase and backplate with the Hacker outrunner motor in place.

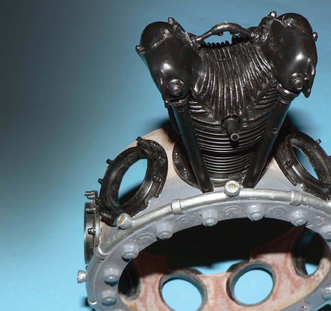
The completed cylinder-mounting flange with the cylinders glued to it. The remaining engine components are also visible.
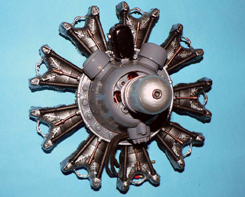
The painted crankcase showing how the cylinder mounting flange is prevented from moving forwards by the two magnetos and the distributor.
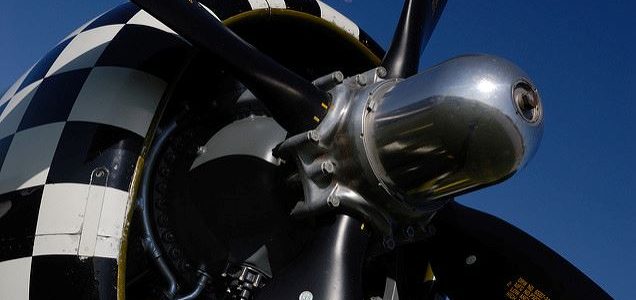
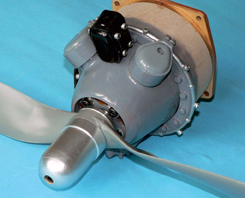
The completed dummy Wasp engine with the Hacker A60-L outrunner motor installed inside the crankcase and with its spinner attached.
When I completed the dummy crankcase, a search on the Web found that the once unavailable Williams Bros. Wasp engine cylinders are now being produced again (lucky indeed!). These obviously save an enormous amount of work while also bestowing a very realistic appearance on the engine. Soon, nine scale Wasp cylinders were on the way to me.
At this stage, I didn’t know if, indeed, the completed engine would fit in the Thunderbolt’s cowl. As it turned out, I had to truncate each cylinder by 3/16 inch before gluing them to their cylinder bases that I, in turn, had glued to the circumference of a mounting flange made of laminations of 1/64-inch-thick ply wrapped around a former.
This “cassette” of cylinders then slips over the front and onto the parallel portion of the crankcase and is retained by the dummy magnetos and the distributor.
The magnetos, distributor and sump are built out of laminations of thin lite-ply. Building in laminations allows you to easily incorporate recesses that help hide the heads of the screws that secure the items in holes drilled in the crankcase. The formed threads are strengthened with thin CA.
Small nuts with short lengths of screw threads are used to represent the studs and nuts that bolt the crankcase halves together, and they are glued around the flanged former. Finally, I used plastic pushrod tubing to simulate spark-plug wiring.
I applied five or six coats of sanding sealant to all of the wooden components in quick succession. This effectively coats everything with a plastic-like surface that only took one brushed coat of gray enamel to color over. The finish is not perfect but more like the casting it is meant to represent. I sprayed the cylinders with aluminum paint and then with a little matte black to tone them down.
The surprisingly tough motor mount has survived a season of flying and I have experienced no overheating problems with the Hacker motor. The dummy engine and mount without the motor weigh 8 ounces, and to fit within the cowl of my Thunderbolt, it measures 7æ inches in diameter over its widest point. As explained previously, I had to shorten the cylinders slightly to achieve this, so technically, I am flying on a high-revving, short-stroke Wasp engine!
TEXT & PHOTOS BY PETE NICHOLSON


Hi where can we get the pans for this radial motor plz
Hi Pete,
I have seen a refernce to your 3D printed Bristol Mercury radial engine in 1/4 scale; I would be interested in printing such an engine too; would it be possible to get a file ?